Wednesday, September 22, 2010

KnowledgeLake Imaging for SharePoint 2010 (Viewing Documents from the SharePoint of view)

This is a continuing series of posts about KnowledgeLake Imaging for SharePoint 2010 a product which my team and I had been working on and is now been released  The product contains features a company needs to implement a quality document imaging system within SharePoint 2010. One of the most important parts of this SharePoint solution is the KnowledgeLake Viewer. Document Imaging requires a capable and powerful viewer, which can enable end users to perform many document based functions. KnowledgeLake Viewer is able to view multiple document formats including (Tiff, PDF, Png, Jpg, Bmp, MSG, Microsoft Word, Excel, and PowerPoint). Having one viewer to view multiple types of documents makes it easier for companies to manage the number of applications on users desktops. Just like our Search component, the viewer is built on Silverlight 4. This means the application does not have to be installed on the user’s desktop and will run in the browser.

Another benefit of one viewer is to make “digital forensics” much easier. “digital forensics” is a branch of forensic science which deals with discovery of court evidence residing in digital format, for example, any electronic document. In the last ten years “e-discovery” has become more important with many companies dealing with litigation. Courts can require companies to search and discover evidence within electronic documents. The KnowledgeLake Viewer makes the process easier by not requiring users to have install multiple applications and switch between them to view the documents. “e-discovery” is more efficient by leveraging KnowledgeLake’s more exact searching and multiple document viewing. Also, once a document is identified, the KnowledgeLake Viewer allows users to declare the document as a “record” allowing the company’s record retention policy to take effect. In the next version the viewer will have the ability to apply a “legal hold” on the document within SharePoint.

Viewing

The viewer can be launched from several places in SharePoint. It can be started from the context menu of a document in a document library, from the search results of the KnowledgeLake Search Center , or from the search results of the KnowledgeLake Search Results web part. Launching the viewer displays the document in a separate browser window.
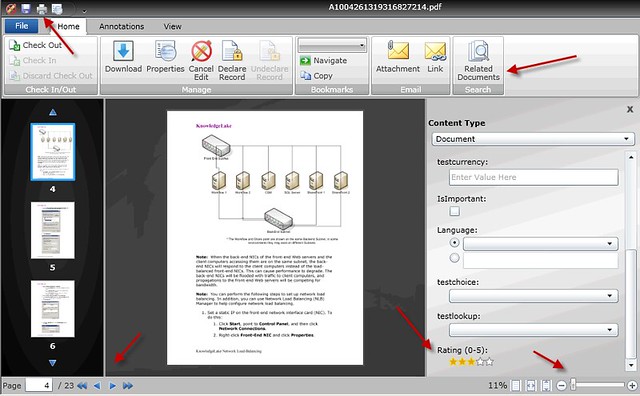
 

The KnowledgeLake Viewer does many things. First you can see the familiar ribbon where you have all the same functions that you get in SharePoint 2010 plus more. You can check in, out and discard a checkout. Also, you can download, view and edit properties (metadata), declare or un-declare as a record (records management). The bookmarks ribbon group lets users navigate documents using bookmarks.  Users can email the document as an attachment or as a link. Editing properties is done through the property panel. The panel supports all SharePoint field types including managed metadata with a metadata picker similar to SharePoint’s. Even the new social rating field is supported.

In the lower left hand corner navigation buttons are available, and the ability to view and navigate via thumbnails of the pages is also supported. The lower right hand corner contains controls to allow fine grained zooming and best fitting of the image. The upper left hand corner the tool bar contains an icon to allow for printing of the document.

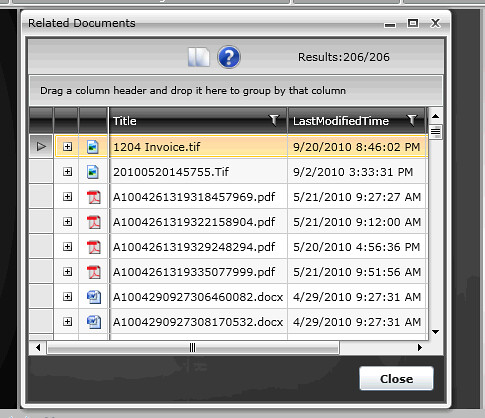
Finally, documents related by metadata can be searched for using the “Related Documents” button which will display a window with the KnowledgeLake Search Results. Here you can preview, edit and view related documents. The search results grid makes it easy to filter or group the related documents.
 

Annotating

One of the mainstays of document imaging is the ability to annotate a document. The KnowledgeLake Viewer allows annotations of Tiff and PDF files. The ribbon is logically laid out by grouping the annotation functions in its own ribbon tab. Standard annotations are available like sticky note, stamps, line, solid rectangle, highlight, text and bookmarking. All fonts, colors, line thickness and stamp types are selectable. Remember, this is all done within the browser and Silverlight application.


Adjusting your View

I already spoke about being able page and adjust your view from the lower left and right hand corners of the viewer. However, the same functionality is available in the View ribbon tab. The image can also be rotated along with adjusting the size of the paging thumbnails. Users can streamline their view by hiding thumbnails and/or annotations.

Viewing multiple documents

If your using Knowledgelake Search you can select multiple documents and view them all.

Viewing documents side by side can be beneficial when trying to compare possible related documents. This helps the “e-discovery” process and records management. You can open the document in a separate window by clicking on the arrow in the upper right hand corner of the document window. You can also switch to a tabbed view by clicking on one of the documents tabs.

 

Clicking on the tile icon returns you back to the tile view.


Document Sets

Document sets is a new feature in SharePoint and can be useful for a case management system. Document sets enable you to group documents along with a common set of metadata, and provide a way to have default documents created when a new document set is created. The KnowledgeLake Viewer allows for viewing documents within a document set. When a user opens a document that belongs to a document set the viewer will have a new ribbon button “Document Explorer”. Clicking on this button will display a new Silverlight window containing a grid similar to the KnowledgeLake Search results.
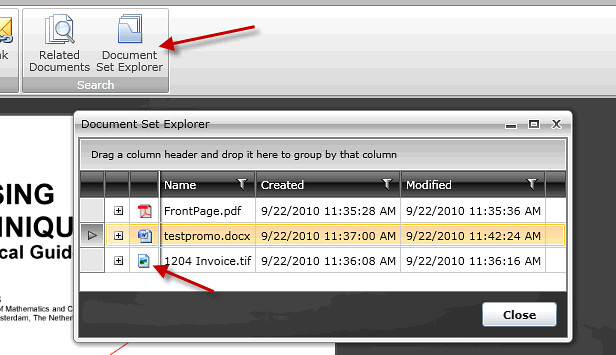
Clicking on the icon will load the document into another tab. Also, you can right click and from the context menu load the document in a separate window. The document set explorer gives the ability to view documents within document set side by side, and leverage the filtering and grouping features of the grid, which is especially useful when dealing with large document sets.

Many companies spend substantial resources to get documents into SharePoint, it only makes sense to have a capable document imaging system to leverage this investment. The KnowledgeLake Viewer gives you many sophisticated features to handle how you want to utilize SharePoint. Whether you are doing case management, e-discovery, digital forensics or records management the KnowledgeLake Viewer will make it easier.

Sunday, August 22, 2010

KnowledgeLake Imaging for SharePoint 2010 (Search Part Two – Effective Results)

This is the second part of a multi-part series on the new KnowledgeLake Imaging for SharePoint 2010. The first part talked about our Search component and how easy it is for users to build queries. http://sharepointfieldnotes.blogspot.com/2010/08/knowledgelake-imaging-for-sharepoint.html

In this post I will be showing the innovative features of the Search component’s results and how these features can make your searching much more productive. Our search product is built on Silverlight 4 and extends SharePoint’s enterprise search. The search center puts the query builder and the results side by side on the same page. This enables the user to see the changes in the query conditions immediately.  You can build simple or complex queries and keep track of the conditions while viewing the results. Also, remember the builder can be docked or auto hidden like a toolbar, allowing for the results to be viewed full screen. This can be useful especially if you are returning a lot of columns in your results. You may want to return many columns in your results, because the search results allows you to do many things with the data interactively.


Viewing, sorting, grouping and refining your search results

One of the weaker points of SharePoint search is what little you can do with the results. Granted you can configure the SharePoint core results web part to display additional columns and add your own refiners. However, the user must have permissions to modify the web part and understand xsl/xml. The KnowledgeLake Search Center results allows the user to interactively resize and relocate columns, sort, group and refine the results on the fly.

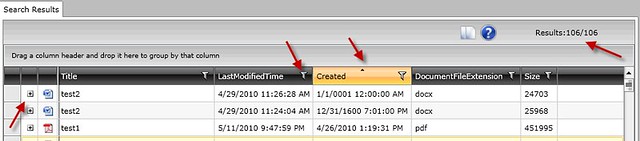
You can click on any column header to sort by that column, click again and it changes the direction of the sort. The small arrow indicates the direction. Holding the shift key and clicking on another column header allows you to sort by multiple columns. You can drag and drop a column header to reposition it and drag the splitter bars to resize the columns.


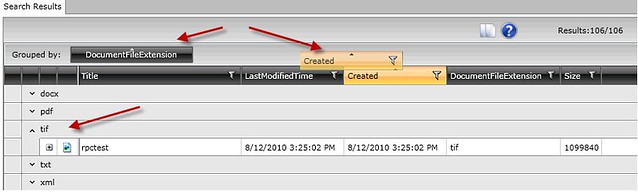
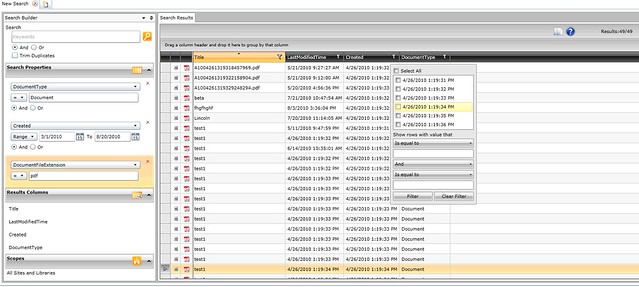
Grouping the search results is a powerful feature. This allows you to drag any number of columns to the area above the grid and the results will be grouped by those column values. In the image above I have grouped by the document’s file extension. So now I can see my results by type of document. I can expand the group value in the results and display all the individual items. I can drag additional columns and groups will contain nested groups. Grouping helps users find what they are looking for and navigate the results more effectively.


Letting users refine there results any way they want is the most effective way for them to find what they are looking for. Clicking on the funnel icon in the column header displays a refinement dialog. Here you can check any of the unique values for that column to filter the results. You can also define other types of filters in the “Show rows with value that” section. If the column is a text data type, then you can also use other operators such as “Starts With”, “Ends With” or “Contains”. Depending on the column’s data type, the operators will vary.


Search results on steroids

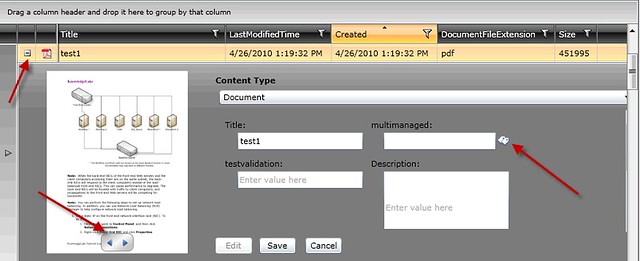
Ok so I can sort, group, rearrange, and refine my search results. KnowledgeLake Search Center takes your searching to a new level. These next features allow users to use searching as a place to get work done. Most users are searching for documents so they can view and edit them. SharePoint’s search provides links to the documents so the user can open the document in an application. Many times the application does not provide integration with SharePoint, so users must download the document, make changes, and then upload the document back. Very time consuming. KnowledgeLake Search Center allows you to edit a document’s metadata without having to leave the search center. In the previous image you should have notice a + plus icon next to a search item. When a user clicks on this it will expand an area revealing a thumbnail of the document along with the document’s metadata properties.

First of all this is not your ordinary thumbnail image. Notice the arrow buttons. These allow you to page through the document within the results. The property panel to the right, allows for full editing of any SharePoint fields directly from the results. In fact, you can even change the contenttype just like the SharePoint edit form. All the same capabilities are there. You can even set managed metadata fields with a full functioning managed metadata picker.

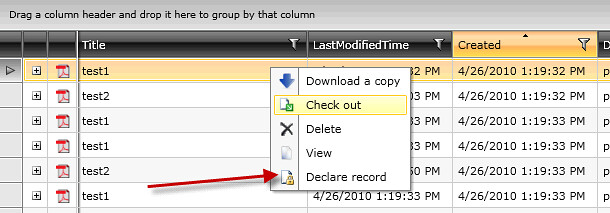
Finally, you can do basically anything to the document as if you were viewing it from a document library. Just right click the item to bring up a context menu to download, check out, check in or delete the document. If you have manual records declaration enabled you can even declare or un-declare the item as a record. The search center even implements the security restrictions around records management, for instance, you cannot delete an item that is declared a record. The context menu also contains a “View” item which allows you to open the document within the KnowledgeLake Viewer, which I will post about next. The viewer allows you to view any document including all Microsoft Office files, graphic files, and of course tiff and pdf files.


Securing and sharing your searches

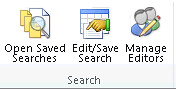
I always got tired of rebuilding my searches every time I wanted to look at a group of documents, and SharePoint did not offer me anything to save and reuse one. KnowledgeLake Search Center has a ribbon bar allowing you to save and share your searches.

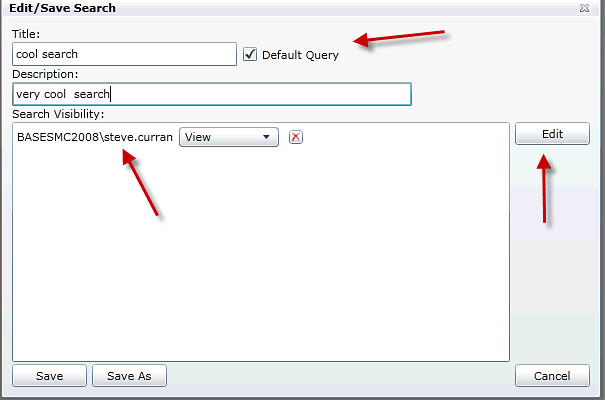
From this ribbon you can save a search and make it visible to others in your company. Once you have built your search just click on the “Edit/Save Search” ribbon button. Give it a title, description, and make it your default search. Click the “Edit” button to display a people picker to allow individual users or AD groups to view and use the search.

Click the “Open Save Searches” to load a search into the search center. The list of searches would be composed of your own searches plus any searches others have decided to share with you.

If you are a site administrator, you would also see the “Manage Editors” button. This is where you add users to give them permissions to save and share searches.

Got Web Parts?

Yes KnowledgeLake Search has web parts, a template search web part and a search results web part. Both are meant to be connected to each other. You can build a search in the search center and save it. Then add the search template web part and configure it to display a saved search. The template web part does not allow users to build searches, but only allows users to fill in values for the search. So an administrator could build a search to be used by others to find only documents within a particular document library for certain metadata values. The web parts then can be located on a web part page anywhere in the site. The results web part is the same search results you see in the search center. So users can manage there documents on any web part page.

Search is only one part of a document imaging system

KnowledgeLake Search is a versatile extension of SharePoint 2010 Search and provides some compelling features for managing your documents. However, it is only one piece of KnowledgeLake Imaging. In the next post you will see our Silverlight 4 Viewer, with full integration with SharePoint and the ability scan, annotate, encrypt/decrypt and navigate almost any type of document, even document sets.