Monday, December 20, 2010

Developing SharePoint 2010 Search Solutions (Fast and SharePoint)

Technorati Tags: ,,,

Developing SP2010 custom search solutions can be rewarding. Custom solutions can enhance SharePoint search by giving user’s the ability to search by properties and manipulate the results. However, making custom search solutions that can be used with either MSS or FAST search can be much more complicated. In this post I am going to layout the similarities, differences and problems between both MSS search and FAST search. I am also going to explain problems that currently exist in SP2010 and FAST search and possible remedies.

MSS compared to FAST search

MSS (Microsoft Shared Services) and FAST have much in common. In fact if you have both installed on your farm, then users will not see much difference between SharePoint and FAST search web parts and search centers. The noticeable difference is in the results where FAST results will include a refinement web part that displays counts and thumbnail images of Word and PowerPoint files. Even from an administrative perspective both MSS and FAST support the following:

Service Application Infrastructure

Metadata schema management

Crawl scheduling

Scopes, Best Bets and Synonyms

The biggest differences between SharePoint and FAST is FAST’s more robust ability to crawl millions of documents and better relevance in search results. SharePoint search can efficiently crawl and query up to 100 million documents, whereas, FAST can efficiently do the same up to a 500 million documents.

Fast Search Capacity Planning

Another substantial difference is the object model and many other little quirks that you will encounter when developing custom search solutions.

  Supported Syntax Object Model
MSS Keyword
FullTextSQL
Microsoft.Office.Server.Search
FAST Keyword
FQL
Microsoft.Office.Server.Search
Microsoft.SharePoint.Search.Extended.Administration

When developing search solutions that support managed property searching you can use either the KeywordQuery or the FullTextSQLQuery class. The KeywordQuery class now supports the operators (OR,AND,NOT,NEAR) when doing property searching. These type of operators were only available through the FullTextSQLQuery class using SharePoint Search SQL syntax in SP2007. Keyword Query Syntax

In some situations you may want to use the FullTextSQLQuery class which supports other proximity operators and full text operators such as CONTAINS which can be more effective for exact results. In addition, the mapped crawled property does not need to be mapped to the full text index which is required for Keyword property searching. SharePoint Search SQL syntax reference

FAST does not support SharePoint Search SQL queries.  Microsoft now recommends you develop all your search solutions using the KeywordQuery class so they can be seamlessly used between both SharePoint and FAST search. However, just like with SharePoint search if you need to create more complex searches in your solution, then you should use FQL (FAST Query Language). The KeywordQuery class exposes the  EnableFQL property. By setting this property to true your solution can use FQL which is an ABNF (Augmented Backus-Naur Form) language for more exact searching using managed properties. FQL syntax reference

Below are examples of the same query using SQL, Keyword and FQL Syntax:

SQL SELECT Title,Created,Path FROM SCOPE() WHERE (Title = 'Whatever' OR FileExtension = 'PDF')
Keyword title:whatever OR fileextension:PDF
FQL or(title:equals("whatever"),fileextension:equals("PDF"))

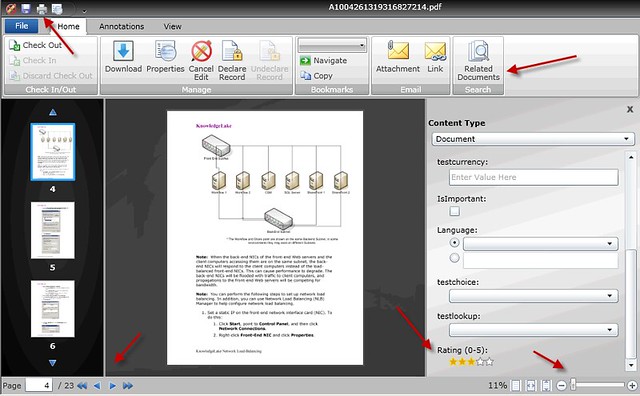
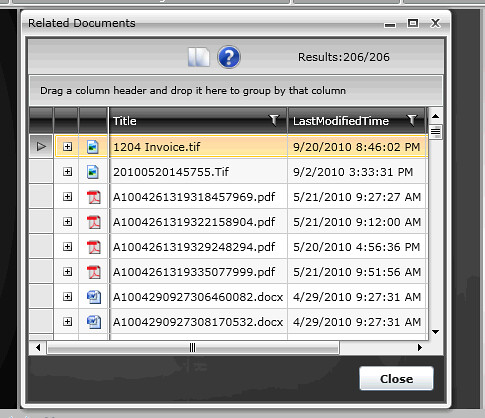
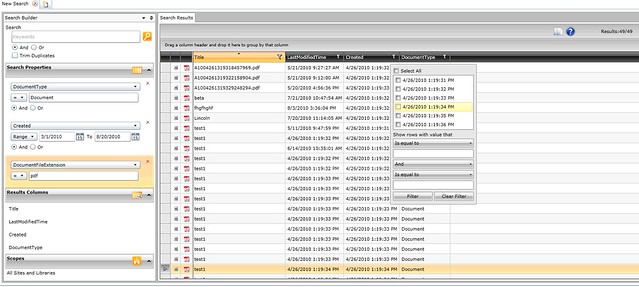
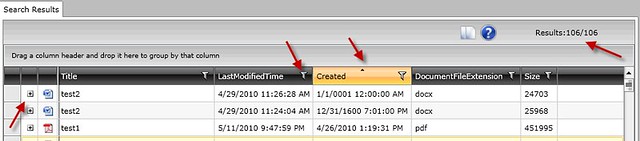
So this is where things start getting different. You will notice that the SQL query includes a SELECT list of properties to retrieve in the results. So how do you tell SharePoint which properties to return with Keyword or FQL syntax? In the code below you will see how using the SelectProperties collection of the KeywordQuery class lets you add the properties you want to return. You can easily add a range of property names.


public DataTable Execute(string queryText,
    Dictionary<string, Type> selectProperties)
{
    ResultTableCollection rtc = null;
    DataTable retResults = new DataTable();

    try
    {
        SPServiceContext context =
            SPServiceContext.GetContext(SPServiceApplicationProxyGroup.Default,
            SPSiteSubscriptionIdentifier.Default);

            SearchServiceApplicationProxy ssap =
                    context.GetDefaultProxy(typeof(SearchServiceApplicationProxy))
                    as SearchServiceApplicationProxy;

        using (KeywordQuery query = new KeywordQuery(ssap))
        {
            query.QueryText = queryText;
            query.ResultTypes = ResultType.RelevantResults;
            query.RowLimit = 5000;
            query.ResultsProvider = SearchProvider.FASTSearch;
            query.EnableFQL = true;
            query.EnableStemming = true;
            query.EnablePhonetic = true;
            query.TrimDuplicates = true;

            if (selectProperties != null && selectProperties.Count > 0)
            {
                query.SelectProperties.Clear();
                query.SelectProperties.AddRange(selectProperties.Keys.ToArray<string>());

            }

            rtc = query.Execute();

            if (rtc.Count > 0)
            {

                using (ResultTable relevantResults = rtc[ResultType.RelevantResults])
                    retResults.Load(relevantResults, LoadOption.OverwriteChanges);

            }

        }

    }
    catch (Exception ex)
    {
        //TODO:Error logging

    }

    return retResults;

}


Notice how you can switch search providers by using the ResultsProvider property. The property is set to the FASTSearch provider, but it can also be set to SharePointSearch or Default. Default will use whatever provider the  search service application proxy is configured for. If your query is using FQL syntax you must set the EnableFQL to true. If you don’t and the solution submits a FQL syntax query it will raise an error. A final note about using FQL and FAST search is that the property names must be in lower case. SQL and Keyword search property names are case insensitive, but not FQL. So if you use a property name that is not all lower case, then the code will raise a “Property doesn't exist or is used in a manner inconsistent with schema settings” error.

Both FullTextSQLQuery and the KeywordQuery class’s execute method returns a ResultTableCollection object which you then load the results into a DataTable. Here is the strange part with FAST. It returns a DataTable object where the data columns are read only and all the data column types are strings. This can be a problem if your solution binds directly to the DataTable . For instance if your grid has sorting and the managed property is expected to be a date time value, then the dates are sorted as strings. You can fix this issue by cloning the DataTable, changing the column’s data type and then importing the row.


          DataTable convertedResults = results.Clone();

          foreach (DataColumn dc in convertedResults.Columns)
          {
              dc.ReadOnly = false;

              if (selectProperties.ContainsKey(dc.ColumnName))
                  dc.DataType = selectProperties[dc.ColumnName];
          }

          foreach (DataRow dr in results.Rows)
          {
             convertedResults.ImportRow(dr);
          }


Searching Problems

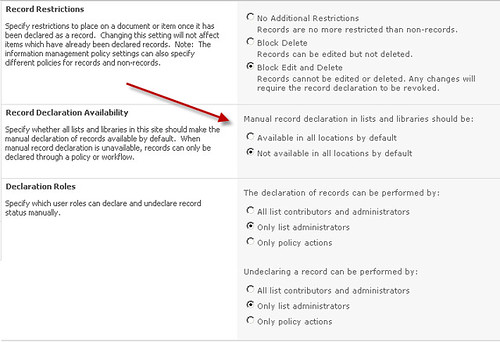
Both SharePoint and FAST have quirky issues when searching decimal type managed properties. SharePoint search has a feature in the schema where you can automatically create new managed properties for newly discovered crawled properties. However, if the crawled property is a decimal, then the crawler does not store the decimal portion of the value from SharePoint. For example,  if your value in SharePoint is 10.12345, then the value stored is 10.00000. This basically makes searching for decimal amounts useless. Fortunately, Microsoft will be issuing a hot fix for this in the February 2011 cumulative update. The work around for this is to delete the automatically created managed property and create your own, then do a full crawl.

FAST has similar issues with the decimal type managed properties but more subtle. When using the FQL int or float functions, FAST will only search up to 3 decimal places. Using the example above,  if you search for 10.123 you will find your invoice, however if you use 10.12345 it will not. Is this a problem? I am not sure how many people use more than 3 decimal places in SharePoint.

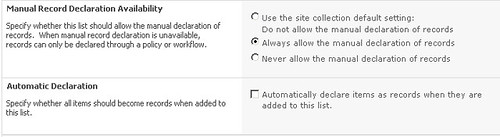
One of the most common ways to search in SharePoint is to find a document based on a text managed property. Unfortunately, SP2010 has made this more complicated. SP2010 search is more scalable than SP2007 and one reason is the new feature of reducing storage space for text type managed properties. When creating a new text managed property you can set the “Reduce storage requirements for text properties by using a hash for comparison” option. If you do not set this option the “=” operator will not work. You can only use the CONTAINS full text predicate function with the FullTextSQLQuery class or the “:” operator with the KeywordQuery class, both of which will return results where the term is located within the text. This does not produce an exact match.

Schema Issues

Both SharePoint and FAST give you access to managed and crawled properties using the object model. You can access SharePoint search schema using the Microsoft.Office.Server.Search.Administration. However, with FAST you must use the Microsoft.SharePoint.Search.Extended.Administration.Schema namespace located in the Microsoft.SharePoint.Search.Extended.Administration.dll. FAST schema administration object model reference

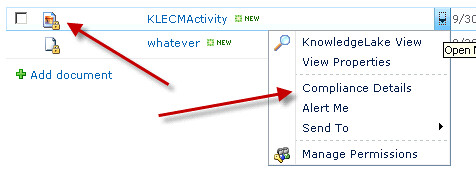
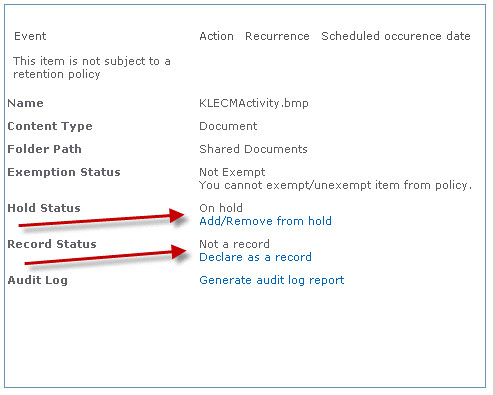
One of the most common errors seen when searching SharePoint is the “Property doesn't exist or is used in a manner inconsistent with schema settings” error. To avoid getting this error in your custom solution you must prevent managed properties from being used that are not “Queryable”. The “Queryable” criteria is different between SharePoint and FAST. With SharePoint search you must use the ManangedProperty.GetDocumentsFound method to determine if any documents in the index are using this managed property. However, with FAST you must check both the ManagedProperty.Queryable and ManagedPropety.SummaryType properties. Queryable must be true and the SummaryType cannot be disabled.  Both these options are available when creating a new managed property in FAST.

A convenient features in SharePoint search is the the ability to have your managed properties automatically generated when a new crawled property is discovered during crawling. This eliminates the need to have an administrator set up the crawled property before your solution can start using it. This setting can be set by editing the crawled property category. Unfortunately, setting it in FAST does not work. All your managed properties must be manually created when using FAST.

Best bets for SharePoint search solutions

Microsoft is recommending standardizing on using the KeywordQuery class for custom search solutions to make it easier for your solution to seamlessly use both search technologies. However, there are still many differences between both which require your solution to add logic that depends on which technology you are using. To keep your solution clean and maintainable, I recommend that you develop your own provider based object model to abstract away the differences between SharePoint and FAST search. Your solution would then interact with a standard interface and each one of your custom providers would handle differences in syntax, schema, searching and object model dependencies.

Microsoft has made it easy to use FAST in SP2010, but in order to leverage it you still must have a deeper knowledge.

Thursday, December 9, 2010

Using SharePoint 2010 Secure Store Service Object Model

The secure store service in SP2010  is a great new feature which enables the BDC (Business Data Connectivity) service to connect to external resources. The secure store service along with BDC are consider two components of SharePoint’s Business Connectivity Services. You can read more about these services here Overview. It also can be used by your own custom SharePoint solutions to access external resources such as web services. For example, there are times when your solution may need access to external resources on another domain, therefore you would need to map the current user to credentials stored for that external resource. Your solution may also want to redirect users to a custom credential page to have user’s enter credentials for other applications, thus eliminating the need to prompt them every time they try accessing an external application. In this post I will show you how to set and get credentials for users from the secure store service object model. In addition, I will show you how to use stored credentials to access a web service. I have also put together a class that contains all the code in this posting, along with code for other secured stored service tasks, such as creating different types of secured stored applications and deleting credentials. The code can be downloaded from here: SecureStoreManagement.zip

The secured stored service provides two basic types of applications, group and individual. Group type applications are used to assign one set of credentials to groups and individual users. An individual type application is used to store one set of credentials for each individual user. You can also create a group or individual ticketed type applications. The ticketed type of application gives the ability to issue tickets to obtain credentials that will expire or timeout. These are useful for  more secure types of external applications. Finally, you can also create group or individual restricted type applications. The restricted application type only allows fully trusted code to obtain credentials. The examples, below deal with the individual type application. The classes used in the examples can be found in the Microsoft.BusinessData.dll and Microsoft.Office.SecureStoreService.dll.


Setting user credentials

The biggest problem that I ran into when using the secure stored service object model was trying to determine which credential corresponded with what field or parameter in the external resource. When you create a secured store application you are allowed to create up to 10 fields. You set each field’s name and credential type (Windows User Name, Windows User Password, Generic, PIN …). However, when using the object model you must use two different collections so you know which values you are setting or getting. You must use the collection of TargetApplicationField and the collection of ISecuredStoreCredential. In an individual type of application each set of credentials must be associated with a SecureStoreService claim, which you can create from a user’s login. The example below takes a user name, password, domain name and a user login to create the credentials and add them to the SecureStoreCredentialCollection in the same order as the TargetApplicationFields collection. This ensures that you can retrieve certain credentials from the SecureStoreCredentialCollection for a given TargetApplicationField. Finally, when creating the credential you must store the value as a System.Security.SecureString. The downloadable code contains the simple code to do this.

public static void SetUserCredentials(string userName,
    string userPassword,
    string domain,
    string targetApplicationID,
    string userLogin)
{      
            SPClaim claim = SPClaimProviderManager.CreateUserClaim(userLogin,
                SPOriginalIssuerType.Windows);
            SecureStoreServiceClaim ssClaim = new SecureStoreServiceClaim(claim);
            SPServiceContext context =
            SPServiceContext.GetContext(SPServiceApplicationProxyGroup.Default,
            SPSiteSubscriptionIdentifier.Default);

            SecureStoreServiceProxy ssp = new SecureStoreServiceProxy();
            ISecureStore iss = ssp.GetSecureStore(context);

            IList<TargetApplicationField> applicationFields =
                iss.GetApplicationFields(targetApplicationID);

            IList<ISecureStoreCredential> creds =
                new List<ISecureStoreCredential>(applicationFields.Count);

            using (SecureStoreCredentialCollection credentials =
                new SecureStoreCredentialCollection(creds))
            {

                foreach (TargetApplicationField taf in applicationFields)
                {
                    switch (taf.Name)
                    {
                        case "Windows User Name":
                            creds.Add(new SecureStoreCredential(MakeSecureString(userName),
                                SecureStoreCredentialType.WindowsUserName));
                            break;

                        case "Windows Password":
                            creds.Add(new SecureStoreCredential(MakeSecureString(userPassword),
                                SecureStoreCredentialType.WindowsPassword));
                            break;

                        case "Domain":
                            creds.Add(new SecureStoreCredential(MakeSecureString(domain)
                                , SecureStoreCredentialType.Generic));
                            break;
                    }
                }

                iss.SetUserCredentials(targetApplicationID, ssClaim, credentials);
            }

}

Getting user credentials

Getting a user’s credentials for a particular application is very straight forward. The code below takes an application ID and get’s the current users credentials. This method works for both group and individual type applications. The key thing to note is that it returns the credentials of the  currently  logged in user. If you are hoping to obtain the credentials for another user will you will be out of luck. The object model has no methods to retrieve credentials for other users. The internal code uses the current thread’s Identity to lookup the credentials in the secure store database. Now if you were able to somehow change the identity of the thread, then that identity also has to be logged in. There should be no need to impersonate another user when you can just easily map credentials to groups and individual users.

public static SecureStoreCredentialCollection GetCredentials(string targetApplicationID)
{
    SecureStoreCredentialCollection credentials = null;
    SPServiceContext context =
    SPServiceContext.GetContext(SPServiceApplicationProxyGroup.Default,
    SPSiteSubscriptionIdentifier.Default);

    SecureStoreServiceProxy ssp = new SecureStoreServiceProxy();
    ISecureStore iss = ssp.GetSecureStore(context);
    credentials = iss.GetCredentials(targetApplicationID);
    return credentials;
}


Using user’s secure store credentials

Now you can set and get credentials. So how do you use them? The code below shows how to get the current user’s credentials for an external application and create new credentials to call a web service. You can have many credentials but your code needs to know which ones to map to what fields to effectively use them. The code will take an application ID and get the credentials and using the list of TargetApplicationFields will map the values to variables by using the index position of the TargetApplicationField in the list, which will correspond to the same position in the list of ISecureStoreCredential. The new NetworkCredential then can be used to call a web service. I chose to use it with the SharePoint Lists web service to return the schema of a list. The secure store credential is stored as a System.Security.SecureString so you must translate it.

public static void UseSecureStoreCredentials(string targetApplicationID)
{

    listservice.Lists listsProxy = new listservice.Lists();
    listsProxy.Url = "http://basesmc2008/_vti_bin/lists.asmx";
    listsProxy.UseDefaultCredentials = false;
    string userName = string.Empty;
    string userPassword = string.Empty;
    string domain = string.Empty;

    using(SecureStoreCredentialCollection ssCreds =
        GetCredentials(targetApplicationID))
    {

        IList<TargetApplicationField> applicationFields =
            GetTargetApplicationFields(targetApplicationID);

        if (ssCreds != null && ssCreds.Count() > 0)
        {
            foreach (TargetApplicationField taf in applicationFields)
            {
                switch (taf.Name)
                {
                    case "Windows User Name":
                        userName =
                            ReadSecureString(ssCreds[applicationFields.IndexOf(taf)].Credential);
                        break;

                    case "Windows Password":
                        userPassword =
                            ReadSecureString(ssCreds[applicationFields.IndexOf(taf)].Credential);
                        break;

                    case "Domain":
                        domain =
                            ReadSecureString(ssCreds[applicationFields.IndexOf(taf)].Credential);
                        break;

                }
            }

            NetworkCredential externalCredential =
                new NetworkCredential(userName, userPassword, domain);

            listsProxy.Credentials = externalCredential;

            XmlNode listNode = listsProxy.GetList("shared documents");
        }
    }

}


Storing it all up

The secure store service is one component of the SharePoint’s Business Connectivity services and is used to enable integration of external resources with Microsoft Office. Here I have shown how your own solutions can leverage this service. Microsoft could have made this object model better by giving developers the ability to navigate the credentials without having to have the target application fields. However, having a central service to store, retrieve and manage external application credentials can enable SSO solutions between SharePoint and CRM systems. It can help you with NTLM “double hop” issues where credentials cannot be transferred across more than one computer boundary. The secure store service provides a way to store credentials securely rather than hard coding them in code or configuration files. SP2010 is making it easier to create more sophisticated enterprise solutions.

Sunday, October 3, 2010

Making your SharePoint 2010 applications ECM aware (Part 5 – Hold and Discovery)

Well I thought I had completed this series a month ago. However, when doing more research into the new features of SP2010, I discovered the “Hold and Discovery” site feature. This is a new and interesting feature in SP2010 and should be part of any ECM solution. My last post talked about the KnowledgeLake Viewer and stressed the importance of having the right tools to manage an “eDiscovery” process. In the last ten years “eDiiscovery” has become more important with many companies dealing with litigation. Courts can require companies to search and discover evidence within electronic documents. It is the responsibility of the company to put these documents on “hold”. “Holding” a document basically locks the document, preventing it from being edited, moved, checked out, or deleted. It is very similar to declaring a document as a record. Records and Holds are just about the same, except records can have different types of restrictions applied to them, for example, a record can be edited but not deleted. Also, it is easier to release holds than it is to un-declare documents as records. Declaring a record is more permanent, whereas, holding document by its nature is temporary.

A great blog post about the “Hold and Discover” feature in SP2010 describes the process.

Microsoft Enterprise Content Management Team Blog

SharePoint’s has expanded its “eDiscovery” capabilities in 2010, while it is now easier to search and manage documents to hold, there is still room for solution architects to enhance this feature. For instance, it would be nice to be able to put a whole document set on hold with one menu click. Possibly a new event handler could be added so that any new documents added to a document set are automatically put on hold. The discovery process could be substantially improved by providing better solutions for searching for documents, compared to the limited keyword searching currently available. For example,leveraging the richer FAST searching syntax to find documents . Another enhancement would be to enable record managers to refine search results and put the refined results on hold using KnowledgeLake Search.

Putting a document on hold

In order to allow your application to put a document on  hold, you will need to allow users to select from the available hold definitions. A SharePoint site is subject to not only the holds defined in it own site, but also its parent site. So when presenting this to the user you must give them a drop down list of available holds. The code in this post uses the Microsoft.Office.Policy assembly located in the 14 hive\ISAPI folder and the Microsoft.Office.Policy.RecordsManagement.Holds.Hold static class.

The following code builds a list of SPListItems that represent the hold definitions available to the a site. This is needed because both the SPListItem you want to hold and the SPListItem representing the hold you want to associate it with are needed.

public static List<SPListItem> GetAvailableHolds(string url)
{

    List<SPListItem> holdListItems = new List<SPListItem>();
    List<SPList> holdList = null;

    using (SPSite site = new SPSite(url))
    {
        using (SPWeb web = site.OpenWeb())
        {
            holdList = Hold.GetApplicableHoldsLists(web);
        }

        foreach (SPList l  in holdList)
        {
            foreach (SPListItem i in l.Items)
            { holdListItems.Add(i); }
        }

    }

    return holdListItems;

}

It is very simple to put a document on hold. All you need is the SPListItem of the document and the SPListItem of the hold. You can also set a comment.

public static void PutOnHold(SPListItem item, SPListItem hold, string comments)
{
    Hold.SetHold(item, hold, comments);      
}


Releasing a document from a hold

Of course if your application can put a document on hold you will want to have the ability to remove the hold. Very simple, basically the same as putting a document on hold but a different method.

public static void RemoveFromHold(SPListItem item, SPListItem hold, string comments)
{
    Hold.RemoveHold(item, hold, comments);
}

Determine if a document is on hold

It is very easy to determine if a document is on hold.

public static bool IsOnHold(SPListItem item)
{
    return Hold.IsItemOnHold(item);
}

When a document is put on hold you will notice a lock icon next to the document icon displayed in the document library. Putting a document on hold or declaring it a record has an immediate effect. However, in the SharePoint UI you cannot tell whether the document is on hold, a record or both. You must select the “Compliance Details” context menu item to see the hold and record status of a document.


When a user clicks on one of these links, SharePoint internally sets a  bit field value of a built in field of the item. The bit field can be combined by using a bitwise OR operation so that the item can be both set as a hold or a record. The following code shows how this works.

public static void GetHoldRecordStatus(SPListItem item)
{
    bool record;
    bool hold;
    int result;

    try
    {
        object obj = item[Microsoft.SharePoint.Publishing.FieldId.HoldRecordStatus];

        if ((obj != null) && !int.TryParse(obj.ToString(), out result))
        {
            record = (result | 273) == 273;
            hold = (result | 4353) == 4353;
        }
    }
    catch (ArgumentException)
    {
        result = 0;
    }
}


The ability to hold and release documents is an essential feature that any ECM application should have. The Microsoft.Office.RecordsManagement.Holds.Hold class enables developer to accomplish this. This class has other methods to hold or release SPListItemCollections  which you can use in scenarios where batch holds are required. You cannot accomplish the same functionality with the Client Object Model. If you wish to call this code remotely you have to wrap the code within a web service deployed to the SharePoint farm.

I will be posting more about enhancing the identification process of “eDiscovery” in SP2010. This will take advantage of KnowledgeLake Search and Fast SharePoint Search.

Wednesday, September 22, 2010

KnowledgeLake Imaging for SharePoint 2010 (Viewing Documents from the SharePoint of view)

This is a continuing series of posts about KnowledgeLake Imaging for SharePoint 2010 a product which my team and I had been working on and is now been released  The product contains features a company needs to implement a quality document imaging system within SharePoint 2010. One of the most important parts of this SharePoint solution is the KnowledgeLake Viewer. Document Imaging requires a capable and powerful viewer, which can enable end users to perform many document based functions. KnowledgeLake Viewer is able to view multiple document formats including (Tiff, PDF, Png, Jpg, Bmp, MSG, Microsoft Word, Excel, and PowerPoint). Having one viewer to view multiple types of documents makes it easier for companies to manage the number of applications on users desktops. Just like our Search component, the viewer is built on Silverlight 4. This means the application does not have to be installed on the user’s desktop and will run in the browser.

Another benefit of one viewer is to make “digital forensics” much easier. “digital forensics” is a branch of forensic science which deals with discovery of court evidence residing in digital format, for example, any electronic document. In the last ten years “e-discovery” has become more important with many companies dealing with litigation. Courts can require companies to search and discover evidence within electronic documents. The KnowledgeLake Viewer makes the process easier by not requiring users to have install multiple applications and switch between them to view the documents. “e-discovery” is more efficient by leveraging KnowledgeLake’s more exact searching and multiple document viewing. Also, once a document is identified, the KnowledgeLake Viewer allows users to declare the document as a “record” allowing the company’s record retention policy to take effect. In the next version the viewer will have the ability to apply a “legal hold” on the document within SharePoint.

Viewing

The viewer can be launched from several places in SharePoint. It can be started from the context menu of a document in a document library, from the search results of the KnowledgeLake Search Center , or from the search results of the KnowledgeLake Search Results web part. Launching the viewer displays the document in a separate browser window.


The KnowledgeLake Viewer does many things. First you can see the familiar ribbon where you have all the same functions that you get in SharePoint 2010 plus more. You can check in, out and discard a checkout. Also, you can download, view and edit properties (metadata), declare or un-declare as a record (records management). The bookmarks ribbon group lets users navigate documents using bookmarks.  Users can email the document as an attachment or as a link. Editing properties is done through the property panel. The panel supports all SharePoint field types including managed metadata with a metadata picker similar to SharePoint’s. Even the new social rating field is supported.

In the lower left hand corner navigation buttons are available, and the ability to view and navigate via thumbnails of the pages is also supported. The lower right hand corner contains controls to allow fine grained zooming and best fitting of the image. The upper left hand corner the tool bar contains an icon to allow for printing of the document.

Finally, documents related by metadata can be searched for using the “Related Documents” button which will display a window with the KnowledgeLake Search Results. Here you can preview, edit and view related documents. The search results grid makes it easy to filter or group the related documents.


Annotating

One of the mainstays of document imaging is the ability to annotate a document. The KnowledgeLake Viewer allows annotations of Tiff and PDF files. The ribbon is logically laid out by grouping the annotation functions in its own ribbon tab. Standard annotations are available like sticky note, stamps, line, solid rectangle, highlight, text and bookmarking. All fonts, colors, line thickness and stamp types are selectable. Remember, this is all done within the browser and Silverlight application.


Adjusting your View

I already spoke about being able page and adjust your view from the lower left and right hand corners of the viewer. However, the same functionality is available in the View ribbon tab. The image can also be rotated along with adjusting the size of the paging thumbnails. Users can streamline their view by hiding thumbnails and/or annotations.

Viewing multiple documents

If your using Knowledgelake Search you can select multiple documents and view them all.

Viewing documents side by side can be beneficial when trying to compare possible related documents. This helps the “e-discovery” process and records management. You can open the document in a separate window by clicking on the arrow in the upper right hand corner of the document window. You can also switch to a tabbed view by clicking on one of the documents tabs.


Clicking on the tile icon returns you back to the tile view.


Document Sets

Document sets is a new feature in SharePoint and can be useful for a case management system. Document sets enable you to group documents along with a common set of metadata, and provide a way to have default documents created when a new document set is created. The KnowledgeLake Viewer allows for viewing documents within a document set. When a user opens a document that belongs to a document set the viewer will have a new ribbon button “Document Explorer”. Clicking on this button will display a new Silverlight window containing a grid similar to the KnowledgeLake Search results.

Clicking on the icon will load the document into another tab. Also, you can right click and from the context menu load the document in a separate window. The document set explorer gives the ability to view documents within document set side by side, and leverage the filtering and grouping features of the grid, which is especially useful when dealing with large document sets.

Many companies spend substantial resources to get documents into SharePoint, it only makes sense to have a capable document imaging system to leverage this investment. The KnowledgeLake Viewer gives you many sophisticated features to handle how you want to utilize SharePoint. Whether you are doing case management, e-discovery, digital forensics or records management the KnowledgeLake Viewer will make it easier.

Sunday, August 22, 2010

KnowledgeLake Imaging for SharePoint 2010 (Search Part Two – Effective Results)

This is the second part of a multi-part series on the new KnowledgeLake Imaging for SharePoint 2010. The first part talked about our Search component and how easy it is for users to build queries. http://sharepointfieldnotes.blogspot.com/2010/08/knowledgelake-imaging-for-sharepoint.html

In this post I will be showing the innovative features of the Search component’s results and how these features can make your searching much more productive. Our search product is built on Silverlight 4 and extends SharePoint’s enterprise search. The search center puts the query builder and the results side by side on the same page. This enables the user to see the changes in the query conditions immediately.  You can build simple or complex queries and keep track of the conditions while viewing the results. Also, remember the builder can be docked or auto hidden like a toolbar, allowing for the results to be viewed full screen. This can be useful especially if you are returning a lot of columns in your results. You may want to return many columns in your results, because the search results allows you to do many things with the data interactively.


Viewing, sorting, grouping and refining your search results

One of the weaker points of SharePoint search is what little you can do with the results. Granted you can configure the SharePoint core results web part to display additional columns and add your own refiners. However, the user must have permissions to modify the web part and understand xsl/xml. The KnowledgeLake Search Center results allows the user to interactively resize and relocate columns, sort, group and refine the results on the fly.

You can click on any column header to sort by that column, click again and it changes the direction of the sort. The small arrow indicates the direction. Holding the shift key and clicking on another column header allows you to sort by multiple columns. You can drag and drop a column header to reposition it and drag the splitter bars to resize the columns.


Grouping the search results is a powerful feature. This allows you to drag any number of columns to the area above the grid and the results will be grouped by those column values. In the image above I have grouped by the document’s file extension. So now I can see my results by type of document. I can expand the group value in the results and display all the individual items. I can drag additional columns and groups will contain nested groups. Grouping helps users find what they are looking for and navigate the results more effectively.


Letting users refine there results any way they want is the most effective way for them to find what they are looking for. Clicking on the funnel icon in the column header displays a refinement dialog. Here you can check any of the unique values for that column to filter the results. You can also define other types of filters in the “Show rows with value that” section. If the column is a text data type, then you can also use other operators such as “Starts With”, “Ends With” or “Contains”. Depending on the column’s data type, the operators will vary.


Search results on steroids

Ok so I can sort, group, rearrange, and refine my search results. KnowledgeLake Search Center takes your searching to a new level. These next features allow users to use searching as a place to get work done. Most users are searching for documents so they can view and edit them. SharePoint’s search provides links to the documents so the user can open the document in an application. Many times the application does not provide integration with SharePoint, so users must download the document, make changes, and then upload the document back. Very time consuming. KnowledgeLake Search Center allows you to edit a document’s metadata without having to leave the search center. In the previous image you should have notice a + plus icon next to a search item. When a user clicks on this it will expand an area revealing a thumbnail of the document along with the document’s metadata properties.

First of all this is not your ordinary thumbnail image. Notice the arrow buttons. These allow you to page through the document within the results. The property panel to the right, allows for full editing of any SharePoint fields directly from the results. In fact, you can even change the contenttype just like the SharePoint edit form. All the same capabilities are there. You can even set managed metadata fields with a full functioning managed metadata picker.

Finally, you can do basically anything to the document as if you were viewing it from a document library. Just right click the item to bring up a context menu to download, check out, check in or delete the document. If you have manual records declaration enabled you can even declare or un-declare the item as a record. The search center even implements the security restrictions around records management, for instance, you cannot delete an item that is declared a record. The context menu also contains a “View” item which allows you to open the document within the KnowledgeLake Viewer, which I will post about next. The viewer allows you to view any document including all Microsoft Office files, graphic files, and of course tiff and pdf files.


Securing and sharing your searches

I always got tired of rebuilding my searches every time I wanted to look at a group of documents, and SharePoint did not offer me anything to save and reuse one. KnowledgeLake Search Center has a ribbon bar allowing you to save and share your searches.

From this ribbon you can save a search and make it visible to others in your company. Once you have built your search just click on the “Edit/Save Search” ribbon button. Give it a title, description, and make it your default search. Click the “Edit” button to display a people picker to allow individual users or AD groups to view and use the search.

Click the “Open Save Searches” to load a search into the search center. The list of searches would be composed of your own searches plus any searches others have decided to share with you.

If you are a site administrator, you would also see the “Manage Editors” button. This is where you add users to give them permissions to save and share searches.

Got Web Parts?

Yes KnowledgeLake Search has web parts, a template search web part and a search results web part. Both are meant to be connected to each other. You can build a search in the search center and save it. Then add the search template web part and configure it to display a saved search. The template web part does not allow users to build searches, but only allows users to fill in values for the search. So an administrator could build a search to be used by others to find only documents within a particular document library for certain metadata values. The web parts then can be located on a web part page anywhere in the site. The results web part is the same search results you see in the search center. So users can manage there documents on any web part page.

Search is only one part of a document imaging system

KnowledgeLake Search is a versatile extension of SharePoint 2010 Search and provides some compelling features for managing your documents. However, it is only one piece of KnowledgeLake Imaging. In the next post you will see our Silverlight 4 Viewer, with full integration with SharePoint and the ability scan, annotate, encrypt/decrypt and navigate almost any type of document, even document sets.

Monday, August 16, 2010

KnowledgeLake Imaging for SharePoint 2010 (Search Part One – Building your search)

Technorati Tags: ,,,

I promised a few weeks ago to write about the SharePoint 2010 product that my team and I have been working on for the past five months. We have just released our “KnowledgeLake Imaging for SharePoint 2010” product last week. This product encompasses features a company needs to implement a quality document imaging system within SharePoint 2010 and compliments our other SharePoint 2010 ready products for capturing documents. KnowledgeLake Imaging has the following features that all run within the context of SharePoint.

  • Search (Search Center and Web Parts)
  • Viewer (Viewer for Tiff, PDF, Graphic files, Microsoft Office files and email messages)
  • Indexing (Enhanced ability to add metadata to documents, including codeless solution to add external data including Oracle or any OLEDB compliant data source)
  • Scanning (Scan documents into SharePoint from SharePoint)
  • Central Administration Integration (Fully deployable SharePoint solution, ULS Log viewer, and Service Applications)

I had a great team of talented SharePoint developers working on this project. A big thanks to Steve Danner, Shawn Cosby, Chris Starkey, and Ralph Boester. All these guys came up with significant innovations for the product.

Since KnowledgeLake Imaging has so much to offer, I will be posting about the features in a multi-part series. In this post I am going to talk about our new Search feature. Searching is a very important piece of a document imaging system. Being able to easily find business documents is a high priority for any company. KnowledgeLake provides a great set of applications for indexing and processing your document images and our search product takes advantage of the metadata attached to these documents.

Our search product is built on Silverlight 4 so we could substantially enhance the user experience when searching for documents in SharePoint. The search product has two components. The first is the Search Center which is similar in concept to SharePoint’s Search Center and a set of web parts also similar to SharePoint’s advanced search web parts. The similarity between the two is restricted to the deployment method only. The KnowledgeLake Search Center is a site template and be created just like any other SharePoint site template.

After creating a new KnowledgeLake Search Center you can navigate to it. Here you are presented with the following page.

This is not your ordinary SharePoint enterprise search center. First of all you have two components on the same page, the search builder and the search results. The search builder allows the user to easily build ad hoc queries, using both keywords and metadata (SharePoint Managed Properties). The builder makes constructing queries very easy compared to the OOB search center. You are able to select from any of the available managed properties to query against. Secondly, you can select which managed properties you want to display in your results. Finally, you can limit the scope of your search down to a single document library if needed.

Lets look at the features of the search builder

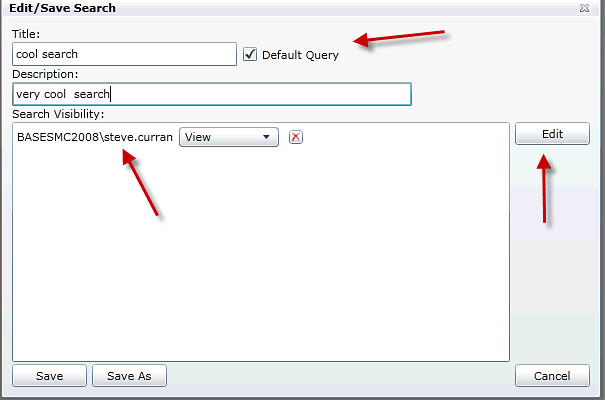
  Adding properties to search with

In order to add a managed property to use in a search just click the button in the “Search Properties” panel header. Select a managed property to use from the drop down list. The other drop down list is for choosing which operator you want to use. Depending on the data type of the managed property you choose, the operators to choose from will be different. For instance, if you choose a text managed property you are presented with “=”, “Contains”, “Starts With”, “Like”, and “Is not null”. If a date managed property is chosen, then all the standard operators like “<” and “>=” are presented along with “Range”. Choosing the “Range” operator gives you the ability to specify the start and end of that range. Of course a date picker control is available to make it easy to enter your dates. If an additional property is added then a group of radio buttons are presented to allow you to choose whether to “or” or “and” the property conditions together. Properties can easily be removed by clicking on the red X button.


Adding properties to return in your search results

One of the most frustrating issues with SharePoint’s OOB advanced search results web part is the difficulty for end users to add managed properties to return in their search results. This involves editing the web part and adding xml to the “Fetched Properties” via the “XSL Editor” . There is nothing intuitive about this from an end user’s perspective. KnowledgeLake Search allows you to to click on a button in the “Result Columns” panel header and drag and drop any managed property you wish to see in your results. You can even adjust the position the column will be in the returned grid.


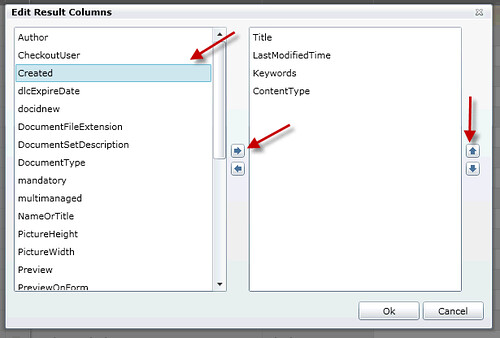
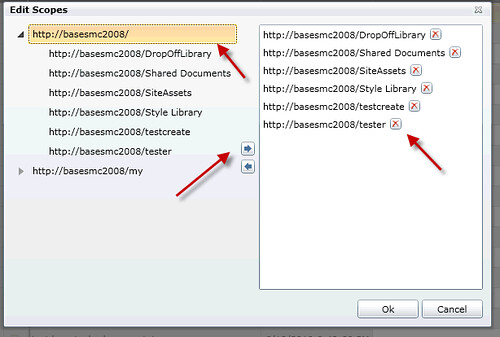
Limiting the scope of your search

There are times when you want to limit your search to particular areas of SharePoint. The search builder allows you to limit your search by any combination of site collection, site or document library. Click on the button in the “Scopes” panel header. You can then drag and drop a whole site collection on expand the site collection node and choose a sub site or a document library. You can remove the site or library dragging it back, using the arrow button or clicking the X close button.


Just click on the search button to execute your search

Other search builder features

One of the greatest UI features of the search builder is the ability to drag the builder and dock it within the search tab workspace. This can give you the maximum amount of space to view and work with the results along with your search criteria. In the screen shot below you can also see that the search builder has a context menu allowing you to set other UI behaviors:

  • Floating (Allows the builder to float within the search workspace)
  • Dockable (Allows the builder to be docked with visual cues similar to Microsoft Visual Studio)
  • Tabbed Document (Creates a “Search Builder” tab adjacent to “Search Results”)
  • Auto Hide (The search builder will automatically hide as it loses focus, and creates a tab on the left side of the workspace)

Another great feature is the tabbed workspace paradigm. I have always wanted to have multiple searches open at the same time. Unfortunately, SharePoint’s OOB search makes this difficult, basically having to open up multiple search centers in multiple browser tabs. With the KnowledgeLake Search Center you can easily create another tabbed workspace by clicking on the new tab.

You can have as many tabs (Searches) as you want.

KnowledgeLake Search Center was designed to make it easy for user’s to work with documents, by allowing them to easily define criteria and find the documents they are interested in. In the next post I will show you the innovations we have added to search results. The new innovations make KnowledgeLake Search Center into a document work center, a place where users can group, analyze, view and edit there documents. I will also show you how searches can be saved, reused and have security applied to them.

Sunday, August 8, 2010

Making your SharePoint 2010 applications ECM aware (Part Four – Records Management)

This is the final installment in my “Making your SharePoint 2010 applications ECM aware” series and it deals with SP2010 Records Management. In this posting I will show you how you can make your server based solutions interact with the built in records management features now available in SP2010. I will do this by showing you the code you need to implement and the SharePoint object model to use.

Records management is a required feature in any ECM system. SP2010 has enhanced SP2007 capabilities by allowing users to declare documents as records at any time, also known as “In place” records management. So why let users manually declare records instead of just relying on SharePoint’s “Document Center”? One reason, is that many companies may have documents outside of the “Document Center” and want to place a restriction or an information policy on a document based on a user review process. As documents are scanned into different document libraries, users (Record managers, lawyers, compliance officers) can not only apply metadata, but also review the document for sensitive information.  The user can then make the decision to declare or even un-declare a document as a record. This feature adds a lot of flexibility to your records review process.

Determine if users can manually declare records

When creating SharePoint records management solutions, one of the most difficult tasks will be programmatically determining if manual record declaration is enabled for a file or a list. You can allow manual records declaration at the site collection level under the “Record declaration settings”.  In the “Record Declaration Availability” section you can select an option to make record declaration available.  This affects what is the site default that is displayed in the document library record declaration settings. In the “Declaration Roles” section where you set what user roles can declare records, you can set “Only policy actions” then manual declarations are not allowed. Selecting the other two roles allows manual declaration.


An administrator can override the site records declaration settings by setting a document library’s record declaration settings shown below.

In order to determine if manual records declaration is available for a file or a list you must find where the above settings are stored. These settings are stored in the SPWeb.Properties and the SPList.RootFolder.Properties collections. The code below shows a method that reads the appropriate properties and makes the determination. All the code listed in this posting requires a reference to the Microsoft. Office.Policy assembly located in the GAC or in the ISAPI folder of the 14 hive.

public static bool IsManualDeclarationEnabled(SPList list)
{
    bool isFeatureActive = Records.IsInPlaceRecordsEnabled(list.ParentWeb.Site);

    bool enabledInSite =
        list.ParentWeb.Properties.ContainsKey("ecm_SiteRecordDeclarationDefault")
        && list.ParentWeb.Properties["ecm_SiteRecordDeclarationDefault"].ToString()
        .Equals(bool.TrueString, StringComparison.OrdinalIgnoreCase);

    bool useListSpecific =
        list.RootFolder.Properties.ContainsKey("ecm_IPRListUseListSpecific")
        && list.RootFolder.Properties["ecm_IPRListUseListSpecific"].ToString()
        .Equals(bool.TrueString, StringComparison.OrdinalIgnoreCase);

    bool enabledInList =
        list.RootFolder.Properties.ContainsKey("ecm_AllowManualDeclaration")
        && list.RootFolder.Properties["ecm_AllowManualDeclaration"].ToString()
        .Equals(bool.TrueString, StringComparison.OrdinalIgnoreCase);

    if (isFeatureActive)
    {
        if (!useListSpecific && enabledInSite) return true;
        if (useListSpecific && enabledInList) return true;
    }

    return false;
}

Now that we can determine if manual record declaration is available we must also check to see if the user falls within a role that allows it. In the image above for the site collection settings you can allow only list administrators, contributors and list administrators, or only policy actions. Manual record declaration can only be done by either a list administrator or a list contributor. The code below shows how to determine this.

public static bool CanDeclareRecord(SPFile file)
{
    bool declare = false;

    RecordDeclarationPermissions perms =
        Records.GetDeclareByPermissionsForSite(file.Web.Site);

    if (perms == RecordDeclarationPermissions.AllListContributors)
    {
        declare =
            file.Item.ParentList.DoesUserHavePermissions(SPBasePermissions.EditListItems);
    }
    else
        declare = ((perms == RecordDeclarationPermissions.OnlyAdmins)
            && file.Item.ParentList.
            DoesUserHavePermissions(SPBasePermissions.EmptyMask
            | SPBasePermissions.ManageLists));

    return declare;

}

public static bool CanUnDeclareRecord(SPFile file)
{
    bool undeclare = false;

    RecordDeclarationPermissions perms =
        Records.GetUndeclareByPermissionsForSite(file.Web.Site);

    if (perms == RecordDeclarationPermissions.AllListContributors)
    {
        undeclare =
            file.Item.ParentList.DoesUserHavePermissions(SPBasePermissions.EditListItems);
    }
    else
        undeclare = ((perms == RecordDeclarationPermissions.OnlyAdmins)
            && file.Item.ParentList.
            DoesUserHavePermissions(SPBasePermissions.EmptyMask
            | SPBasePermissions.ManageLists));

    return undeclare;

}

Declaring a file as a record

So now that we know the user can declare a file as a record, lets look at how to actually declare it. It is one line of code using the static DelcareItemAsRecord method of the Records class. This method takes a SPListItem as an argument. However, many times I work with url’s and SPFiles. So the code below shows how to use these as arguments.

public static void DeclareFileAsRecord(string url)
{

    using (SPSite site = new SPSite(url))
    {
        using (SPWeb web = site.OpenWeb())
        {
            SPFile file = web.GetFile(url);

            if (file.Exists)
            {
                DeclareFileAsRecord(file);
            }
            else
            {
                throw new Exception("File does not exist");
            }
        }

    }

}

public static void DeclareFileAsRecord(SPFile file)
{

    Records.DeclareItemAsRecord(file.Item);

}

If you want to un-declare a file as a record then just call the Records.UndeclareItemAsRecord static method.

Determining if a file is a record

Another piece of information your solution will need is if a file has been declared a record. Your solution needs to know this so it can take appropriate action. For example, you may not want to allow users to edit or delete the document. Once again it is a call to a static method on the Records class.

public static bool IsFileRecord(string url)
{
    bool record = false;

    using (SPSite site = new SPSite(url))
    {
        using (SPWeb web = site.OpenWeb())
        {
            SPFile file = web.GetFile(url);
            record = Records.IsRecord(file.Item);
        }
    }

    return record;

}

public static bool IsFileRecord(SPFile file)
{
    bool record = false;

    record = Records.IsRecord(file.Item);

    return record;

}

Determining record restrictions

Remember you could apply restrictions to a record in the Site Collection “Records Declaration Settings” page.

Here you can block a record from being deleted, or edited and deleted. Your solution may want to check this regardless of whether a user can manually declare a file as a record. You can use the Records class and some more static methods. The IsLocked method determines if a file cannot be edited or has been put on hold. The IsDeleteBlocked method checks to see if the file can be deleted. You should check if the file is locked first, and if it is not then check if it can be deleted.

public static bool IsFileLocked(string url)
{
    bool locked = false;

    using (SPSite site = new SPSite(url))
    {
        using (SPWeb web = site.OpenWeb())
        {
            SPFile file = web.GetFile(url);
            locked = Records.IsLocked(file.Item);
        }
    }

    return locked;

}

public static bool IsFileLocked(SPFile file)
{

    return Records.IsLocked(file.Item);

}

public static bool IsDeleteBlocked(string url)
{
    bool locked = false;

    using (SPSite site = new SPSite(url))
    {
        using (SPWeb web = site.OpenWeb())
        {
            SPFile file = web.GetFile(url);
            locked = Records.IsDeleteBlocked(file.Item);
        }
    }

    return locked;

}

public static bool IsDeleteBlocked(SPFile file)
{
    return Records.IsDeleteBlocked(file.Item);
}


Is your SharePoint application ECM aware?

I hope the above code helps make your solutions active participants in SP2010 ECM features. One limitation is that your solution must reside on the SharePoint server. This code can easily be wrapped into a custom web service where your remote solution could utilize it. However, as we all know, this makes for more difficult installations, and some corporate environments do not allow custom web services. Unfortunately, Microsoft did not expose any of this functionality in the client object model per se. But as I have demonstrated previously with document sets where there is a will there is a way. If you would like to see another posting about how to accomplish records management with the client object model, then leave a comment to this post and I will research how difficult it may be.

This series of postings has shown how to add value to your applications by integrating with the new ECM features within SP2010, including the content organizer and document sets. If your applications are not leveraging these features, then of course users will look else where for better solutions.

Tuesday, July 27, 2010

Sharepoint 2010 and Silverlight

Well I have been busy for the last 5 months doing SharePoint 2010 development and Silverlight. Below are links to some MSDN channel 9 videos of what my team and I have been doing in regards to ECM and Search. The videos show some of our products in the beta stage. The release of KnowledgeLake Imaging 2010 is very soon. I will be posting more information about the things we implemented in this product.

KnowledgeLake Search Center

KnowledgeLake Viewer

KnowledgeLake SharePoint development with VS2010 and Silverlight

Monday, July 5, 2010

Adjusting date time values in SharePoint 2010

Technorati Tags: ,,

It is well known that SharePoint stores date time values in GMT(Greenwich Mean Time). This is done in order for SharePoint to adjust date time values according to site or user regional setting preferences. On a recent project I had to determine how to adjust date time values returned from search results, for example the “Last Modified” value for a document. The value is returned in GMT time and users complained it was not the same value as what was showing in the document library in SharePoint.  Below is a picture of list of time zones SharePoint displays to choose from when setting the regional settings for a Site. Notice some time zones are listed with a negative number of hours compared to the GMT time and others are listed with a positive number.

SharePoint exposes the SPTimeZoneInformation class to enable your code to make the same regional setting adjustments as the UI. Below is code showing you how to use this class, along with the logic to adjust for daylight savings time. The strange thing is that the Bias value is opposite of the value displayed in the time zone list. For example, central time is listed as being 6 hours behind GMT, however the value for the Bias which is in minutes is a positive value. Conversely, the Bias value for Amsterdam which is listed as an hour ahead of GMT is a negative value. So you must reverse the sign of the value before adjusting the date time value.


           int timeZoneBiasMinutes = 0;

           DateTime newVal;

           DateTime tmpVal = DateTime.Now;

           if (SPContext.Current != null && SPContext.Current.Web != null)
           {
               SPTimeZoneInformation info =
                   SPContext.Current.Web.RegionalSettings.TimeZone.Information;
               timeZoneBiasMinutes = info.Bias;

               DateTime now = DateTime.Now;
               SPSystemTime daylightDate = info.DaylightDate;

               if(now.Month >= daylightDate.Month)
                   if(now.Day >= daylightDate.Day)
                       timeZoneBiasMinutes += info.DaylightBias;

               if (timeZoneBiasMinutes > 0)
                  minAdjustment = -timeZoneBiasMinutes;
               else
                  minAdjustment = Math.Abs(timeZoneBiasMinutes);

               newVal = ((DateTime)tmpVal).AddMinutes(minAdjustment);
           }

Friday, July 2, 2010

SharePoint 2010 and Silverlight (Downloading a file with the client object model)

Technorati Tags: ,,

When I was doing SivlerLight 2 development and using SP2007, I was wishing for a cleaner way of downloading a file. It just seemed so browser like to stream a file via the response stream and force the browser to pop open two dialogs like below. I had worked so hard on making the Silverlight application not to look like a traditional browser based application, it just seemed to be a shame.

Well when I was doing Silverlight 4 and SP2010 development I came across the SilverLight System.Windows.Controls.SaveFileDialog class. This is just like using the Windows.Forms.FileDialog class of old days except for Silverlight. Very nice, because you just get the save file dialog  without all the extra windows, making it behave more like a desktop application.


So I needed some code to get a file from SharePoint and then prompt the user with the SaveFileDialog. Remember everything must be called asynchronously in Silverlight. The code below uses the Sivlerlight client object model File.OpenBinaryDirect along with an “in-line” anonymous delegate allowing the callback code to be executed in the same method. Works out very well.

       private void DownloadFile(string path)
       {
           string filterTemplate = "!@Ext Files (*.!@Ext) | *.!@Ext";
           SaveFileDialog dialog = new SaveFileDialog();
           dialog.DefaultExt = Path.GetExtension(path).Substring(1);
           dialog.Filter = filterTemplate.Replace("!@Ext", dialog.DefaultExt);

           bool? result = dialog.ShowDialog();

           if (result.HasValue && result == true)
           {
               this.Busy = true;
               Stream sourceStream = null;
               Uri fileUrl = new Uri(path);

               ClientContext clientContext =
                   new ClientContext(fileUrl.GetComponents(
                       UriComponents.SchemeAndServer,
                       UriFormat.UriEscaped));

               Microsoft.SharePoint.Client.File.OpenBinaryDirect(clientContext, fileUrl.AbsolutePath,
                   (object eventSender, OpenBinarySucceededEventArgs eventArgs) =>
                   {
                       if (eventArgs.Stream != null)
                           sourceStream = eventArgs.Stream;
                       Deployment.Current.Dispatcher.BeginInvoke(() =>
                       {
                           using (Stream destStream = dialog.OpenFile())
                           {
                               byte[] bytes = new byte[sourceStream.Length];

                               sourceStream.Read(bytes, 0, (int)sourceStream.Length);
                               destStream.Write(bytes, 0, bytes.Length);
                               destStream.Flush();

                           }
                           this.Busy = false;
                       });

                   }, null);             
           }

       }