Tuesday, December 31, 2013

Make Developing with the SharePoint 2013 REST API Easy with the SPRemoteAPIExplorer Visual Studio Extension

Technorati Tags: ,,,,

One of the biggest mysteries in SharePoint 2013 from a developers perspective has been the REST API. The REST API in SharePoint 2013 has had an huge amount of functionality added to it since SharePoint 2010. Developers have been told that the REST API matches almost everything that is exposed in the managed client server object model (CSOM). Yet as developers we know that what is said about a particular API hardly ever matches up with what it actually can do. Sometimes it can do more than what is said about it. Almost always it can do more than what is documented about it. The SharePoint 2013 REST API until recently has not been a focal point for MSDN documentation. This has resulted in many unproductive hours of developer experimentation with the REST API. Many times we don’t even know where to start and just stick with CSOM or JSOM. Unfortunately, even documentation on the capabilities of JSOM  versus CSOM is inaccurate. In this blog post I will attempt to give you a simple explanation of how SharePoint 2013 uses a cache of metadata to validate remote API calls. I have received the dreaded “resource not found” or “ type not found in the model” errors too many times when using REST. So in this post I will also introduce you to a new Visual Studio extension that will give you the ability to browse this metadata. I got tired of opening up reflector every time to figure out if something was available in the REST API.  So “necessity is the mother of all invention”. The extension exposes all this information in a very user friendly server explorer extension.

You can get the extension here: SPRemoteAPIExplorer


The Mechanics of SharePoint 2013 Remote API Validation

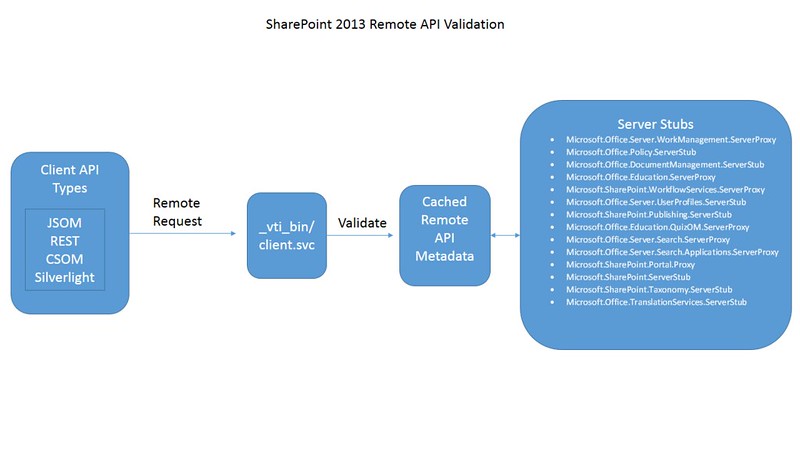
All SharePoint remote requests are sent through the client.svc service. The service will then validate the request against a static in memory cache of metadata. This metadata is supplied by approximately 14 server stub assemblies residing in either the GAC or in the 15/config/bin folder on the SharePoint server. The assemblies are located by SharePoint by examining the xml files contained in the 15/config/clientcallable directory on the SharePoint server. These server stub  assembly names emulate the server side object model namespace with either a “ServerProxy” or “ServerStub” appended. Each assembly contains types that inherit from Microsoft.SharePoint.Client.ServerStub. These types expose a GetMethods and a GetProperties method that return objects representing rules on what api can use the server side object and how it should be called. All this information is very useful when building applications that use a remote API.

Making the Remote API Metadata Useful with the SPRemoteAPIExplorer Extension

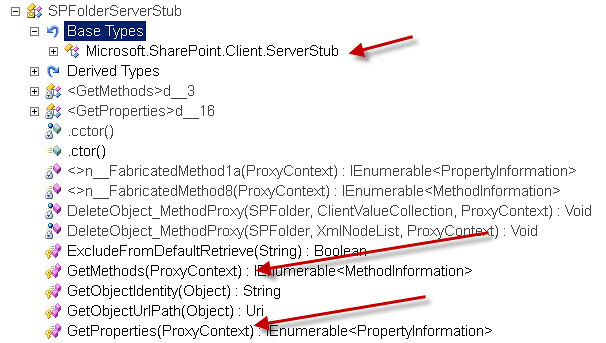
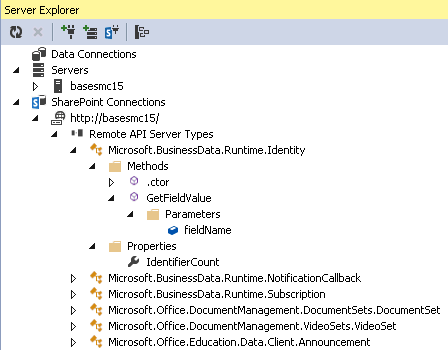
As you can see you would need a reflection tool to examine the types, methods and properties that are available to be called remotely. Why not expose this information in an organized manner within Visual Studio?  The SPRemoteAPIExplorer is a Visual Studio (2012 2013) SharePoint server explorer extension. Install the package from the Visual Studio gallery and under any local SharePoint connection you will have an additional node named “Remote API Server Types”. This will contain approximately 361 type nodes representing the server side object model types that can be used through SharePoint’s remote API. Each type if it exposes any methods or properties will have a corresponding methods and properties folder containing the methods and properties.

So Where is All the Useful Information?

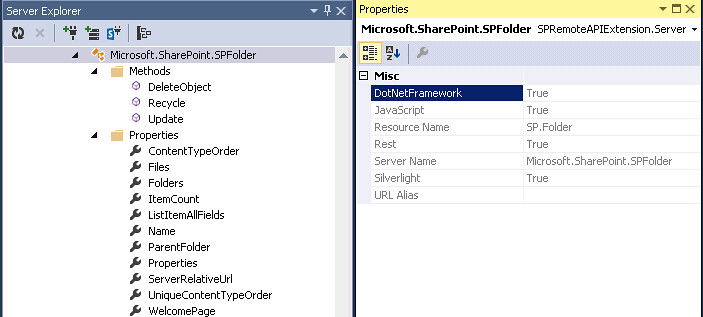
The useful information is contained in the properties panel. If you right click on a type, property, method or parameter you will see all the remote api information in the property grid. The example below shows information for the Microsoft.SharePoint.SPFolder type. For example, this type can be used by the managed CSOM (DotNetFramework), JSOM(JavaScript), REST(Rest) and Sivlerlight CSOM(Silverlight) api. So you should never get a “resource not found” error in your rest call if you are using the corresponding “Resource Name” property either in the URL or the POST content. Also, if there is a URL alias for the type it will be listed here also under the “URL Alias” property.


Information About Methods

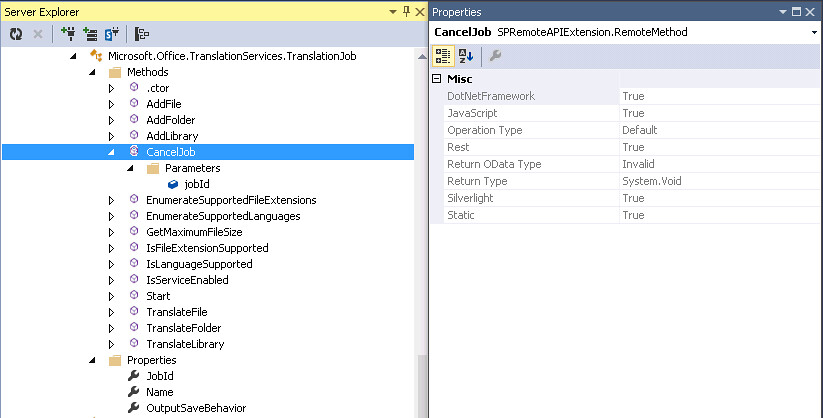
Below is an example of what information you get for methods. In this example the Microsoft.Office.TranslationServices.TranslationJob type exposes 14 methods. It also has a constructor. Please not that some types do have constructors even though some methods may be static. The CancelJob method is available for all the remote api platforms. The “Operation Type” property is an enumeration of either Default or Read. When set to Default the method is for Read and Write operations. If the Operation Type is set to Read the it is for Read only. This enumeration is used in the request process. It appears that the ProxyContext  object on the server can be set up to allow only remote requests that request Read operations only.  The “Return OData Type” property tells you what OData Type is returned on the method call. In this case it is “Invalid” since the  “Return Type” property is void. The following are possible OData return types:

        Invalid
        Primitive
        ComplexType
        MultiValue
        Entity
        Feed

The Primitive type represents  scalar or primitive types such as string, int32 etc. You will see a relationship between the “Return OData Type” and the “Return Type” properties. The ComplexType corresponds to a type in the server object model that is not exposed via the EDM entity model or Remote API. These are the types that give most developers a headache. You can use these in REST but you must figure out how to set them up with JSON by looking at the server object model. The MultiValue and Feed types usually represents an array of something. Finally the Entity type represents a type that is defined in the EDM model and Remote API and can be found in the list of types exposed by this extension.


Information About Method Parameters

Below is an example of what information is available for method parameters. Methods can have many parameters and cause a lot of development headaches when using REST. The “Default Value” property is the default value that is used when your code does not send a value. The “OData Type” property once again is very useful. Since it is a primitive type you need only to use the name of parameter and the value using JSON. If it were a ComplexType or Entity Type then you would have to include the __metadata property. Now here is something that has driven me nuts with the REST api. In the case where the method is callable from REST but one of the parameters has an Invalid “OData Type” property then it cannot be called through REST. The internal code validates the resource, method and the parameter.  Never assume just because the method is callable from REST that it will work. You must also examine all the parameters. An example of this would be the Microsoft.SharePoint.Administration.SPAppCatalog.GetAppInstances method. This method has a web parameter which takes a SPWeb object. These types of parameters are marked as invalid for OData because they are deemed too complex. Hopefully, new methods will be added on the server side to accommodate this by taking a Guid that represents the SPWeb. Finally, the “REST Parameter Source” property is very important. This represents an enumeration defining how the parameter should be passed in a REST call. Once again this has been a huge source of confusion. The following are the valid parameter sources:

        Default
        Path
        QueryString
        Body

Default is Body. This means the parameter must be passed in a POST in the content body. The others are self explanatory. However there is some quirkiness. If the parameter “OData Type” is complex then you must look at the underlying server object model type. In the case of the Microsoft.SharePoint.SPAttachmentCollection_Client type and its Add method, it takes a complex type of Microsoft.SharePoint.AttachmentCreationInformation and the “REST Parameter Source” property is set to Path. Unfortunately, this object has two properties FileName and ContentStream. Only FileName can be passed using the path. The ContentStream which represents a stream can only be passed in the content body. So be prudent and check the underlying complex type to make sure all the properties can be passed in the correct manner. Also, when passing parameters using JSON make sure to use the exact parameter name, these appear to be case sensitive.


Information About Properties

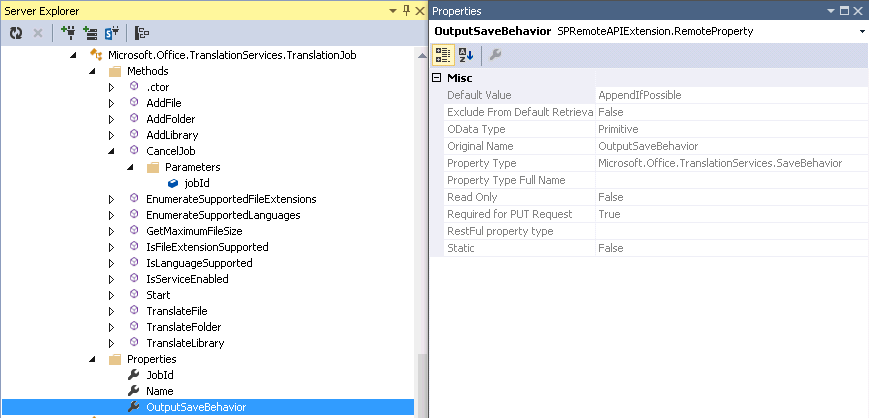
Below is an example of what information is available for properties. One of the more important properties to examine on a remote API property is the “Exclude From Default Retrieval” property. If this is set to true then it will not be returned on an API call. Unfortunately, in the case of REST if it is set to false it does not guarantee it will be returned. If the “OData Type” is set to entity or complexType then it will be deferred. In REST when a property is deferred then only the REST URL to the resource is returned. The “Original Name” property represents the name of the property in the serer object model. Many times these are renamed for URL efficiency. The “Required for PUT Request” is a very strange property. It is used on PUT requests and only applied if the property is “scalar” and not excluded from default retrieval. So if it is set to true but is a entity or complex type then the property probably has no affect when you do not send it on a PUT request.

SPRemoteAPIExplorer Makes REST Development Easier

This extension should make it easier to discover the abilities and use any of the SharePoint remote api’s . In my experience it has saved me trips to the MSDN documentation and numerous hours of trial and error. Even if you are able to get the REST request to pass through to the server, there is no guarantee it will work. There are quirks on the server object model side that will prevent the REST request from working. These are things I hope Microsoft fixes in the future. This extension should give you more time to experiment with the REST api and discover other issues that Microsoft should address. As you play with these you may discover that some may work with SharePoint on-prem but not with SharePoint On-line. While examining server stub framework you can see that the base class Microsoft.SharePoint.Client.ServerStub has the methods IsMethodBlocked, IsSetPropertyBlocked, and IsGetPropertyBlocked. Most all of the derived server stubs make the call back into the base class for these methods. If Microsoft desired to make any of the methods or properties inaccessible, then it would be easy to modify the base or inherited methods and recompile the server stubs.

I will be adding features to this extension in the future and if you have any ideas then just post them in the Q/A section on the Visual Studio Gallery.

Friday, November 29, 2013

More SharePoint 2013 REST Code Tips

Technorati Tags: ,,,

I continue to use the SharePoint 2013 REST api when ever I can. It simplifies my java script code and does not require that I include all the JSOM dependent java script files. It is truly amazing what you can accomplish with this REST api. Unfortunately, it’s secrets are difficult to decipher. So once again I am going to list some example code to hopefully help you be more productive with the REST api. These code examples do various things but may give you insight into what the REST api is capable of.

Logging Analytics Usage Events

There are many undiscovered REST method calls in SP2013 and one I thought might be useful is the ability to log analytic usage events from your SharePoint app. Using this you can add usage metrics about your app to the standard analytics reporting.

function logUsageEvent() {

var restSource = decodeURIComponent(getQueryStringParameter("SPAppWebUrl"))
+ "/_api/Microsoft.SharePoint.Administration.SPAnalyticsUsageService/logevent"

$.ajax(
{
url: restSource,
method: "POST",
data:JSON.stringify( {
usageEntry: {
"__metadata": { "type": "Microsoft.SharePoint.Administration.UsageEntry" },
"EventTypeId": 1,
"ItemId": "anything you want",
"Site": "a975b994-fc67-4203-a519-b160175ca967",
"User": "johndoe"
}
}),
headers: {
"accept": "application/json;odata=verbose",
"content-type": "application/json;odata=verbose",
"X-RequestDigest": $("#__REQUESTDIGEST").val()
},
success: function (data) {
var d = data;
},
error: function (err) {
alert(JSON.stringify(err));
},
}
);

}


This example uses the fully qualified type name for the SPAnalyticsUsageService in the url. This will work. You should use an alias whenever possible. In this case the alias for this type is “events”. As you use this api more you will learn that not all types have an alias. Aliases are also difficult to discover in the api. Please note the type parameter of “Microsoft.SharePoint.Administration.UsageEntry”. This is the OData model type used in this call. You would never figure this out unless it was documented. This is because this type is marked as internal and is undiscoverable unless your using a tool like reflector. Secondly, you must set the parameter name of “usageEntry”. Once again this fact is not evident unless your reflecting the server stub class for Microsoft.SharePoint.ServerStub. The EventTypeId can be any of the following:

First 1
Last 3
None 0
RecommendationClick 3
RecommendationView 2
View 1


You can just use 0 for custom events and supply whatever text you want in the itemId parameter. The site, scopeId and user parameters are optional. If these are not sent then the server code uses the current site and user.


Getting User Permissions for a Document Library


Using the REST api to get user permissions I found takes two steps. One you must get the user’s account name and then send this to get the permissions for the document library. You can also do this for web resources.


function getUserName() {
var uri = new URI(document.URL)
var appVar = uri.getQueryParameter("SPAppWebUrl");

var restSource = decodeURIComponent(getQueryStringParameter("SPAppWebUrl"))
+ "/_api/SP.UserProfiles.PeopleManager/GetMyProperties"

$.ajax(
{
url: restSource,
method: "GET",
headers: {
"accept": "application/json; odata=verbose",
},
success: function (data) {
var userAccountName = data.d.AccountName;
getUserPermissionsREST(userAccountName);

},
error: function (err) {
alert(JSON.stringify(err));
},
}
);
}

}

function getUserPermissions(accountName) {
hostweburl = decodeURIComponent(getQueryStringParameter('SPHostUrl'));
appweburl = decodeURIComponent(getQueryStringParameter('SPAppWebUrl'));

userUrl = appweburl + "/_api/SP.AppContextSite(@target)/web/lists/getbytitle('Documents')/getusereffectivepermissions('" + accountName + "')?@target='" + hostweburl + "'";

$.ajax({
headers: { "Accept": "application/json;odata=verbose" },
contentType: 'application/json',
url: userUrl,
success: function (data) {
var mydata = data;
},
error: function (err) {
alert(JSON.stringify(err));
}
});
}


Adding a Site Group to a Web


Add a new group to a web was perplexing. The issue is what exactly is the complex type name that needs to be sent. Many times when calling the REST api you will receive the “type does not exist in the model” error. Discovering which type name was trial an error. The server stub points to the Microsoft.SharePoint.SPGroupEntityData but this was wrong. So the code below works using “SP.Group”. Also, there is always logic you need to contend with on the server side. So even if you send the correct parameters you will have to make sure the OwnerTitle and LoginName are the same otherwise you will receive the cryptic standard parameter value not recognized error. Finally, you will notice that url contains the alias “sitegroups”. Once again this alias is not discoverable from the server stub but only through reflecting the attributes of the SPGroup class. Never the less this is only a convenience alias and you can just use “Microsoft.SharePoint.SPGroupCollection” in the url. You will notice also there is no method call but just a posting of a data payload. This is because the SharePoint collections expose an intrinsic method on the server side to use. So just posting a payload with the correct parameters will add the json object to the collection.


function addSiteGroup() {
appweburl = decodeURIComponent(getQueryStringParameter('SPAppWebUrl'));
hostweburl = decodeURIComponent(getQueryStringParameter('SPHostUrl'));
var urlTemplate = appweburl + "/_api/SP.AppContextSite(@target)/web/sitegroups?@target='" + hostweburl + "'";

$.ajax({
url: urlTemplate,
type: "POST",
data: JSON.stringify({
'__metadata': { 'type': 'SP.Group' },
'Description': 'Rest Group',
'OwnerTitle': 'domain\steve.curran',
'LoginName':domain\steve.curran'
}),
headers: {
"accept": "application/json;odata=verbose",
"content-type": "application/json;odata=verbose",
"content-length": 80,
"X-RequestDigest": $("#__REQUESTDIGEST").val()
},
success: function (data) {
var d = JSON.parse(data.body);

},
error: function (err) {
alert(JSON.stringify(err));
}
});

}


The Discovery Continues


I will continue to post more examples in future posts including things that just cannot be done using REST even though the api supports it. An example of this is adding a field to a contenttype. The REST api  exposes the contenttype collection and has an intrinsic method for adding a field but the server object model will not add it since the collection is listed as read only. The read only check is only applied in the REST method but is not applied in the JSOM method.

The REST api is a mystery. My next post will illustrate how the api works with the “server stub” assemblies. These assemblies are the key to writing valid and working REST calls. I am also working on a SharePoint 2013 Remote API Discovery Visual Studio extension, hopefully, this would help us all become more productive and effective SharePoint app developers.

Sunday, October 27, 2013

SharePoint 2013 REST Code Tips

Technorati Tags: ,,

I have been doing a lot of Office 365 coding lately and strictly using typescript, javascript and the SharePoint 2013 REST API. The REST API is easy to use but the documentation around what you can and cannot do with REST is incomplete. In this post I will give you a few tips on what you can do with the REST API.  All of these examples will be used in the context of a SharePoint app. So they will include code to go against the host web that is hosting the app. 

Provision a Site Column

You may have a scenario where your app will want to create a new  site column on the fly. The following example uses the REST API to create a new site column. Note that you must set the FieldTypeKind value. This maps back to the server side object model’s SPFieldType enumeration. It must be an integer value. For example if you want to create a text field then use 2. The REST API does not utilize enumerations. So how did I figure out that I needed to use the name “FieldTypeKind” in the REST call? By examining the Microsoft.SharePoint.Client object model. The majority of the time you can set the values using these names when using the REST API. With the REST API you just add to the collections by constructing a URL to the collection and posting the data. It is important to remember to use the _metadata value in order to tell the server the type of object that is in your payload. Another important point is that any time you are creating or updating SharePoint data you must include the request digest value in your request.

function provisionSiteColumn() {

appweburl = decodeURIComponent(getQueryStringParameter('SPAppWebUrl'));
hostweburl = decodeURIComponent(getQueryStringParameter('SPHostUrl'));
var fieldType = 2;
var fieldInternalName = "NewCol5";
var fieldDisplayName ="NewCol5";
var fieldGroup = "Custom Columns";
var fieldRequired = false;
var fieldHidden = false;

$.ajax(
{
url: appweburl + "/_api/SP.AppContextSite(@target)/web/fields?@target='" +
hostweburl + "'",
type: "POST",
data: JSON.stringify({
'__metadata': { 'type': 'SP.Field' }, 'FieldTypeKind': fieldType,
'InternalName': fieldInternalName, 'Title': fieldDisplayName,
'Group': fieldGroup, 'Required': fieldRequired, 'Hidden': fieldHidden
}),
headers: {
"accept": "application/json;odata=verbose",
"content-type": "application/json;odata=verbose",
"X-RequestDigest": $("#__REQUESTDIGEST").val()
},
success: function (data) {
var d = JSON.parse(data.body);
},
error: function (err) {
alert(JSON.stringify(err));
}


})

}


Retrieve the Choices for a SharePoint Choice Column


Another useful tip is getting the choices for a SharePoint choice column. This can be used when you are creating your own custom new and edit forms for your app. The choices can be bound to a html list so the user can choose the appropriate value. The example below is generic and passes in the name of the list and choice field. Note that it adds the SELECT command to get the choices collection of the field and uses the FILTER command to get the choice column. It also utilizes the jQuery deferred object so the calling code can wait on the asynchronous call.


function getFieldChoices(fieldName, listName) {
var dfd = $.Deferred();
hostweburl = decodeURIComponent(getQueryStringParameter('SPHostUrl'));
appweburl = decodeURIComponent(getQueryStringParameter('SPAppWebUrl'));

var urlTemplate = appweburl + "/_api/SP.AppContextSite(@target)/web/lists/getbytitle('#mylist')/fields?@target='" + hostweburl + "'&$select=Choices&$filter=Title eq '#myfield'";
var url = urlTemplate.replace("#mylist", listName).replace("#myfield", fieldName);

$.ajax({
headers: { "Accept": "application/json;odata=verbose" },
contentType: 'application/json',
url: url,
success: function (data) {
var result = data.d.results[0].Choices.results;
var i = result.length;
dfd.resolve(result);
},
error: function (err) {
dfd.reject(err);
}
});
return dfd;

}


Call multiple asynchronous functions and wait for them all to complete


One of the biggest challenges when writing asynchronous code is chaining multiple function calls together. The best approach is to use jQuery promises in your asynchronous functions shown in the previous example. If your code needs to do multiple steps (function calls) before you can continue the next step, then use the jQuery $.when.apply function. This function will take an array of functions that return a promise and execute them in order of the array, and then execute a done function after they have all completed. The sample code below will create three function calls that call the SharePoint JSOM to retrieve all the terms for a given term set. Each function gets a different term set ID. The code then calls the $.when.apply and checks the counts of the terms after all functions have been executed.


function execMultipleRequests() {

var tsIds = ["626db900-c668-45d0-b673-f43b6929f81f",
"626db900-c668-45d0-b673-f43b6929f81f",
"626db900-c668-45d0-b673-f43b6929f81f"];

var functionCalls = [];

functionCalls = $.map(tsIds, function (id) {
var context = SP.ClientContext.get_current();
var taxSession = SP.Taxonomy.TaxonomySession.getTaxonomySession(context);
var termStores = taxSession.get_termStores();
var termStore = taxSession.getDefaultSiteCollectionTermStore();

var dfd = $.Deferred();

termSet = termStore.getTermSet(id);
terms = termSet.getAllTerms();
context.load(terms);

context.executeQueryAsync(
function() {
dfd.resolve(terms);
},
function(sender, args) {
dfd.reject(args);
});
return dfd.promise();
});

$.when.apply($, functionCalls).done(function (results) {
$.each(arguments, function (k, v) {
alert(v.get_count().toString());
})
}).fail(function (e) {
var i = e;
});

}


You can read more about the jQuery when function here http://api.jquery.com/jQuery.when/


Set the Default Value for a Column


Recently there was a scenario where I needed to set the default value for a managed metadata field and I needed do this with a REST call. The sample below accomplishes this. Once again it is a generic function taking the list, field and default value as arguments. The important thing to note is to use the "IF-MATCH": "*", "X-Http-Method": "MERGE" header values.


function setDefaultMMValue(listName, fieldName, defaultValue) {

appweburl = decodeURIComponent(getQueryStringParameter('SPAppWebUrl'));
hostweburl = decodeURIComponent(getQueryStringParameter('SPHostUrl'));

urlTemplate = appweburl + "/_api/SP.AppContextSite(@target)/web/lists/getbytitle('#ListName')/fields/getbytitle('#FieldName')?@target='" +
hostweburl + "'";

updateUrl = urlTemplate.replace("#ListName", listName).replace("#FieldName", fieldName);

$.ajax({
async:false,
url: updateUrl,
type: "POST",
data: JSON.stringify({
"__metadata": { type: "SP.Field" },
DefaultValue: defaultValue
}),
headers: {
Accept: "application/json;odata=verbose",
"Content-Type": "application/json;odata=verbose",
"X-RequestDigest": jQuery("#__REQUESTDIGEST").val(),
"IF-MATCH": "*",
"X-Http-Method": "MERGE"
},
success: function (data) {

},
error: function (data) {
alert(JSON.stringify(data));
}
});

}


The REST API is not equal to the CSOM


I hope you can find some use from these REST coding tips. The REST api is easier to use than the javascript implementation of the client object model but it can only do a small fraction of what the CSOM can do. However, this may not be true and only be caused by lack of good documentation on the capabilities of the REST API. I am currently researching a way to easily discover REST capabilities in the server object model using reflection. Putting the pieces together is proving to be very difficult. Eventually, either myself or Microsoft should provide you a Visual Studio extension to let you right click on a server object model method and display a REST code snippet example on how to use it. Dream, dream, dream.

Saturday, August 31, 2013

How to Turn Off Auto Generated Managed Properties in SharePoint 2013 Search

Technorati Tags: ,,

Managed properties are still the mainstay of a robust search solution allowing users to fine tune their searches using refiners or property restrictions. Since SharePoint 2010 managed properties have had the ability to be auto created. Auto generated managed properties can be either a benefit or a nightmare depending on how you look at it. They can be a benefit if in you have a system to govern the creation of site columns and content types. In this case auto generated managed properties are created and mapped to crawled properties as they are discovered which prevents you from having to do full crawls. It also helps your users have readily available managed properties for property restriction searches if they know the naming rules. This can save administrators time. On the other hand, if you have no governance in place for the creation of site columns and content types, then your search schema can become hard to manage and users become confused on what certain managed properties represent. In SharePoint 2010 you had to turn this on by editing the crawled property category and checking the “Automatically generate a new managed property for each crawled property discovered in this category”. 


This option has disappeared in SharePoint 2013. Out of the box SharePoint will auto generate a managed property for every new site column that either a full or incremental crawl discovers. These auto generated managed properties are useless if the site columns are numeric or date/time types as described in my previous blog posting Understanding and Getting SharePoint 2013 Search Managed Properties to Work. Unfortunately, I thought there was no way to turn this off. In SharePoint 2013 the crawled property category edit screen has three options under the new “Bulk Crawled Property Settings” section. The options are Searchable, Queryable, and Retrievable. If any new site column crawled properties are discovered then a new managed property will be created with these attributes set to true if they are checked. Out of the box none of these are checked. 


Three steps to turn off auto generated managed properties

The first step is to make sure Searchable, Queryable, and Retrievable are not checked. Hey wait a minute! These are unchecked out to the box and the managed properties are still getting generated. Yes that is correct. The second step is to check them and then save the category changes, then uncheck them and save them again. The default search schema out of the box has the category set up to auto generate the managed properties but the UI does not reflect it. The third step is to do an IIS reset on at least the Central Administration server. Once you completed these steps you will have control of your search schema. 

Convenience or Manageability you decide

I like choice, especially in SharePoint. Initially, I did not understand why the choice to auto generate managed properties was taken away in SharePoint 2013. However, with SharePoint Online it makes sense to auto generate managed properties by default so these can show up in the site collection search schema automatically, making management of your online environment easier. I like having the choice for SharePoint on-premise which allows me as an administrator to control the growth, naming and mapping of the search schema.  If you have been struggling trying to understand why in some environments auto generated manage properties occur and in others it does not, then I hope this post helps you make the behavior consistent.

Wednesday, July 31, 2013

Speed up Tiff file processing with Microsoft Windows Imaging Components (WIC)

Technorati Tags: ,

This post is about speeding up processing of Tiff files in your imaging solutions. For years developers have relied on the System.Drawing namespace (GDI+) to process tiff files and for years we have suffered with the dreaded “GDI+ generic error” error message. Sometimes the error would only occur in certain environments. Urban legend says that GDI+ had changed from Windows 2008 server to Windows 2008 R2. Developers could replicate the errors on R2 but not on non-R2 servers. Microsoft has also stated  that GDI+ should not be used in a server environment System.Drawing Namespace:

“Caution:

Classes within the System.Drawing namespace are not supported for use within a Windows or ASP.NET service. Attempting to use these classes from within one of these application types may produce unexpected problems, such as diminished service performance and run-time exceptions. For a supported alternative, see Windows Imaging Components.”

Well that is a tell tale sign to move to the alternative of Windows Imaging Components Overview. WIC is located in the presentationcore and windowsbase assemblies providing access to the classes via the System.Windows.Imaging and System.Windows.Imaging.Media namespaces. The framework was added in .Net 3.0. The main benefits of the WIC framework is that it enables application developers to perform image processing operations on any image format through a single, consistent set of common interfaces, without requiring prior knowledge of specific image formats. Basically it removes all the encoding lookups and stream/bitmap management you have to deal with in GDI+. It also provides an extensible "plug and play" architecture for image codecs, pixel formats, and metadata, with automatic run-time discovery of new formats.

What is so special about WIC?

In my experience GDI+ and Tiff processing errors were produced when working with tiff files that contained either mixed resolutions or mixed color (black/white and color) pages. These would occur  on Windows 2008 R2 but not on Windows 2008. Using WIC this problem has disappeared and WIC can handle these types of tiffs without a problem. Coding with GDI+ especially with scanning solutions where multiple single page tiffs need to be combined into one is needlessly complicated. Having to keep all the single page bitmaps and the underlying streams open while writing to the destination multipage tiff stream required more code to manage memory and cleanup. WIC manages the memory and cleanup for you. WIC’s biggest benefit has come in terms of performance. WIC’s built-in caching and memory management is approximately 69% faster than GDI+  when splitting and joining tiff files. Below are some number comparisons between the two frameworks:

Framework Split 500 pages Join 500 pages
GDI+ 32 Seconds 31 Seconds
WIC 10 Seconds 9 Seconds


Real world example

So on average GDI+ can process a tiff page every .064 seconds and WIC can process a tiff page every .020 seconds. This does not sound like much but it can add up especially with tiff files with many pages. Lets say you scan in approximately 15000 2 page documents a day, so how much faster would this be per day? The more pages you have the more it adds up. It could speed up scanning by days.

Number of Documents Pages per document Seconds per page Total time
15000 2 .064 32 minutes
15000 2 .020 10 minutes
15000 500 .064 133 hours
15000 500 .020 42 hours


Easy coding with WIC

Below are code examples used in the performance testing for splitting and joining tiff files using the two frameworks. What you should notice is how much cleaner the code is using WIC. GDI+ requires you to iterate the pages using the SelectActiveFrame method and WIC is much more intuitive iterating through the frames collection of the decoder. The WIC framework comes with built-in encoders and decoders for png, gif, jpg,  bmp, and tiff. The encoders and decoders all inherit from a base class which enables you to write polymorphic code to handle them.  GDI+ lacks this requiring developers to come up with their own methods of abstracting away the different encoding parameters needed to create different formats.

        public static void JoinTiffWIC()
{
TiffBitmapEncoder newFileEncoder = new TiffBitmapEncoder();
TiffBitmapDecoder originalFileDecoder = null;

DirectoryInfo di = new DirectoryInfo("c:\\tiffs");

foreach (FileInfo fi in di.GetFiles())
{
using (Stream documentStream = fi.OpenRead())
{
originalFileDecoder = new TiffBitmapDecoder(documentStream,
BitmapCreateOptions.PreservePixelFormat, BitmapCacheOption.OnLoad);
newFileEncoder.Frames.Add(originalFileDecoder.Frames[0]);

}

}

using (FileStream stream = File.Create("c:\\tiffsOut\\" + Guid.NewGuid().ToString() + ".tiff"))
{
newFileEncoder.Save(stream);
}

}

public static void JoinTiffGDI()
{
DirectoryInfo di = new DirectoryInfo("c:\\tiffs");
Stream documentStream = null;
GDI.Bitmap bmp = null;
GDI.Bitmap newFile = null;
List pages = new List();

GDIImaging.EncoderParameters multiParms = new GDIImaging.EncoderParameters(1);
GDIImaging.EncoderParameters singleParms = new GDIImaging.EncoderParameters(1);
GDIImaging.EncoderParameters saveParms = new GDIImaging.EncoderParameters(1);

multiParms.Param[0] = new GDIImaging.EncoderParameter(GDIImaging.Encoder.SaveFlag, (long)GDIImaging.EncoderValue.MultiFrame);
singleParms.Param[0] = new GDIImaging.EncoderParameter(GDIImaging.Encoder.SaveFlag, (long)GDIImaging.EncoderValue.FrameDimensionPage);
saveParms.Param[0] = new GDIImaging.EncoderParameter(GDIImaging.Encoder.SaveFlag, (long)GDIImaging.EncoderValue.Flush);

GDIImaging.ImageCodecInfo tiffCodecInfo = (from c in GDIImaging.ImageCodecInfo.GetImageEncoders()
where c.FormatID.Equals(GDIImaging.ImageFormat.Tiff.Guid)
select c).FirstOrDefault();


foreach (FileInfo fi in di.GetFiles())
{
documentStream = fi.OpenRead();
bmp = new GDI.Bitmap(documentStream);
bmp.SelectActiveFrame(GDIImaging.FrameDimension.Page, 0);
pages.Add(bmp);

}

using (MemoryStream fs = new MemoryStream())
{
for (int i = 0; i < pages.Count; i++)
{
if (i == 0)
{
newFile = pages[i];
newFile.Save(fs, tiffCodecInfo, multiParms);
}
else
{
newFile.SaveAdd(pages[i], singleParms);
}
}

newFile.SaveAdd(saveParms);

}

}

public static void SPlitTiffWIC(string fileName)
{

TiffBitmapEncoder newFileEncoder = null;

FileInfo fi = new FileInfo(fileName);
using (Stream documentStream = fi.OpenRead())
{

TiffBitmapDecoder originalFileDecoder = new TiffBitmapDecoder(documentStream,
BitmapCreateOptions.PreservePixelFormat, BitmapCacheOption.None);
foreach (BitmapFrame frame in originalFileDecoder.Frames)
{
newFileEncoder = new TiffBitmapEncoder();
newFileEncoder.Frames.Add(frame);
using (FileStream stream = File.Create("c:\\tiffs\\" + Guid.NewGuid().ToString() + ".tiff"))
{
newFileEncoder.Save(stream);
}

}
}
}
public static void SPlitTiffGDI(string fileName)
{

FileInfo fi = new FileInfo(fileName);
GDIImaging.EncoderParameters multiParms = new GDIImaging.EncoderParameters(1);
multiParms.Param[0] = new GDIImaging.EncoderParameter(GDIImaging.Encoder.SaveFlag, (long)GDIImaging.EncoderValue.MultiFrame);

GDIImaging.ImageCodecInfo tiffCodecInfo = (from c in GDIImaging.ImageCodecInfo.GetImageEncoders()
where c.FormatID.Equals(GDIImaging.ImageFormat.Tiff.Guid)
select c).FirstOrDefault();

using (Stream documentStream = fi.OpenRead())
{
using (GDI.Bitmap bp = new GDI.Bitmap(documentStream))
{
GDIImaging.FrameDimension fd = new GDIImaging.FrameDimension(bp.FrameDimensionsList[0]);
int pageCount = bp.GetFrameCount(fd);

for (int i = 0; i < pageCount; i++)
{
bp.SelectActiveFrame(fd, i);
bp.Save("c:\\tiffs\\" + Guid.NewGuid().ToString() + ".tiff", tiffCodecInfo, multiParms);
}


}

}

}

This code is for illustration purposes only. The GDI+ code that joins tiffs does not dispose of all the bitmaps that are created and leaks memory. It points out that you must handle the disposal of many bitmaps and streams whereas, with WIC this not required. The slowness from using GDI+ appears to be from calling the bitmap’s SaveAdd method multiple times. I originally thought it might be from writing to disk so I used a stream and this made no difference. It appears GDI+ has a lot of overhead encoding on each SaveAdd. WIC is optimized for navigating frames (pages) in memory and has a few options for caching the metadata needed for encoding. Memory consumption can be optimized using the BitmapCacheOption.None. However, if you do this and close the decoder’s stream before calling the encoder’s save method you will get an error. You must use either BitmapCacheOption.onLoad or BitmapCacheOption.onDemand to encode with the source decoder’s stream closed. Even when caching is enabled memory consumption was minimal.


Clear, Efficient and Fast


Compared to GDI+ WIC enables to you write clearer, more efficient and faster code for processing tiffs. The code is clearer since you don’t need to build the scaffolding for cleaning up bitmaps. WIC is more efficient since it does the clean up and has built in caching. Faster, because of optimized encoding. Experiment with WIC and you will discover it can do many things easier such as reading and writing annotations and creating custom metadata. It can also create thumbnails and manipulate images.

Tuesday, July 23, 2013

SharePoint Server MVP 2013

Technorati Tags: ,,

Once again I am very grateful to be honored with my 5th Microsoft SharePoint MVP award. It is great to be included with other incredible SharePoint professionals in the community. I look forward to another technically challenging year. SharePoint 2013 is consuming most of the community’s time and the need to help others has never been greater. I also want to thank KnowledgeLake for an awesome place to work and the technical environment to continue  my passion for SharePoint.

Sunday, June 30, 2013

SharePoint 2013 Code Tips – Setting a Managed Metadata Field with the Client Object Model(CSOM and JSOM)

Technorati Tags: ,,,

This is my first blog post on SharePoint 2013 code tips. I am going to start this series by tackling a problem most SharePoint developers have run across when using the client object model with SharePoint 2010. The problem is updating managed metadata fields. Fortunately, this has become easier in SP2013 with the new Microsoft.SharePoint.Taxonomy.Client and the SP.Taxonomy.js file in JSOM. I wrote a blog post about updating managed metadata fields in SP2010 and you can read it here SP2010 Managed Metadata . I explained how you had to update two fields when updating managed metadata. This was confusing and error prone. Now you no longer need to update the additional field. In this post I will show you how to do this using both the managed CSOM and JSOM in the app model. I will cover updating single and multi valued managed metadata fields and a few things about accessing lists outside of the application host in Office 365. The code for this article can be found here Managed Metadata Code Samples

Updating Managed Metadata using CSOM

In order to update a managed metadata field in SP2010 you had to update two fields. One was the managed metadata field itself and the other was it’s corresponding backing text field. This was very cumbersome. First you had to use the managed metadata’s SchemaXml property to parse out the ID of its backing field and then use this ID to set the backing field. Fortunately, the new Microsoft.SharePoint.Client.Taxonomy namespace in SP2013 has made this much easier. No longer do you need to update two fields. It is also much easier to lookup the GUID for a term. The GUID is needed to update managed metadata fields. In SP2010 you needed to call the Taxonomy web service to get these and parsing the returned xml was a nightmare. The following code uses the managed SharePoint 2013 client object model to either update a single managed metadata value field or a multi-valued metadata field. The method takes a site URL, list name, item ID, the name of the managed metadata field and the label of the term. The caller of the method does not have to know anything about the term or field since the code will do all the work to get the appropriate information.

public static void SetManagedMetaDataField(string siteUrl,
string listName,
string itemID,
string fieldName,
string term)
{

ClientContext clientContext = new ClientContext(siteUrl);
List list = clientContext.Web.Lists.GetByTitle(listName);
FieldCollection fields = list.Fields;
Field field = fields.GetByInternalNameOrTitle(fieldName);

CamlQuery camlQueryForItem = new CamlQuery();
string queryXml = @"


!@itemid


";

camlQueryForItem.ViewXml = queryXml.Replace("!@itemid", itemID);

ListItemCollection listItems = list.GetItems(camlQueryForItem);


clientContext.Load(listItems, items =>; items.Include(i =>; i[fieldName]));
clientContext.Load(fields);
clientContext.Load(field);
clientContext.ExecuteQuery();

TaxonomyField txField = clientContext.CastTo(field);
string termId = GetTermIdForTerm(term, txField.TermSetId, clientContext);

ListItem item = listItems[0];

TaxonomyFieldValueCollection termValues = null;
TaxonomyFieldValue termValue = null;

string termValueString = string.Empty;

if (txField.AllowMultipleValues)
{

termValues = item[fieldName] as TaxonomyFieldValueCollection;
foreach (TaxonomyFieldValue tv in termValues)
{
termValueString += tv.WssId + ";#" + tv.Label + "|" + tv.TermGuid + ";#";
}

termValueString += "-1;#" + term + "|" + termId;
termValues = new TaxonomyFieldValueCollection(clientContext, termValueString, txField);
txField.SetFieldValueByValueCollection(item,termValues);

}
else
{
termValue = new TaxonomyFieldValue();
termValue.Label = term;
termValue.TermGuid = termId;
termValue.WssId = -1;
txField.SetFieldValueByValue(item, termValue);
}

item.Update();
clientContext.Load(item);
clientContext.ExecuteQuery();
}


The code uses the CSOM taxonomy classes TaxonomyFieldValueCollection and TaxonomyFieldValue. These make it easier for setting the different properties that are required for managed metadata values. Also the new TaxonomyField class enables the code to check whether the field accepts multiple values by using the AllowMultipleValues property. Also, these new classes expose methods for updating the field. You no longer set the field value directly on the item. The example above shows how you can append a new term to an existing group of terms. Finally, below is the code for the GetTermIdForTerm method which uses the new CSOM capabilities to search for a term’s unique ID based on a given term label using the new LabelMatchInformation class.


 public static string GetTermIdForTerm(string term,
Guid termSetId, ClientContext clientContext)
{
string termId = string.Empty;

TaxonomySession tSession = TaxonomySession.GetTaxonomySession(clientContext);
TermStore ts = tSession.GetDefaultSiteCollectionTermStore();
TermSet tset = ts.GetTermSet(termSetId);

LabelMatchInformation lmi = new LabelMatchInformation(clientContext);

lmi.Lcid = 1033;
lmi.TrimUnavailable = true;
lmi.TermLabel = term;

TermCollection termMatches = tset.GetTerms(lmi);
clientContext.Load(tSession);
clientContext.Load(ts);
clientContext.Load(tset);
clientContext.Load(termMatches);

clientContext.ExecuteQuery();

if (termMatches != null && termMatches.Count() > 0)
termId = termMatches.First().Id.ToString();

return termId;

}


What about Office 365 and JSOM


Implementing the same CSOM code in JSOM to run in Office 365 proved to be much more complex. For example, the code needs to lookup the term’s GUID before you can update the field.The CSOM is easier since it is synchronous and the calling thread waits until the lookup is completed. However when using JSOM you must make all your calls asynchronously. So in the code below subsequent calls must be made in the success call back functions. This of course makes the code hard to follow. The asynchronous requirement of JSOM also forced me to make the GetTermIdForTerm method asynchronous. In Office 365  to access lists residing in the hosting web you must set up a new SP.AppContextSite object in order to get the host web and list. All the same classes that are available in CSOM are also available in JSOM.  The Taxonomy classes are contained in the SP.Taxonomy.js file and is not loaded by default. So you must make sure this is loaded.


function SetManagedMetaDataField(listName,
itemID,
fieldName,
term) {

appweburl = decodeURIComponent(getQueryStringParameter('SPAppWebUrl'));
hostweburl = decodeURIComponent(getQueryStringParameter('SPHostUrl'));
context = new SP.ClientContext(appweburl);
factory = new SP.ProxyWebRequestExecutorFactory(appweburl);
context.set_webRequestExecutorFactory(factory);
appContextSite = new SP.AppContextSite(context, hostweburl);

var list = appContextSite.get_web().get_lists().getByTitle(listName);
var item = list.getItemById(itemID);
var field = list.get_fields().getByInternalNameOrTitle(fieldName);
var txField = context.castTo(field, SP.Taxonomy.TaxonomyField);


context.load(field);
context.load(txField);
context.load(item);


context.executeQueryAsync(
function () {

var termSetId = txField.get_termSetId().toString();
var termId;

getTermIdForTerm(function success(id) {
termId = id;
var value = item.get_item(fieldName);
var terms = new Array();

if (txField.get_allowMultipleValues()) {

var enumerator = value.getEnumerator();
while (enumerator.moveNext()) {
var tv = enumerator.get_current();
terms.push(tv.get_wssId() + ";#" + tv.get_label() + "|" + tv.get_termGuid());
}

terms.push("-1;#" + term + "|" + termId);
termValueString = terms.join(";#");
termValues = new SP.Taxonomy.TaxonomyFieldValueCollection(context, termValueString, txField);
txField.setFieldValueByValueCollection(item, termValues);
}
else {
var termValue = new SP.Taxonomy.TaxonomyFieldValue();
termValue.set_label(term);
termValue.set_termGuid(termId);
termValue.set_wssId(-1);
txField.setFieldValueByValue(item, termValue);
}

item.update();
context.executeQueryAsync(
function () {
alert('field updated');
}, function (sender, args) {
alert(args.get_message() + '\n' + args.get_stackTrace());
});
}, function (sender, args) {
alert(args.get_message() + '\n' + args.get_stackTrace());
},context, term, termSetId);

}, function error(err) {
alert(err.get_message());
});

}

function getTermIdForTerm(success, error, clientContext, term, termSetId)
{
var termId = "";

var tSession = SP.Taxonomy.TaxonomySession.getTaxonomySession(clientContext);
var ts = tSession.getDefaultSiteCollectionTermStore();
var tset = ts.getTermSet(termSetId);
var lmi = new SP.Taxonomy.LabelMatchInformation(clientContext);

lmi.set_lcid(1033);
lmi.set_trimUnavailable(true);
lmi.set_termLabel(term);

var termMatches = tset.getTerms(lmi);

clientContext.load(tSession);
clientContext.load(ts);
clientContext.load(tset);
clientContext.load(termMatches);

context.executeQueryAsync(
function () {

if (termMatches && termMatches.get_count() > 0)
termId = termMatches.get_item(0).get_id().toString();
success(termId);

}, function (sender, args) {
error(args);
});


}

function getQueryStringParameter(p) {
var params =
document.URL.split("?")[1].split("&");
var strParams = "";
for (var i = 0; i < params.length; i = i + 1) {
var singleParam = params[i].split("=");
if (singleParam[0] == p)
return singleParam[1];
}

}


Managed Metadata and SharePoint 2013


Managed metadata remote API has become a full citizen in SharePoint 2013. The taxonomy web service has been deprecated and replaced with a CSOM and JSOM client API allowing you to standardize on one remote api. Unfortunately, there is no support for manage metadata manipulation in the SharePoint 2013 REST api. So you will be forced to mix in JSOM into your REST applications for managed metadata.

Thursday, May 9, 2013

Understanding and Getting SharePoint 2013 Search Managed Properties to Work

Technorati Tags: ,,

Many things have changed with SharePoint 2010 and SharePoint 2013 search. However, managed properties are still the mainstay of a robust search solution allowing users to fine tune their searches using refiners or property restrictions. SharePoint 2013 has a new focus on content driven search which makes understanding how managed properties work even more important. Unfortunately, the documentation on what crawled properties represent in the search schema has not improved. This leads to confusion and an unnecessary trial and error process to get the search schema to return the correct results.  Crawled properties are the properties generated from crawling the content in SharePoint. These are then mapped to managed properties sometimes automatically and many times by a search administrator. A good link explaining this process is here on TechNet http://technet.microsoft.com/en-us/library/jj613136.aspx. In this post I will explain some of the strange behavior you may encounter when trying to use SharePoint 2013 Search out of the box and ways to fix the behavior.

What happened to my Auto-Generated managed properties?

SharePoint 2010 has the ability to automatically generate managed properties. This is done by editing the crawled property category and selecting the option to auto-generate managed properties when new crawled properties are discovered. The auto-generated managed properties always matched the type of the crawled property. So if a new date time SharePoint column was discovered, then the crawl process would generate a date time managed property. SharePoint 2013 has put a new twist on this. A new managed property is only auto-generated when a new site column is created and used. What I mean by “used” is that a value must be stored in the content database using the new site column. A second twist is that two new crawled properties are created for each site column. One is in the format of ows_q_{Data Type Code}_{Site Column Internal Name} and another in the format of ows_{Site Column Internal Name}. For example if you had a site column named salesdate the two crawled properties generated would look like the picture below:


The auto-generated managed property is named {Site Column Internal Name}+OWS+{Data Type Code}. Some examples of the date type codes are DATE,BOOL, CHCS (CHOICE), and GUID. Unfortunately,the new managed property generated is always a text data type. This is apparently by design for some unknown reason. A problem arises if you want to use the auto-generated property in a property restriction within a query transformation.  For example, if the site column is a date time type and you want to use operators like < or > with the auto-generated text managed property it will produce a syntax error. The auto-generated managed properties are rather useless if they are mapped to non-text crawled properties.

You should avoid using the auto-generated managed property and create your own with the correct data type and map it to the crawled property named just with “ows_”, in this case ows_salesdate.

I am not sure why this auto-generation process is set up and there seems to be no option to turn if off.

Where is my title for my Microsoft Word file?

One of the biggest problems I am hearing about SharePoint 2013 search is that the title managed property for Microsoft Word files shows the first line in the content of the document and not the title that is given to it when it is uploaded to SharePoint. In SharePoint 2010 you could turn this behavior off by setting the enableOptimisticTitleOverride to zero in the HKLM\SOFTWARE\Microsoft\Office Server\14.0\Search\Global\Gathering Manager registry entry. This no longer works in SharePoint 2013. The work around on this is to create a new managed property and map the TermTitle and Title crawled properties. Trying to do this on the out of the box Title managed property has no effect. This behavior is very inconvenient for search administrators. Once again there seems to be no reasoning around this.

What is going on with the ContentType managed property?

Searching on the ContentType managed property in SP2010 did not work since is was not retrievable. In SP2013 the ContentType managed property can be retrieved but using it to search for a contenttype name does not work. The ContentType managed property is mapped to two crawled properties ows_ContentType and Basic:5. SP2013 stores both the contenttype name and the mime type name in this managed property.

The best way to search on the name of a contenttype is to use the new SPContentType managed property. This is mapped only to the ows_ContentType crawled property. You must make sure to mark this managed property as Retrievable in order to display it in the search results.

Why does my PDF file’s last modified date never change?

After uploading and crawling a PDF file the LastModifiedTime managed property value never changes. This  is caused by the managed property storing the value from the actual modified property stored in the document. To fix this problem you must re-order the crawled property mappings of the LastModifiedTime managed property. First start by checking the option to “Include content from the first crawled property that is not empty, based on the specified order”  then  make the ows_Modified crawled property first in the list. Finally do a full crawl. It appears the LastSavedDateTime crawled property represents the last modified property in the document.

Who is creating these documents?

When searching you may want to see who created the document in your search results. Unfortunately, the Author managed property will bring back a string that contains the claims identifier for the user who created the document.


This of course is not very user friendly. I looked at the CreatedBy managed property and this managed property does not return anything. To fix this add ows_created_x0020_by and move the Internal:105 and Internal:3 to the top of the crawled properties mappings and make sure the “Include content from the first crawled property that is not empty, based on the specified order” is checked. Make sure to do a full crawl.

You still need to experiment with the SharePoint 2013 search schema

The documentation on what crawled properties represent in SharePoint search is still missing after all these years. This is unfortunate because it causes so many unnecessary full crawls. How would anyone know what Internal:5 or Basic:105 represent? This prevents search administrators from building an effective search schema. A possible way of documenting these may be to plug into the new Content Enrichment web service and document what some of these unknown crawled properties represent. Sounds like fun. Maybe I will post the results here.

Thursday, April 11, 2013

Fast Deploy Visual Studio Extension for SharePoint 2013 Updated

Technorati Tags: ,,,

Last month I blogged about the new fast deployment Visual Studio extension I created for the SharePoint 2013 app model http://sharepointfieldnotes.blogspot.com/2013/03/making-it-easy-to-develop-and-debug.html. This extension allows you to make changes to a single file in your app model solution. Just right click on the file and have the changes automatically deployed without having to re-deploy the whole application. You won’t lose all your previously loaded list data and you won’t have to add your client app part back to the web part page. Saves a lot of time when developing app model solutions. The last version only supported on-premise SharePoint app model solutions. The newest version here SPFastDeploy now supports SharePoint app model solutions hosted in Office 365. The extension detects that your solution is hosted in O365 and will prompt you to login with your O365 credentials.

It also allows you to stayed logged in so you only have to do this once. The extension is great when developing client only app model solutions or when just making style and content changes. Let me know if improvements can be made using the Q/A section on the Visual Studio Gallery site. Also, if you like it give it a good rating. Hopefully, Microsoft will have something like this in the next update of the Office Developer Tools.

Monday, March 18, 2013

Making it easy to develop and debug SharePoint 2013 hosted apps

Technorati Tags: ,,,

One of the hardest things to do when developing SharePoint 2013 hosted apps is making changes and re-deploying the application. This was difficult also when doing solutions in SP2010. Making small changes and having to re-deploy basically tears down whatever list data or client web parts you have already deployed. This forces you into defining your list data in the elements.xml for your list. The problem is even more acute when developing a client web part. Making a change requires you to re-deploy and add the client web part  to the web part page before you can start debugging. The “Fast Update” capability in VS2012 Office Dev Tools helped this situation a little. This feature allows you to make changes to single files like html, aspx and javascript while debugging and have the changes automatically deployed. So all you have to do is refresh the browser and your changes are there. Unfortunately, this only works when you have done an “F5” deployment and are currently attached. It would be nice to have the ability to make a change to some java script, right click and deploy the change without having to re-deploy the whole application.

Fast Deploy Visual Studio Extension for SharePoint 2013 App Model

To increase my productivity and to keep me from going crazy I decided to create a VS2012 command extension to deploy single files to an existing SharePoint 2013 hosted app. This enables me to make quick changes without having to set everything back up and/or run in debug mode. You can get the extension here SPFastDeploy in the Visual Studio Gallery or just search for it under SharePoint 2013 in Visual Studio from the start page  and “Discover extensions, add-ons, and samples”. After downloading it just click on the VSIX file and it will install itself. You can see it under Tools –> Extensions and Updates

Initially the Fast Deploy extension will show up in the tools menu. You can click on it and it will deploy the file that is in the current code window.


You can make it easier to use the extension by adding it to the project item context menu, so it will be visible when you right click on a file in your solution explorer. Do this by clicking on the VS tool bar drop down menu and selecting “Customize…”. Here select the “Context Menu” option and select the “Project and Solution Context Menus|Item”. Select the “Add Command” button, then select the “Tools” category and find the “Fast deploy to SP App” command and click OK.

Once you have done this you can use the extension from the context menu. Right clicking on any file will execute the code and deploy the file to the appropriate folder in your hosted app. A status message is displayed during and after the deployment.  The code constructs a non-host header URL to the site where your application is hosted. It then uses the client object model to obtain the actual host header URL to the application. The host header URL is required when using the System.Net.WebClient to upload the file.


Productive app development

Visual Studio extensions are a great way to increase your productivity as a developer. The Fast Deploy extension lets me make minor changes and quickly upload them to my application without having to provision another application. This is especially useful if your applications are just using java script, html and css. No longer do I have to add my client web part on every change or provision my test data. This extension can only be used with SharePoint 2013 hosted apps. It could possibly be extended to be used with auto-hosted applications. Ideas are welcome. A codeplex project may be in the future for this.

Wednesday, February 27, 2013

SharePoint 2013 Search with REST, App Model and JQuery (Part Two)

Technorati Tags: ,,,

In part one of this series I mashed together a SharePoint on-premises app model search application using REST and JQuery. It gave you the ability to choose which managed properties to display from a list of default managed properties, and displayed the results in the DataTables JQuery plug-in. Searching was done using the SP2013 search REST api. The mash up was completely client side. In this post I take what I learned and create a search client app part. The full project code is here. A client app part is the app model's version of the standard SharePoint web part with restrictions. One of the restrictions is that it runs in it's own IFrame. I remember when IFrames were considered security risks in web applications, in the case of the app model it seems to be only way Microsoft could implement a sandbox within a web page. One of the benefits of client app parts is that they are more reusable and configurable versus an immersive application. Client app parts can be added to a web part page and configured just like a standard web part. 

Client app parts limited configuration

When I converted the search application I was looking forward to being able to provide users the ability to choose which managed properties they wanted to display in the tool pane of the client app part. This would have used a multiple choice list box. I was sadly disappointed to find out that the client app part framework limits you to what you can use for app part configuration. Configuration of a client app part is done through the elements.xml definition. You add property elements and set attributes like the name, type, defaultvalue and webdisplayname. You then need to modify the Content element’s Src attribute to include these property names as query string variables. These configuration settings are then passed from SharePoint to your app via the query string. Unfortunately, the type attribute of the property element is limited to string, int, bool and enum. These translate to text box, text box, check box and drop down list controls in your client app part’s tool pane. That is all you get.  Being able to define a richer configuration experience which you can do with on-premises web parts is not present. I hope Microsoft will provide a more robust client app part framework in future versions of SP2013 giving developers more choices via the type attribute.


The search client app part provides users the ability to set various search parameters using the tool pane. For example, a user can type in a comma delimited list of managed properties they want displayed, they will be displayed in the order they are listed.  Also, they can set the default query, row limit, trim duplicates, bypass query rules, enable stemming, set the ranking model id (GUID) and result source id (GUID). Being able to set the result source is essential since these are the replacements of SharePoint 2010 scopes. Once again I am disappointed because Microsoft has decided not to provide any ability to obtain result source information through any of the remote API’s. So users are required to know the GUID of a result source, which is ironic because SharePoint does not surface this anywhere in the administration UI.

Mashing it all up

The code in the project is completely javascript and jquery. It uses the Datatables plug-in to display, sort and page the results. I used felix gnass’s  spinjs plug-in for displaying a processing indicator when searching, this is on github. I tried using the colReorder plug-in to reorder columns dynamically but unfortunately it does not render properly when dragging the column headers because the app part runs in an IFrame. I fear many jquery plug-ins may have problems with IFrames. All the searching and displaying code is in Search.js. The buildSearchUrl function reads the query string parameters sent in from the web part’s configuration and sets up the REST call to search.

function buildSearchUrl(){

var qSelectProps = decodeURIComponent(getQueryStringParameter("qProps"));
var qRowLimit = parseInt(getQueryStringParameter("qRowLimit"));
var qDups = decodeURIComponent(getQueryStringParameter("qDups"));
var qRules = decodeURIComponent(getQueryStringParameter("qRules"));
var qModel = decodeURIComponent(getQueryStringParameter("qModel"));
var qSource = decodeURIComponent(getQueryStringParameter("qSource"));

var searchRestSource = decodeURIComponent(getQueryStringParameter("SPAppWebUrl"))
+ "/_api/search/query?querytext='"
+ $('#searchText').val() + "'"
+ "&selectproperties='" + qSelectProps + "'"
+ "&rowlimit=" + qRowLimit
+ "&trimduplicates=" + qDups.toLowerCase()
+ "&enablequeryrules=" + qRules.toLowerCase()

if (qModel.length > 0)
searchRestSource = searchRestSource + "&rankingmodelid='" + qModel + "'";
if (qSource.length > 0)
searchRestSource = searchRestSource + "&sourceid='" + qSource + "'";

return searchRestSource;

}


The convertResults method reads the returned data for the properties requested in the app part’s configuration into another array.


function convertResults(data) {

var queryResults = data.d.query.PrimaryQueryResult.RelevantResults.Table.Rows.results;
var tempResults = [];
var key;
var displayProps = decodeURIComponent(getQueryStringParameter("qProps")).split(",");
var keyIndex;
var resultIndexes = [];

for (var i = 0; i < queryResults[0].Cells.results.length; i++) {
key = queryResults[0].Cells.results[i].Key;
keyIndex = displayProps.indexOf(key);

if (keyIndex > -1) {
resultIndexes.push(i);
}
}


for (var h = 0; h < queryResults.length; h++) {
var cellValues = [];

for (var i = 0; i < resultIndexes.length; i++) {
cellValues.push(queryResults[h].Cells.results[resultIndexes[i]].Value);
}

tempResults.push(cellValues);
}

results = tempResults;

}


The buildColumnDefs function builds the column definitions for the Datatable plug-in. Here you set whether the column is visible and searchable. I also use it to add a function for custom rendering of the data based on some rules. For example, since dates are returned in ISO-8601 format you must format them into something user friendly. Another example is setting up a link to the result document that displays the document’s corresponding icon similar to a document library. I basically converted the docicon.xml into a getDocIcon function to lookup the icon for the file extension. The code then creates an anchor to launch the KnowledgeLake Imaging Viewer in another window. If the managed property is a user’s profile picture the code creates an img element.


function buildColumnDefs() {
colDefs = [];
var colName;
var bDisplayCol = false;
var bSearchCol = false;

var displayProps = decodeURIComponent(getQueryStringParameter("qProps")).split(",");

for (var h = 0; h < displayProps.length; h++) {
colName = displayProps[h];

//rules for column definitions

switch (colName) {

case ("LastModifiedTime"):
colDefs.push({"sTitle": colName,
"bVisible": true, "bSearchable": true,
"aTargets": [h], "fnRender": function (o,val) {
var sDate = val.substring(0, val.indexOf(".")) + ".000Z";
var renderDate = new Date(sDate);
return renderDate.toDateString();
}
});
break;

case ("Path"):
colDefs.push({
"sTitle": "", "bSortable": false,
"bVisible": true, "bSearchable": true,
"aTargets": [h], "fnRender": function (o, val) {
var docIcon = "../_layouts/15/images/" + getDocIcon(val.substr((val.lastIndexOf('.') + 1)));
var link = "";
return link;
}
});
break;

case ("PictureURL"):
colDefs.push({
"sTitle": "", "bSortable": false,
"bVisible": true, "bSearchable": true,
"aTargets": [h], "fnRender": function (o, val) {
var link = "";
return link;
}
});
break;

default:
colDefs.push({"sTitle": colName,
"bVisible": true, "bSearchable": true,
"aTargets": [h]
});

}

}

}


Finally the doSearch method puts all the calls together.


function doSearch() {
var searchRestSource = buildSearchUrl();

var target = document.getElementById("searchResultsContainer");
var spinner = new Spinner().spin(target);
try
{
$.ajax(
{
url: searchRestSource,
method: "GET",
headers: {
"accept": "application/json; odata=verbose",
},
success: function (data) {
if (data.d.query.PrimaryQueryResult.RelevantResults.RowCount > 0) {
convertResults(data);
buildColumnDefs();

var oTable = $('#searchResults').dataTable({
"bDestroy": true,
"aoColumnDefs": colDefs,
"bStateSave": false,
"bPaginate": true,
"sPaginationType":"full_numbers",
"bLengthChange": false,
"bFilter": false,
"bSort": true,
"bInfo": true,
"bAutoWidth": false,
"aaData": results,
"aoColumns": null
});

}
else {
$('#searchResults').dataTable().fnClearTable();
}

spinner.stop();

},
error: function (err) {
spinner.stop();
alert(JSON.stringify(err));
},
}
);
}
catch(err)
{
spinner.stop();
}

}


The final results is a search client web part that be configured using the standard web part configuration framework. All  this with client side only code. In the example below the client app part is configured to display the path, title, author, lastmodifiedtime for the default result source, which is documents.


In this example I display the PictureURL, AccountName and AboutMe managed properties and set the result source id to the People results.


Microsoft’s client web part app model needs more work


It was easy mashing together a client web part, however, trying to deliver a more advanced search solution using this framework proved challenging. The number one problem is the inability to provide a more immersive configuration for the web part. The framework (elements.xml schema) lacks capabilities to create richer types of controls, grouping of controls, and  tool pane events. Secondly, the inability of the IE developer tools to step through the javascript running in the IFrame was painful. Having to redeploy, trust the app, edit the web part page, and add the client web part every time a change was made was excruciating. Maybe I am not doing something right but this does not seem productive. So the challenge is to fill in the gaps which translates into opportunity. So in upcoming posts I will attempt to give you some ideas on how to create a better configuration experience, save and reuse queries, and a good Visual Studio 2012 extension to eliminate the need to redeploy your app every time there is a change.

Tuesday, January 8, 2013

SharePoint 2013 Search with REST, App Model and JQuery (Part One)

Technorati Tags: ,,,

During the holiday break I became restless and decided to do a mash up with the SharePoint 2013 app model. I put together a simple on premises application using SharePoint 2013 search called Basic Search. I was intrigued by the simplicity of the SharePoint 2013 REST API and also am a fan of the JQuery plug-in called DataTables.  What I came up with was a practical search that can display search results in a JQuery DataTable grid using very little code. In this post I will show you the simplicity of the REST search API and the incredible amount of flexibility using the DataTable JQuery plug-in. I will also show you a simple way of getting a default list of managed properties so the user can select which managed properties to display in the results. You can also download the sample project here. Code


The Beginning

My first step was to create a SharePoint 2013 on premises application project. I am not going into the details about this since there has already been a lot written about it. Some great links I used for this are below:

Introducing SharePoint Apps

Using the Search REST API from the SharePoint App Model

Planning the Infrastructure for the new SharePoint 2013 App Model

Please note you must add the the “Search QueryAsUserIgnorAppPrincipal” permission to the application manifest in order to retrieve search results.


Using the SharePoint Search REST API

I started my mashing by stepping. My first step was to create a text box to type in a search and a button to submit the search using the REST API. Of course there is a lot of documentation on the URL syntax to use when submitting the search.  I decided to use JQuery for all the code so I made sure the default.aspx included a link to the JQuery libraries. When creating the application through VS 2012 the JQuery libraries for version 1.6 are included by default. I recommend you link to the latest and include them in the scripts folder of your project. Below is the code which uses JQuery to request a search using the $ajax command.

function doSearch() {
var searchRestSource = _spPageContextInfo.webAbsoluteUrl + "/_api/search/query?querytext='"
+ $get('searchText').value + "'"
+ "&rowlimit=500";

$.ajax(
{
url: searchRestSource,
method: "GET",
headers: {
"accept": "application/json; odata=verbose",
},
success: function (data) {
if (data.d.query.PrimaryQueryResult.RelevantResults.RowCount > 0)
{

}
else
{

}

},
error: function (err) {
alert(JSON.stringify(err));
},
}
);

}


The best way to test this initial code was to use the developer tools that are furnished with Internet Explorer. Using IE9 just press the F12 button and navigate to the Scripts tab then select the app.js file from the drop down. You can now set a break point and click the “Start Debugging” button. I set a break point in the success function and examined the results. When examining the data variable the developer tools give the same ability to view live objects as if you are debugging in VS 20102. I was able to determine where the relevant results were located so I could display them. When using the REST API you code needs to be able to concatenate URL requests. Your best friend in this case is to use the always available _spPageContextInfo object and the webAbsoluteUrl property. The code concatenates the search term to the querytext variable and sets the returned rowlimit variable to 500. The search REST API has many variables that you can set and I recommend you use the POST method rather the GET to overcome the 4K query string limitation. You can read more about the api from these SharePoint 2013 Search REST API Programming the SharePoint 2013 REST API


Displaying Results


Displaying search results and making them useful to users has always been difficult. It was difficult in SharePoint 2010 using XSLT and basic things like sorting on any return value just did not exist. In SharePoint 2013 result customization has greatly improved with the use of the new Query Rules and Display Templates. Unfortunately these are limited to the out of the box SharePoint search web parts. I needed something I could deploy to the app model that would run on premise or anywhere. The JQuery DataTable grid plug-in proved to be ideal for this. It is free and has many useful features such as sorting, styling, scrolling, paging and supports themes.


The grid comes with built in features like selecting how many rows you wish to display, column sorting, paging and paging information. The API for this plug-in is versatile and supports JQueryUI themes, multi-column sorting, filtering, grouping, custom headers and footers. For more information see this link DataTables JQuery Plug-in


Below is the doSearch method that incorporates the loading of the DataTable grid with search results.


function doSearch() {
var searchRestSource = _spPageContextInfo.webAbsoluteUrl + "/_api/search/query?querytext='"
+ $get('searchText').value + "'"
+ "&rowlimit=500";

$.ajax(
{
url: searchRestSource,
method: "GET",
headers: {
"accept": "application/json; odata=verbose",
},
success: function (data) {
if (data.d.query.PrimaryQueryResult.RelevantResults.RowCount > 0)
{
convertResults(data);

var oTable = $('#searchResults').dataTable({
"bDestroy": true,
"bStateSave":false,
"bPaginate": true,
"bLengthChange": true,
"bFilter": false,
"bSort": true,
"bInfo": true,
"bAutoWidth": false,
"aaData": results
});

}
else
{
$('#searchResults').dataTable().fnClearTable();
}

},
error: function (err) {
alert(JSON.stringify(err));
},
}
);

}


You should have a table element already defined with an id of “searchResults”. The code uses the DataTable JQuery plug-in attaching a datatable to the table and passing in arguments. Many of the arguments are enabling features. You can look these up in the DataTables site. The aaData argument contains an array of string arrays containing values which represent the values from  each row of the search results. This array is built from the results in the convertResults method.


function convertResults(data) {

var queryResults = data.d.query.PrimaryQueryResult.RelevantResults.Table.Rows.results;
var tempResults = [];
var cellValues = [];
var tempColumns = [];

for (var i = 0; i < queryResults.length; i++)
{
cellValues = [];

for (var h = 0; h < queryResults[i].Cells.results.length; h++)
{
cellValues.push(queryResults[i].Cells.results[h].Value);
}

tempResults.push(cellValues);
}

results = tempResults;

}


This is very simple looping of the result rows and cells that populates arrays. The DataTable plug-in supports custom formatting of result values such as dates and hyperlinks.  So now I have an SharePoint app model application that allows me to type in a search term and return all the results. The results can be sorted and paged.


Dynamic Results


The next step was to allow users to select which managed properties to display the results. Usually this is a simple task using the SharePoint server side object model. The SharePoint 2013 client side libraries for Search are supposed to be equivalent with the server side object model. Unfortunately, this is not true. The list of Managed Properties is not available in the CSOM, JSOM or REST. They are still available in the deprecated Search.asmx web service through the GetSearchMetadata method. However, you cannot call this web service from the app model. I decided to construct an initial search when the application loads and set the row limit to one. The search term I use is “Microsoft” which you can almost guarantee will find something. The returned search results always returns approximately 41 default managed property values. I used these to populate a list box and an array that the user can choose from to display. This was better than nothing.


In order to customize which managed properties to display in the DataTable you must pass in an array of objects in the aoColumnDefs argument, and an array of the available managed properties in the aoColumns argument. The code basically loops through the available managed properties and checks to see if the managed property chosen exists. If it exists then it is added to the column definitions setting the bVisible property to true, else it is set to false and the bSearchable property is set to false preventing the column from being used in filtering.


function doSearch() {
var searchRestSource = _spPageContextInfo.webAbsoluteUrl + "/_api/search/query?querytext='"
+ $get('searchText').value + "'"
+ "&rowlimit=500";

$.ajax(
{
url: searchRestSource,
method: "GET",
headers: {
"accept": "application/json; odata=verbose",
},
success: function (data) {
if (data.d.query.PrimaryQueryResult.RelevantResults.RowCount > 0)
{
convertResults(data);
var displayColumns = getDisplayManagedProperties();
var columnDefs = [];

for (var h = 0; h < resultColumns.length; h++) {
var columns = $.grep(displayColumns, function (e) {
return e == resultColumns[h].sTitle;
});

if (columns.length > 0)
columnDefs.push({ "bVisible": true, "aTargets": [h] });
else
columnDefs.push({ "bSearchable": false, "bVisible": false, "aTargets": [h] });

}

var oTable = $('#searchResults').dataTable({
"bDestroy": true,
"aoColumnDefs": columnDefs,
"bStateSave":false,
"bPaginate": true,
"bLengthChange": true,
"bFilter": false,
"bSort": true,
"bInfo": true,
"bAutoWidth": false,
"aaData": results,
"aoColumns": resultColumns
});

}
else
{
$('#searchResults').dataTable().fnClearTable();
}

},
error: function (err) {
alert(JSON.stringify(err));
},
}
);

}


More Mashing to Come


In this post I showed how easy it is to put together a useful SharePoint 2013 app model application that only uses client side code only. SharePoint Search REST is a URL based API that is easy to integrate into your JQuery code. The DataTable plug-in is free and offers a rich and capable tool for offering users actionable search results. In the next post I hope to make this application an “AppPart” web part. Moving the option to display managed properties, scrolling, display items and formatting of paging to the tool pane. This may well contain options to theme the AppPart using JQuery UI ThemeRoller.