Monday, August 16, 2010

KnowledgeLake Imaging for SharePoint 2010 (Search Part One – Building your search)

Technorati Tags: ,,,

I promised a few weeks ago to write about the SharePoint 2010 product that my team and I have been working on for the past five months. We have just released our “KnowledgeLake Imaging for SharePoint 2010” product last week. This product encompasses features a company needs to implement a quality document imaging system within SharePoint 2010 and compliments our other SharePoint 2010 ready products for capturing documents. KnowledgeLake Imaging has the following features that all run within the context of SharePoint.

  • Search (Search Center and Web Parts)
  • Viewer (Viewer for Tiff, PDF, Graphic files, Microsoft Office files and email messages)
  • Indexing (Enhanced ability to add metadata to documents, including codeless solution to add external data including Oracle or any OLEDB compliant data source)
  • Scanning (Scan documents into SharePoint from SharePoint)
  • Central Administration Integration (Fully deployable SharePoint solution, ULS Log viewer, and Service Applications)

I had a great team of talented SharePoint developers working on this project. A big thanks to Steve Danner, Shawn Cosby, Chris Starkey, and Ralph Boester. All these guys came up with significant innovations for the product.

Since KnowledgeLake Imaging has so much to offer, I will be posting about the features in a multi-part series. In this post I am going to talk about our new Search feature. Searching is a very important piece of a document imaging system. Being able to easily find business documents is a high priority for any company. KnowledgeLake provides a great set of applications for indexing and processing your document images and our search product takes advantage of the metadata attached to these documents.

Our search product is built on Silverlight 4 so we could substantially enhance the user experience when searching for documents in SharePoint. The search product has two components. The first is the Search Center which is similar in concept to SharePoint’s Search Center and a set of web parts also similar to SharePoint’s advanced search web parts. The similarity between the two is restricted to the deployment method only. The KnowledgeLake Search Center is a site template and be created just like any other SharePoint site template.

After creating a new KnowledgeLake Search Center you can navigate to it. Here you are presented with the following page.

This is not your ordinary SharePoint enterprise search center. First of all you have two components on the same page, the search builder and the search results. The search builder allows the user to easily build ad hoc queries, using both keywords and metadata (SharePoint Managed Properties). The builder makes constructing queries very easy compared to the OOB search center. You are able to select from any of the available managed properties to query against. Secondly, you can select which managed properties you want to display in your results. Finally, you can limit the scope of your search down to a single document library if needed.

Lets look at the features of the search builder

  Adding properties to search with

In order to add a managed property to use in a search just click the button in the “Search Properties” panel header. Select a managed property to use from the drop down list. The other drop down list is for choosing which operator you want to use. Depending on the data type of the managed property you choose, the operators to choose from will be different. For instance, if you choose a text managed property you are presented with “=”, “Contains”, “Starts With”, “Like”, and “Is not null”. If a date managed property is chosen, then all the standard operators like “<” and “>=” are presented along with “Range”. Choosing the “Range” operator gives you the ability to specify the start and end of that range. Of course a date picker control is available to make it easy to enter your dates. If an additional property is added then a group of radio buttons are presented to allow you to choose whether to “or” or “and” the property conditions together. Properties can easily be removed by clicking on the red X button.


Adding properties to return in your search results

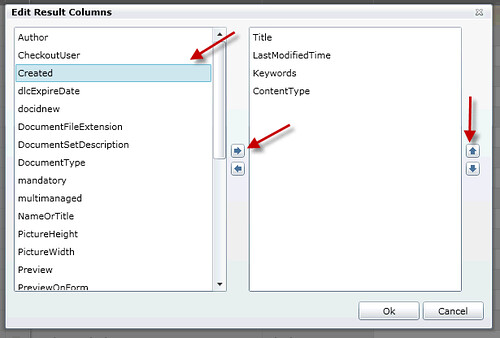
One of the most frustrating issues with SharePoint’s OOB advanced search results web part is the difficulty for end users to add managed properties to return in their search results. This involves editing the web part and adding xml to the “Fetched Properties” via the “XSL Editor” . There is nothing intuitive about this from an end user’s perspective. KnowledgeLake Search allows you to to click on a button in the “Result Columns” panel header and drag and drop any managed property you wish to see in your results. You can even adjust the position the column will be in the returned grid.
 

Limiting the scope of your search

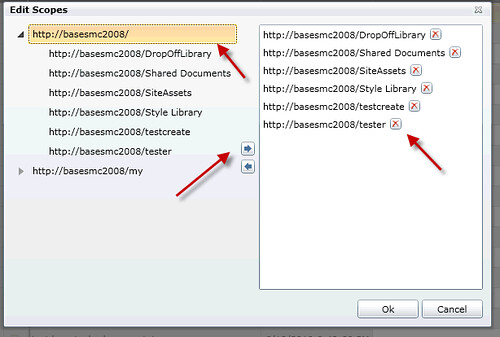
There are times when you want to limit your search to particular areas of SharePoint. The search builder allows you to limit your search by any combination of site collection, site or document library. Click on the button in the “Scopes” panel header. You can then drag and drop a whole site collection on expand the site collection node and choose a sub site or a document library. You can remove the site or library dragging it back, using the arrow button or clicking the X close button.
 

Just click on the search button to execute your search

Other search builder features

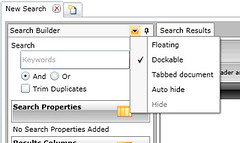
One of the greatest UI features of the search builder is the ability to drag the builder and dock it within the search tab workspace. This can give you the maximum amount of space to view and work with the results along with your search criteria. In the screen shot below you can also see that the search builder has a context menu allowing you to set other UI behaviors:

  • Floating (Allows the builder to float within the search workspace)
  • Dockable (Allows the builder to be docked with visual cues similar to Microsoft Visual Studio)
  • Tabbed Document (Creates a “Search Builder” tab adjacent to “Search Results”)
  • Auto Hide (The search builder will automatically hide as it loses focus, and creates a tab on the left side of the workspace)

Another great feature is the tabbed workspace paradigm. I have always wanted to have multiple searches open at the same time. Unfortunately, SharePoint’s OOB search makes this difficult, basically having to open up multiple search centers in multiple browser tabs. With the KnowledgeLake Search Center you can easily create another tabbed workspace by clicking on the new tab.

You can have as many tabs (Searches) as you want.

KnowledgeLake Search Center was designed to make it easy for user’s to work with documents, by allowing them to easily define criteria and find the documents they are interested in. In the next post I will show you the innovations we have added to search results. The new innovations make KnowledgeLake Search Center into a document work center, a place where users can group, analyze, view and edit there documents. I will also show you how searches can be saved, reused and have security applied to them.

Sunday, August 8, 2010

Making your SharePoint 2010 applications ECM aware (Part Four – Records Management)

This is the final installment in my “Making your SharePoint 2010 applications ECM aware” series and it deals with SP2010 Records Management. In this posting I will show you how you can make your server based solutions interact with the built in records management features now available in SP2010. I will do this by showing you the code you need to implement and the SharePoint object model to use.

Records management is a required feature in any ECM system. SP2010 has enhanced SP2007 capabilities by allowing users to declare documents as records at any time, also known as “In place” records management. So why let users manually declare records instead of just relying on SharePoint’s “Document Center”? One reason, is that many companies may have documents outside of the “Document Center” and want to place a restriction or an information policy on a document based on a user review process. As documents are scanned into different document libraries, users (Record managers, lawyers, compliance officers) can not only apply metadata, but also review the document for sensitive information.  The user can then make the decision to declare or even un-declare a document as a record. This feature adds a lot of flexibility to your records review process.

Determine if users can manually declare records

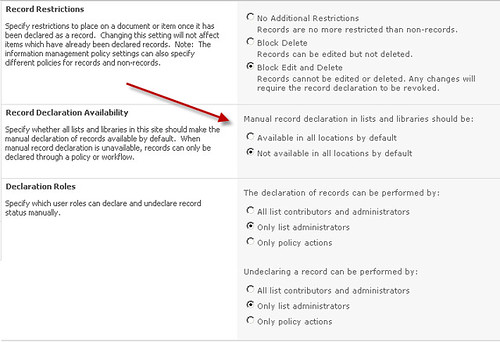
When creating SharePoint records management solutions, one of the most difficult tasks will be programmatically determining if manual record declaration is enabled for a file or a list. You can allow manual records declaration at the site collection level under the “Record declaration settings”.  In the “Record Declaration Availability” section you can select an option to make record declaration available.  This affects what is the site default that is displayed in the document library record declaration settings. In the “Declaration Roles” section where you set what user roles can declare records, you can set “Only policy actions” then manual declarations are not allowed. Selecting the other two roles allows manual declaration.


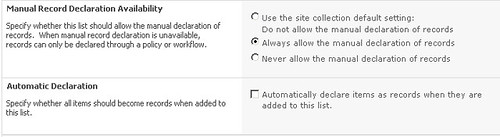
An administrator can override the site records declaration settings by setting a document library’s record declaration settings shown below.

In order to determine if manual records declaration is available for a file or a list you must find where the above settings are stored. These settings are stored in the SPWeb.Properties and the SPList.RootFolder.Properties collections. The code below shows a method that reads the appropriate properties and makes the determination. All the code listed in this posting requires a reference to the Microsoft. Office.Policy assembly located in the GAC or in the ISAPI folder of the 14 hive.

public static bool IsManualDeclarationEnabled(SPList list)
{
    bool isFeatureActive = Records.IsInPlaceRecordsEnabled(list.ParentWeb.Site);

    bool enabledInSite =
        list.ParentWeb.Properties.ContainsKey("ecm_SiteRecordDeclarationDefault")
        && list.ParentWeb.Properties["ecm_SiteRecordDeclarationDefault"].ToString()
        .Equals(bool.TrueString, StringComparison.OrdinalIgnoreCase);

    bool useListSpecific =
        list.RootFolder.Properties.ContainsKey("ecm_IPRListUseListSpecific")
        && list.RootFolder.Properties["ecm_IPRListUseListSpecific"].ToString()
        .Equals(bool.TrueString, StringComparison.OrdinalIgnoreCase);

    bool enabledInList =
        list.RootFolder.Properties.ContainsKey("ecm_AllowManualDeclaration")
        && list.RootFolder.Properties["ecm_AllowManualDeclaration"].ToString()
        .Equals(bool.TrueString, StringComparison.OrdinalIgnoreCase);

    if (isFeatureActive)
    {
        if (!useListSpecific && enabledInSite) return true;
        if (useListSpecific && enabledInList) return true;
    }

    return false;
}

Now that we can determine if manual record declaration is available we must also check to see if the user falls within a role that allows it. In the image above for the site collection settings you can allow only list administrators, contributors and list administrators, or only policy actions. Manual record declaration can only be done by either a list administrator or a list contributor. The code below shows how to determine this.

public static bool CanDeclareRecord(SPFile file)
{
    bool declare = false;

    RecordDeclarationPermissions perms =
        Records.GetDeclareByPermissionsForSite(file.Web.Site);

    if (perms == RecordDeclarationPermissions.AllListContributors)
    {
        declare =
            file.Item.ParentList.DoesUserHavePermissions(SPBasePermissions.EditListItems);
    }
    else
        declare = ((perms == RecordDeclarationPermissions.OnlyAdmins)
            && file.Item.ParentList.
            DoesUserHavePermissions(SPBasePermissions.EmptyMask
            | SPBasePermissions.ManageLists));

    return declare;

}

public static bool CanUnDeclareRecord(SPFile file)
{
    bool undeclare = false;

    RecordDeclarationPermissions perms =
        Records.GetUndeclareByPermissionsForSite(file.Web.Site);

    if (perms == RecordDeclarationPermissions.AllListContributors)
    {
        undeclare =
            file.Item.ParentList.DoesUserHavePermissions(SPBasePermissions.EditListItems);
    }
    else
        undeclare = ((perms == RecordDeclarationPermissions.OnlyAdmins)
            && file.Item.ParentList.
            DoesUserHavePermissions(SPBasePermissions.EmptyMask
            | SPBasePermissions.ManageLists));

    return undeclare;

}

Declaring a file as a record

So now that we know the user can declare a file as a record, lets look at how to actually declare it. It is one line of code using the static DelcareItemAsRecord method of the Records class. This method takes a SPListItem as an argument. However, many times I work with url’s and SPFiles. So the code below shows how to use these as arguments.

public static void DeclareFileAsRecord(string url)
{

    using (SPSite site = new SPSite(url))
    {
        using (SPWeb web = site.OpenWeb())
        {
            SPFile file = web.GetFile(url);

            if (file.Exists)
            {
                DeclareFileAsRecord(file);
            }
            else
            {
                throw new Exception("File does not exist");
            }
        }

    }

}

public static void DeclareFileAsRecord(SPFile file)
{

    Records.DeclareItemAsRecord(file.Item);

}

If you want to un-declare a file as a record then just call the Records.UndeclareItemAsRecord static method.

Determining if a file is a record

Another piece of information your solution will need is if a file has been declared a record. Your solution needs to know this so it can take appropriate action. For example, you may not want to allow users to edit or delete the document. Once again it is a call to a static method on the Records class.

public static bool IsFileRecord(string url)
{
    bool record = false;

    using (SPSite site = new SPSite(url))
    {
        using (SPWeb web = site.OpenWeb())
        {
            SPFile file = web.GetFile(url);
            record = Records.IsRecord(file.Item);
        }
    }

    return record;

}

public static bool IsFileRecord(SPFile file)
{
    bool record = false;

    record = Records.IsRecord(file.Item);

    return record;

}

Determining record restrictions

Remember you could apply restrictions to a record in the Site Collection “Records Declaration Settings” page.

Here you can block a record from being deleted, or edited and deleted. Your solution may want to check this regardless of whether a user can manually declare a file as a record. You can use the Records class and some more static methods. The IsLocked method determines if a file cannot be edited or has been put on hold. The IsDeleteBlocked method checks to see if the file can be deleted. You should check if the file is locked first, and if it is not then check if it can be deleted.

public static bool IsFileLocked(string url)
{
    bool locked = false;

    using (SPSite site = new SPSite(url))
    {
        using (SPWeb web = site.OpenWeb())
        {
            SPFile file = web.GetFile(url);
            locked = Records.IsLocked(file.Item);
        }
    }

    return locked;

}

public static bool IsFileLocked(SPFile file)
{

    return Records.IsLocked(file.Item);

}

public static bool IsDeleteBlocked(string url)
{
    bool locked = false;

    using (SPSite site = new SPSite(url))
    {
        using (SPWeb web = site.OpenWeb())
        {
            SPFile file = web.GetFile(url);
            locked = Records.IsDeleteBlocked(file.Item);
        }
    }

    return locked;

}

public static bool IsDeleteBlocked(SPFile file)
{
    return Records.IsDeleteBlocked(file.Item);
}


Is your SharePoint application ECM aware?

I hope the above code helps make your solutions active participants in SP2010 ECM features. One limitation is that your solution must reside on the SharePoint server. This code can easily be wrapped into a custom web service where your remote solution could utilize it. However, as we all know, this makes for more difficult installations, and some corporate environments do not allow custom web services. Unfortunately, Microsoft did not expose any of this functionality in the client object model per se. But as I have demonstrated previously with document sets where there is a will there is a way. If you would like to see another posting about how to accomplish records management with the client object model, then leave a comment to this post and I will research how difficult it may be.

This series of postings has shown how to add value to your applications by integrating with the new ECM features within SP2010, including the content organizer and document sets. If your applications are not leveraging these features, then of course users will look else where for better solutions.