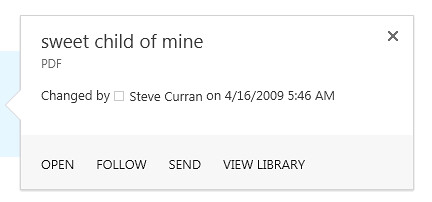
One of the great features in SharePoint 2013 search is the ability to customize your search results with the new display templates feature. Display templates are a combination of html and generated javascript which enable the customization of what appears for items in search results. SharePoint 2010 required developers to use xslt to customize results making this task less than easy, but with the new display templates developers are only limited by what html and javascript they write. This post is about the ability to customize the new hover panel in search results using built in features of KnowledgeLake Imaging (SP2013). The hover panel was introduce to give users the ability to preview office files and to take action on results such as opening, viewing or following results. The hover panel is a very powerful and useful feature. Below is an example of the standard out the box SharePoint 2013 hover panel when highlighting a PDF. Search thumbnail previews are provided by SharePoint 2013 for Microsoft Office files if you have the Office Web Apps server deployed and SharePoint is configured to use it. The Office Web Apps server also provides for displaying and editing the document within the browser if you have the appropriate license.

I am going to show how to create a customized search hover panel that can provide a thumbnail preview of almost any type of document and also include a link action to view the document in KnowledgeLake Imaging’s viewer. You can download the item and item hover panel display templates here Display Templates. Below is an example of a preview for a PDF document.

Step One: Download a copy of a display template
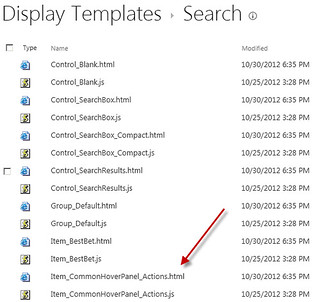
Navigate to Site Settings –> Master Page Gallery –> Display Templates –> Search. Here you will find a list of associated HTML and javascript files. Please note that if the “SharePoint Server Publishing Infrastructure” feature is not activated for the site collection then you will not see the HTML files. Download the Item_PDF.html and Item_PDF_HoverPanel.html. Rename these to Item_KLView.html and Item_KLView_HoverPanel.html.

Step Two: Modify the item template
Open the Item_KLView_.html in Visual Studio 2012 and make the following changes.

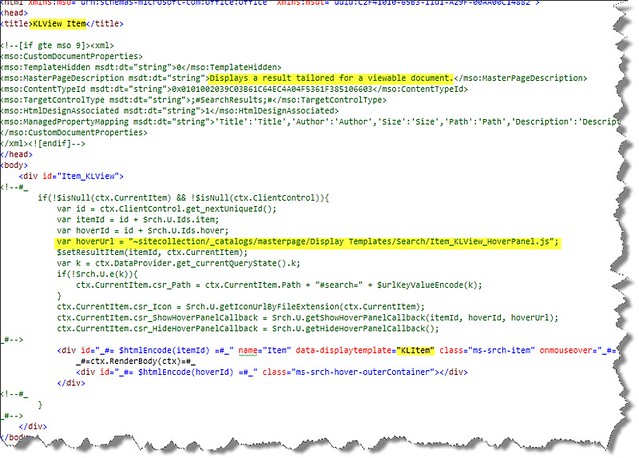
Change the Title element to KLView Item. Add a new description. Finally change the hoverUrl variable to point the new Item_KLView_HoverPanel.js that will be generated when you upload the new html templates.
Step Three: Modify the hover panel template
Open the Item_KlView_HoverPanel.html and make the following changes.

The first modification will be adding the logic to determine the file extension of the currently viewed search result item. The hover panel will support the previewing of (pdf,tif,tiff,msg,txt,png,gif, jpg,xml,ppt,pptx,doc,docx,xls,xlsx) files. Second, add the getUniqueId function to generate a unique id. This will be appended to the URL to get the thumbnail image making sure it is an updated image every time, otherwise the browser will cache the thumbnail. Next you will add a condition to check the file extension, and then code to construct a URL pointing to KnowledgeLake Imaging’s filetransfer.ashx handler which will create the thumbnail. The handler takes a query string parameter that points to the URL of the document in SharePoint, width, height and the unique Id to keep the thumbnail fresh.
The final modification is checking the file extension and then adding a link labeled “View” that points to KnowledgeLake Imaging’s Viewer URL with a query string parameter of the URL to the document in SharePoint.
Step Four: Upload the new display templates
After saving your changes navigate back to the Search display templates folder in the Master Page Gallery and upload the new display templates. Associated javascript files are re-generated for each of the templates. Now you can start using these in your search results.
Step Five: Integrate the new hover panel in search results
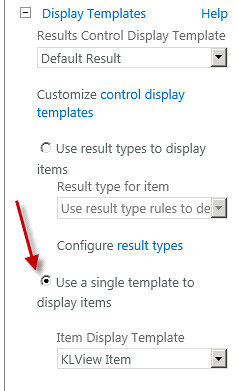
Modify a Search Results web part to use the new hover panel. You can set the web part to use the new Item_KLView display template for all results by selecting “Use single template to display items” and selecting it from the dropdown list. Save the configuration and your ready to use the new hover panel. Do a search and move your cursor over one of the file types supported and you will see the thumbnail display with a “View” action. KnowledgeLake Imaging provides the ability to cache thumbnail previews so the display of the preview should be immediate. You could also use the “Use result types to display items” option. This would require you to modify the item display template of each result type to point to the Item_KLView_HoverPanel.js Url as I described in step two.

Simple and effective search enhancement
Display templates are a powerful way to enhance a user’s search experience. Adding KnowledgeLake Imaging’s ability to render multiple types of documents makes it easy to display thumbnail previews and viewing to the majority of your documents in SharePoint. There are many more ideas we have about enhancing the built in features of SharePoint 2013 with KnowledgeLake Imaging. I am hoping to blog about the details soon.