Wednesday, November 28, 2012

Customizing SharePoint 2013 Search Display Templates with KnowledgeLake Imaging

Technorati Tags: ,,

One of the great features in SharePoint 2013 search is the ability to customize your search results with the new display templates feature. Display templates are a combination of html and generated javascript which enable the customization of what appears for items in search results. SharePoint 2010 required developers to use xslt to customize results making this task less than easy, but with the new display templates  developers are only limited by what html and javascript they write. This post is  about the ability to customize the new hover panel in search results using built in features of KnowledgeLake Imaging (SP2013).  The hover panel was introduce to give users the ability to preview office files and to take action on results such as opening, viewing or following results. The hover panel is a very powerful and useful feature. Below is an example of the standard out the box SharePoint 2013 hover panel when highlighting a PDF. Search thumbnail previews are provided by SharePoint 2013 for Microsoft Office files if you have the Office Web Apps server deployed and SharePoint is configured to use it. The Office Web Apps server also provides for displaying and editing the document within the browser if you have the appropriate license.
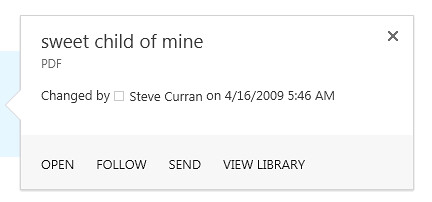
I am going to show how to create a customized search hover panel that can provide a thumbnail preview of almost any type of document and  also include a link action to view the document in KnowledgeLake Imaging’s viewer. You can download the item and item hover panel display templates here Display Templates. Below is an example of a preview for a PDF document.


Step One: Download a copy of a display template

Navigate to Site Settings –> Master Page Gallery –> Display Templates –> Search. Here you will find a list of associated HTML and javascript files. Please note that if the “SharePoint Server Publishing Infrastructure” feature is not activated for the site collection then you will not see the HTML files. Download the Item_PDF.html and Item_PDF_HoverPanel.html. Rename these to Item_KLView.html and Item_KLView_HoverPanel.html.
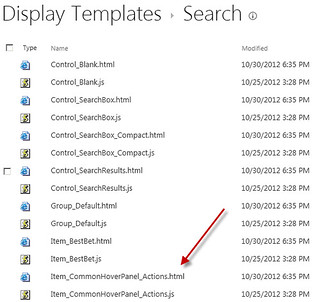


Step Two: Modify the item template

Open the Item_KLView_.html in Visual Studio 2012 and make the following changes.
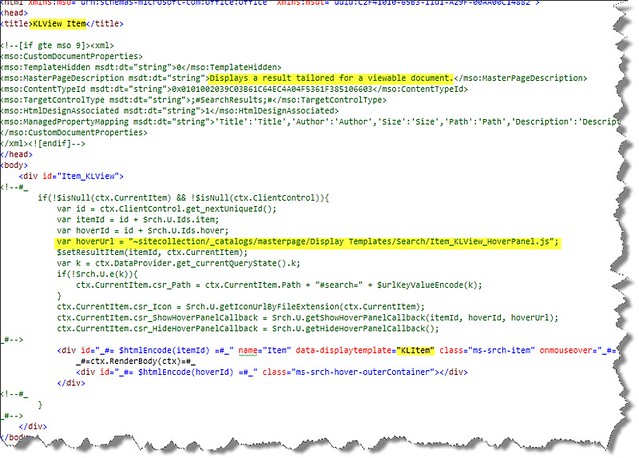
Change the Title element to KLView Item. Add a new description. Finally change the hoverUrl variable to point the new Item_KLView_HoverPanel.js that will be generated when you upload the new html templates.


Step Three: Modify the hover panel template

Open the Item_KlView_HoverPanel.html and make the following changes.

The first modification will be adding the logic to determine the file extension of the currently viewed search result item. The hover panel will support the previewing of (pdf,tif,tiff,msg,txt,png,gif, jpg,xml,ppt,pptx,doc,docx,xls,xlsx) files. Second, add the getUniqueId function to generate a unique id. This will be appended to the URL to get the thumbnail image making sure it is an updated image every time, otherwise the browser will cache the thumbnail. Next you will add a condition to check the file extension, and then code to construct a URL pointing to KnowledgeLake Imaging’s filetransfer.ashx handler which will create the thumbnail. The handler takes a query string parameter that points to the URL of the document in SharePoint, width, height and the unique Id to keep the thumbnail fresh.

The final modification is checking the file extension and then adding a link labeled “View” that points to KnowledgeLake Imaging’s Viewer URL with a query string parameter of the URL to the document in SharePoint.

Step Four: Upload the new display templates

After saving your changes navigate back to the Search display templates folder in the Master Page Gallery and upload the new display templates. Associated javascript files are re-generated for each of the templates. Now you can start using these in your search results.

Step Five: Integrate the new hover panel in search results

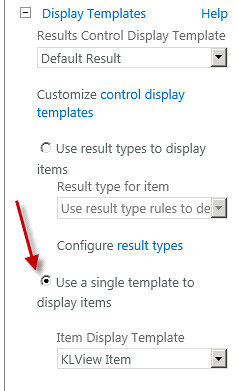
Modify a Search Results web part to use the new hover panel. You can set the web part to use the new Item_KLView display template for all results by selecting “Use single template to display items” and selecting it from the dropdown list. Save the configuration and your ready to use the new hover panel. Do a search and move your cursor over one of the file types supported and you will see the thumbnail display with a “View” action. KnowledgeLake Imaging provides the ability to cache thumbnail previews so the display of the preview should be immediate. You could also use the “Use result types to display items” option. This would require you to modify the item display template of each result type to point to the Item_KLView_HoverPanel.js Url as I described in step two.
 

Simple and effective search enhancement

Display templates are a powerful way to enhance a user’s search experience. Adding KnowledgeLake Imaging’s ability to render multiple types of documents makes it easy to display thumbnail previews and viewing to the majority of your documents in SharePoint. There are many more ideas we have about enhancing the built in features of SharePoint 2013 with KnowledgeLake Imaging. I am hoping to blog about the details soon.

Monday, October 1, 2012

What’s New In SharePoint 2013 Search (Developers Perspective) Part Three

Technorati Tags: ,,

This is my third post in a series which is covering the new capabilities in SharePoint 2013 Search and how you can leverage them through the server API. In the last post I wrote about the new SearchExecutor class and how it can be used to execute multiple queries. The reasoning behind putting this new class into SharePoint Search was to enable the federation of multiple searchable sources into one search experience. The ability to easily set up remote SharePoint farms as search sources makes federation useful for searching across large geographically distributed farms. In this post I will write about the new search Query Rules that are available in SharePoint 2013. The new Query Rule is an incredibly powerful tool which enables the manipulation of search results when a search is executed. Query rules encompass three components, result sources, conditions and actions. First I will show you the different types of conditions that can be used to trigger actions. Second I will show you the relationship between result sources and query rules. Finally I will show what kind of actions can be triggered by query rule conditions and how they affect the search results the user sees. As a developer you will interested in knowing how to interpret the query rule actions using the object model so you can leverage these in your own solutions. As always search entities can defined at the search service application and the site collection level, this also applies to query rules.


Query Rule Conditions

Query rule conditions are the conditions that will trigger any query rule actions that take place when a search is executed. A rule can have multiple conditions and can only be “OR” together. The conditions can be as simple as matching a keyword term or as sophisticated as the query matching on a regular expression. The wide range allows you tailor the search results on the intent and audience of the search user rather just matching keyword terms.  Below is a brief description on what each type of condition can do:

Condition Type Description Example
Query Matches Keyword Exactly If the query matches any of the semi-colon separated list of phrases then the rule is triggered Query= “Document”

Document;Invoice;Purchase Order
Query Matches Action Term Triggered when the query contains verbs or commands that match a semi-colon separated list of phrases or a taxonomy dictionary. Query= “Downloaded documents from Saint Louis”

Downloaded;Saint Louis;Approved
Query Matches Dictionary Exactly Triggered when the query matches a dictionary entry exactly. The dictionary can be an imported taxonomy such as peoples names. Query=”John Doe”
Query Commonly Used in Source A popular query that has been logged numerous times for a given result source. You can choose which result source.  
Result Type Commonly Clicked If the results from the query contain result types that have been clicked on and opened for viewing numerous times, then the rule is triggered. Email, Microsoft Office files and PDF
Advanced Query Text Match Most powerful of all conditions. Includes query matching on a regular expression, semi-colon separated list of phrases or an entry in a taxonomy dictionary. Depending on which you choose additional options are included. For example, exact query match, query starts with or ends with. The matching can be applied to either the subject terms or the action terms in the query. Query=”Legal documents” Microsoft

Triggered when starts with Legal


Additional restrictions when a rule is triggered can be targeted to certain topic pages or user segments (Audiences). These restrictions can be set in the “Show more conditions” section.

Result Sources

Query rules can be assigned to multiple result sources or all result sources. I explained what result sources are in my previous posts. The association between sources and rules is required in order for the search engine to evaluate triggered rules for a given query. Any  query submitted by the user can only be associated with one source. This is accomplished by an administrator setting what result source a search web part will be associated with or a developer setting the SourceID property of the KeywordQuery class. When the query is submitted to the query server, the query server checks which result source the query is searching. Next the query server checks to see if query rules should be evaluated. If rules are not being evaluated then the query server executes the query and returns the results with no further action, else the conditions of query rules associated with the result source are evaluated. If conditions are met, then the actions associated with the conditions are executed and any additional results are combined and returned with original search results. Below is a flow of how queries, result sources and rules work together:


Query Rule Actions

The three types of query rule actions are Promoted Results, Result Blocks and Change rank results by changing the query. The query rule actions is where most of the power of query rules resides. As a developer you will want to know what the triggered rules are for a given query. You can then interrogate the triggered rules in order to know how to access and display any additional results. There are three types of actions. I am going to describe these and show some code on how to access them using  the server search API. Below is a simple execution of a KeywordQuery using the new SearchExecutor class. Your first step is to access the triggered rules for the search by using the returned ResultTableCollection’s TriggeredRules collection. This is a collection of query rule GUIDS.

public static DataTable ExecuteKeyWordSearch(string queryText)
{
    ResultTableCollection rtc = null;
    DataTable retResults = new DataTable();

    using (SPSite site = new SPSite("http://basesmc15"))
    {
        using (KeywordQuery query = new KeywordQuery(site))
        {
            query.QueryText = queryText;
            query.KeywordInclusion = KeywordInclusion.AllKeywords;
            query.RowLimit = 500;
            query.SelectProperties.Add("Path");
            query.SelectProperties.Add("IsDocument");
            query.EnableQueryRules = true;

            SearchExecutor se = new SearchExecutor();

            rtc = se.ExecuteQuery(query);

           List<Guid> triggeredRuleIds = rtc.TriggeredRules;


            if (rtc.Count > 0)
            {

                var results = rtc.Filter("TableType", KnownTableTypes.RelevantResults);
                if (results != null && results.Count() > 0)
                {
                    foreach (ResultTable result in results)
                    {
                        retResults.Load(result, LoadOption.OverwriteChanges);
                    }

                }

            }

        }

    }

    return retResults;

}

Once you have retrieved the triggered rule IDs for the query you will need to get the associated QueryRule objects. The code below shows how to use the QueryRuleManager to obtain the query rules triggered from the search. Please note this code only searches for query rules defined at the search service application level.

public static List<QueryRule> GetQueryTriggeredRules(List<Guid> queryRuleIds)
{
    SPServiceContext serviceContext =
    SPServiceContext.GetContext(SPServiceApplicationProxyGroup.Default,
    SPSiteSubscriptionIdentifier.Default);

    var searchProxy =
        serviceContext.GetDefaultProxy(typeof(SearchServiceApplicationProxy))
        as SearchServiceApplicationProxy;

    QueryRuleManager qrm = new QueryRuleManager(searchProxy);
    SearchObjectFilter filter = new SearchObjectFilter(SearchObjectLevel.Ssa);
    filter.IncludeLowerLevels = true;

    QueryRuleCollection rules = qrm.GetQueryRules(filter);

    var triggeredRules = from r in rules join sourceIds
                             in queryRuleIds on r.Id equals sourceIds select r;

    return triggeredRules.ToList();
}


Promoted Result Actions

A promoted result action is very similar to the “Best Bet” capability in SharePoint 2010. It gives you the ability to promote URLs to the top of the search results. The only difference in SharePoint 2013 is that the promoted results can be defined based on the more powerful query rule conditions, whereas in SharePoint 2010 you were limited to a particular keyword. As a developer you will be interested in getting the title, URL and description of the promoted result. In order to get at the returned results of a promoted result action you will need the ID of the query rule. The code below will check the triggered rules for promoted results and then access the promoted results using a linq query against the ResultTableCollection where the QueryRuleId property of the ResultTable matches the ID of the promoted result query rule. Normally you should use the built-in Filter method of the ResultTableCollection but it has a bug where it will not work using a GUID or object property. The Title, URL, Description and whether the promoted result should be rendered as a banner instead of a hyperlink is contained in the IsVisualBestBet value. You can get the appropriate rendering template from the RenderTemplateId value. Make sure to render the promoted results in the order they are returned.

SearchExecutor se = new SearchExecutor();
   rtc = se.ExecuteQuery(query);

   List<Guid> triggeredRuleIds = rtc.TriggeredRules;

   var promotedResultRules = from r in GetQueryQueryRules(triggeredRuleIds)
                                       where r.AssignBestBetsAction != null select r;

   if (promotedResultRules != null && promotedResultRules.Count() > 0)
   {
       var results = from r in rtc join pr in promotedResultRules on r.QueryRuleId equals pr.Id select r;

       if (results != null && results.Count() > 0)
       {
           foreach (ResultTable result in results)
           {
               retResults.Load(result, LoadOption.OverwriteChanges);
           }

           foreach (DataRow dr in retResults.Rows)
           {
               string title = dr["Title"].ToString();
               string url = dr["URL"].ToString();
               string description = dr["Description"].ToString();

               //if you should render the promoted result as a banner
               bool isVisualBestBet = dr["IsVisualBestBet"] != null ?
                   bool.Parse(dr["IsVisualBestBet"].ToString()): false;

              //template to render the promoted result
               string template = dr["RenderTemplateId"].ToString();
           }

       }

   }

Change ranked results by changing the query action

The “Change ranked results by changing the query action” action  is the most powerful action. Only one can be defined per query rule. Based on conditions this action can substitute or append another query and boost the rankings of other results.  As a developer you don’t need to know much about the effects of this action. However since this action can fundamentally change the results of the query you may want to inform the user what changes were made. For example, if the action has changed the sorting and any type rank reordering. All the information you need will be contained in the query rule’s ChangeQueryAction object and it’s QueryTranform property. The code below get query rules that have a ChangedQueryAction and then accesses the QueryTransform.OverrideProperties collection to obtain information on sorting and rank boosting.

SearchExecutor se = new SearchExecutor();
rtc = se.ExecuteQuery(query);

List<Guid> triggeredRuleIds = rtc.TriggeredRules;

var changedQueryRules = from r in GetQueryQueryRules(triggeredRuleIds)
                            where r.ChangeQueryAction != null
                            select r;

if (changedQueryRules != null && changedQueryRules.Count() > 0)
{
    foreach (QueryRule rule in changedQueryRules)
    {
        ChangeQueryAction action = rule.ChangeQueryAction;
        SortCollection sorts = action.QueryTransform.OverrideProperties["SortList"] as SortCollection;

        foreach (Sort sort in sorts)
        {
            string sortProp = sort.Property;
            SortDirection sortDirection = sort.Direction;
        }

        ReorderingRuleCollection rankRules =
            action.QueryTransform.OverrideProperties["RankRules"] as ReorderingRuleCollection;

        foreach (ReorderingRule rankRule in rankRules)
        {
            string matchValue = rankRule.MatchValue;
            ReorderingRuleMatchType matchType = rankRule.MatchType;
            int boostValue = rankRule.Boost;
        }
    }

}

Result Block Actions

The result block actions are similar to promoted results. It is like “Best Bets” but uses additional  blocks of results instead of titles and URLs. Your solution may be interested in knowing the title, title language, what source the result block originated from, “More Link Behavior” (URL for more results), whether to always display the result block above the core results, group display template, item display template and the label for routing to a content search web part. The difficult part comes when you want to determine which ResultTable belongs to which CreateResultBlockAction. Remember that you can have multiple of these actions associated with one query rule. There seems to be no way to select the corresponding ResultTable from the returned ResultTableCollection. I tried selecting on the ResultTile but the action’s ResultTitle.DefaulLanguageString will not match since it uses the place holder “{subjectTerms}” which holds the keywords from the query. You can modify this in the UI to make sure they all have unique titles, however that could be very unreliable. I also tried using the  routing label but this of course cannot be guaranteed to be unique. Better approach would be to add the acton’s ID to the ResultTable.

SearchExecutor se = new SearchExecutor();
rtc = se.ExecuteQuery(query);

List<Guid> triggeredRuleIds = rtc.TriggeredRules;

var blockResultRules = from r in GetQueryQueryRules(triggeredRuleIds)
                            where r.CreateResultBlockActions != null
                            select r;

var blockResults = from r in rtc join br in blockResultRules
                   on r.QueryRuleId equals br.Id select r;

if (blockResultRules != null && blockResultRules.Count() > 0)
{
    foreach (QueryRule qr in blockResultRules)
    {
        foreach (CreateResultBlockAction crba in qr.CreateResultBlockActions)
        {
            //always show results on top
            bool showOnTop = crba.AlwaysShow;

            //template ids
            string grpTemplateId = crba.GroupTemplateId;
            string itemTemplateId = crba.ItemTemplateId;

            //title and what is the default language for the title
            MultiLingualString<CreateResultBlockAction> titleInfo = crba.ResultTitle;
            int defalutLanguageId = titleInfo.DefaultLanguageLcid;
            string defaultTitle = titleInfo.DefaultLanguageString;

            //link for more results
            string showMoreResultsLink = crba.ResultTitleUrl;
           //label for a content search web part
            string searchLabel = crba.ResultTableType;

            //id to the source of the block results
            Guid? blockResultSource = crba.QueryTransform.SourceId;

            //MISSING which resulttable belongs to which CreateResultBlockAction?
            var blockResultForAction = from r in blockResults where r.ResultTitle == defaultTitle select r;
        }             
    }

}

Query Rules are the Rubik’s Cube of SharePoint 2013 Search

The new SharePoint 2013 Search query rules add a great deal of extensibility to search. The ability to add numerous types of conditions and actions that can pull data from multiple sources into one search experience is a big step forward from SharePoint 2010 search. Combining query rules with different result types and display templates makes it easier for administrators to customize the look and feel of search. One question is whether there is a limit on the number of rules you can associate with a result source, or if there is a limit on how many triggered rules will be executed given a query?  The query rules UI gives you the ability to group rules and set where the evaluation can stop or continue. I hope there is a limit because you could set up a chain of rules that could basically run away and timeout.  I have not tested this but it would be good in the future to understand the best practices and limitations of evaluating and executing query rules.

Friday, August 31, 2012

What’s New in SharePoint 2013 Search (A Developer’s Perspective) Part Two

Technorati Tags: ,,

In my first post of this series Part One I talked about how SharePoint 13 preview search has made changes to the API to accommodate the ability to store search objects at different levels. These levels are the Search Service Application, Site Collection and the Site (Tennant). One of these objects is the new result source. It is a combination of SP2010 Federated Locations and Scopes. The result source is a sophisticated tool to allow administrators to construct fine tuned sources for user queries. The sources can be SharePoint (local and remote), file shares, Microsoft Exchange or even custom sources. In this post I will show you how to use the new SearchExecutor class and search using  FQL (FAST Query Language) with it. I will also show you how to leverage the result sources to execute multiple queries and bring back results from different sources in one method call. Please note this posting is based on features in SharePoint 2013 Preview and are subject to change.

The new SearchExecutor class

In SP2010 you used either the KeywordQuery or FullTextSQLQuery classes to execute searches. Since the FAST search technology has now been assimilated into SharePoint 2013  the FullTextSQL syntax is no longer supported. Strangely, the FullTextSQLQuery class still exists and is not marked as deprecated, but it does not work. The KeywordQuery class appears to be the only class to execute queries with. This class uses the new KQL (Keyword Query Language) which is a mixture of SP2010 keyword and FQL syntax. Building Search Queries in SharePoint 2013.

Below is an example of doing a keyword search in SP2010. Notice that the search was invoked by calling the KeywordQuery’s  Execute method

SharePoint 2010 Keyword Search

public static DataTable ExecuteKeywordSearch(string queryText)
{
    ResultTableCollection rtc = null;
    DataTable retResults = new DataTable();

    using (SPSite site = new SPSite("http://basesmc2008"))
    {
        using (KeywordQuery query = new KeywordQuery(site))
        {

            query.QueryText = queryText;
            query.ResultTypes |= ResultType.RelevantResults;
            query.KeywordInclusion = KeywordInclusion.AllKeywords;
            query.RowLimit = 500;
            query.ResultsProvider = SearchProvider.SharepointSearch;
            query.SelectProperties.Add("Path");
            query.SelectProperties.Add("IsDocument");

            rtc = query.Execute();

            if (rtc.Count > 0)
            {

                using (ResultTable relevantResults = rtc[ResultType.RelevantResults])
                    retResults.Load(relevantResults, LoadOption.OverwriteChanges);

            }

        }
    }
    return retResults;
}

The next example is a SharePoint 2013 keyword search. It uses the new SearchExecutor class and the ExecuteQuery method taking the KeywordQuery object as an argument. You no longer need to set the ResultsProvider property since there is just one provider. Also you do not need to set the ResultTypes property to tell the search engine what type of results you want. Finally, you need to use the new Filter method on the returned ResultTableCollection object to retrieve the results you want. In SP2010 you used an enumeration and the ResultTableCollection’s indexer. The Filter method is much more flexible but you need to hard code string property names rather than using an enumeration. The string argument represents property name of the ResultTableColection, and the second argument is an object value for that property.

SharePoint 2013 Keyword Search

public static DataTable ExecuteKeyWordSearch(string queryText)
{
    ResultTableCollection rtc = null;
    DataTable retResults = new DataTable();

    using (SPSite site = new SPSite("http://basesmc15"))
    {
        using (KeywordQuery query = new KeywordQuery(site))
        {
            query.QueryText = queryText;
            query.KeywordInclusion = KeywordInclusion.AllKeywords;
            query.RowLimit = 500;                
            query.SelectProperties.Add("Path");
            query.SelectProperties.Add("IsDocument");


            SearchExecutor se = new SearchExecutor();
            rtc = se.ExecuteQuery(query);


            if (rtc.Count > 0)
            {
                var results = rtc.Filter("TableType", KnownTableTypes.RelevantResults);
                if (results != null && results.Count() == 1)
                    retResults.Load(results.First(), LoadOption.OverwriteChanges);

            }

        }

    }

    return retResults;

}

What about FQL?

SharePoint allegedly supports FQL queries. So if you have legacy solutions that use FQL then these should be supported. You must set the EnableFQL property of the KeywordQuery class to true. Unfortunately, results are inconsistent. The results are returned every 4 searches, the other 3 no results are returned. There is additional set up needed in order for FQL to work.  A bigger issue with using FQL is that FQL searches will not work with any result sources that have Query Transformations. The reason for this is that Query Transformation are additional conditions that are appended to the query text. Many of the out of the box result sources including the default have transformations that use KQL (Keyword Query Language). Therefore when you execute a FQL search with a result source with a Query Transformation you will receive a QueryMalformedException. You must set up a result source without a transformation and use that when executing FQL searches. So FQL support is theoretical at this point of the beta.

The new SearchExecutor is built for executing multiple queries at once

So why the switch to the new SearchExecutor class? The big reason is to give you more flexibility to execute multiple queries either on the server or remotely using the new client object model for search. The code below demonstrates how to create and issue multiple queries to the server at once. The first query uses the default result source, the second query uses a different result source by setting the KeywordQuery’s SourceID property. It uses a method for getting a search result source from part one of this series. The SearchExecutor’s ExecuteQueries method takes a dictionary of strings and KewywordQuery objects. The strings are friendly names you can give the queries so you can refer to them in the returned dictionary of strings and ResultTableCollections. Also notice that you can check the QueryErrors collection on each returned ResultTableCollection. This is useful if you set the handleExceptions argument of the ExecuteQueries method to true. If you set this to false the first error that occurs on any of the queries will halt execution and throw the error to the caller. You should be aware that if you are sending a query to a remote source you must set up a trusted connection.

The code also illustrates the inefficiencies of creating multiple KeywordQuery objects to submit to multiple sources. Typically you would submit the same terms, returned properties, row limits, and other properties. It would be nice if there was a method to clone KeywordQuery objects and then just set the SourceID properties. A good opportunity for an extension method.


public static Dictionary<string,DataTable> ExecuteMultipleKeyWordQueries()
{

    DataTable tableResults = null;
    Dictionary<string, DataTable> retResults = new Dictionary<string, DataTable>();

    using (SPSite site = new SPSite("http://basesmc15"))
    {

        Dictionary<string, Query> queries = new Dictionary<string, Query>();
        Dictionary<string, ResultTableCollection> results;

        using (KeywordQuery query1 = new KeywordQuery(site))
        {
            query1.QueryText = "title:\"Viewer Testing with PDF\"";
            query1.RowLimit = 500;
            query1.SelectProperties.Clear();
            query1.SelectProperties.Add("Path");
            query1.SelectProperties.Add("IsDocument");
            query1.SelectProperties.Add("Title");
            SearchExecutor se = new SearchExecutor();

            queries.Add("local", query1);
            using (KeywordQuery query2 = new KeywordQuery(site))
            {

                query2.QueryText = "title:\"Viewer Testing with PDF\"";
                query2.RowLimit = 500;
                query2.SelectProperties.Clear();
                query2.SelectProperties.Add("Path");
                query2.SelectProperties.Add("IsDocument");
                query2.SelectProperties.Add("Title");
                Source remoteSource = GetSearchSource("remoteFarm");
                query2.SourceId = remoteSource.Id;
                queries.Add("remote", query2);

                results = se.ExecuteQueries(queries, true);

                foreach (KeyValuePair<string,ResultTableCollection> result in results)
                {
                    if (result.Value.Count > 0 && result.Value.QueryErrors.Count() == 0)
                    {
                        var resultTable = result.Value.Filter("TableType", KnownTableTypes.RelevantResults);
                        if (resultTable != null && resultTable.Count() == 1)
                        {
                            tableResults = new DataTable();
                            tableResults.Load(resultTable.First(), LoadOption.OverwriteChanges);
                            retResults.Add(result.Key, tableResults);
                        }
                    }
                }

            }
        }

    }

    return retResults;

}


It is all about Federation

The SearchExecutor is built for Federation of different search sources. Federation is key piece in making SharePoint search more scalable by eliminating the need to crawl and index other searchable sources. Designing the SearchExecutor  to easily execute and process the results of multiple queries, even FQL queries, helps you leverage Federation in your solutions. Even the CSOM has exposed this feature in the Microsoft.SharePoint.Client.Search assembly and namespace. Retrieving results is different in the CSOM since there is no Filter method exposed on the ResultsTableCollection due to the nature of the execution. You just use basic LINQ to get the appropriate DataTable. You must call the SearchExecutor’s ExecuteQuery method and then call the Context’s ExecuteQuery method. This looks strange but if you have used the CSOM in the past it makes sense.

Client Object Model Keyword Search

public static DataTable ExecuteKeywordQuery(string query)
{
    DataTable retResults = new DataTable();
    ClientContext con = new ClientContext("http://basesmc15");
    KeywordQuery kq = new KeywordQuery(con);

    kq.QueryText = query;
    kq.SelectProperties.Add("testcol");

    SearchExecutor se = new SearchExecutor(con);
    var results = se.ExecuteQuery(kq);

    con.Load(kq);
    con.Load(se);
    con.ExecuteQuery();

    var result = from r in results.Value where r.TableType == KnownTableTypes.RelevantResults select r;

    if (result != null)
    {
        //get column names
        foreach (var col in result.First().ResultRows.First())
        {
            retResults.Columns.Add(col.Key.ToString(), col.Value != null ? col.Value.GetType() : typeof(object));
        }

        foreach (var row in result.First().ResultRows)
        {
            retResults.LoadDataRow(row.Values.ToArray(), LoadOption.Upsert);

        }

        retResults.AcceptChanges();

    }

    return retResults;

}

SharePoint 2013 search has many new features. I will be posting more about these soon.

Thursday, August 23, 2012

What's New in SharePoint 2013 Search (A Developers Perspective) Part One

Technorati Tags: ,,

Microsoft has made dramatic changes to serch in SharePoint 2013 Preview. There have been so many changes it is impossible to cover them all in one post. In this post I am going to talk about some of the changes you need to know about as a SharePoint Search developer. I will cover how the API has changed to accommodate the importance of Office 365. Secondly, I will show you how search scopes have been eliminated and replaced with result sources. Please remember that the findings in this post are based on the SharePoint 2013 Preview and are subject to change.

What happened to my Search Scopes?

In SharePoint 2013 search scopes are deprecated. Basically they are gone and not being used. You can access two system scope “All Sites” and “People” from the search service  application result sources page. However, you cannot create new search scopes nor can they be displayed in a dropdown list next to the standard search box. This is unfortunate because scopes could help users  find what they are looking for easier. SharePoint 2013 has replaced scopes with result sources. Result sources are SharePoint 2010 Federated Locations and Scopes combined with an easier way to define scoping rules.

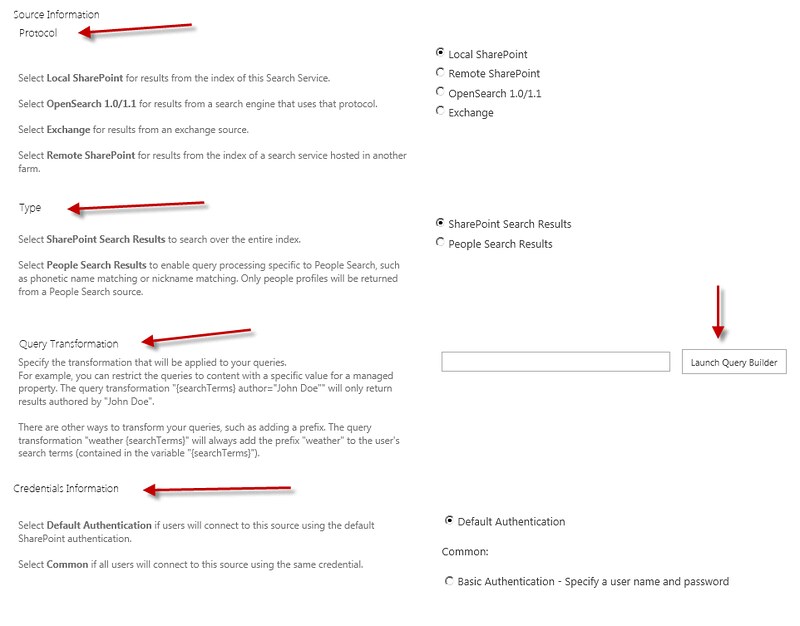
Result sources make it easier to search remote sources including other SharePoint farms. Searching of remote SharePoint farms is easier than before because SharePoint 2013 relies on claims based authentication. No longer do you have to publish and subscribe to a remote service application and designate certain accounts for searching. Users can connect to the source using the default SharePoint authentication.


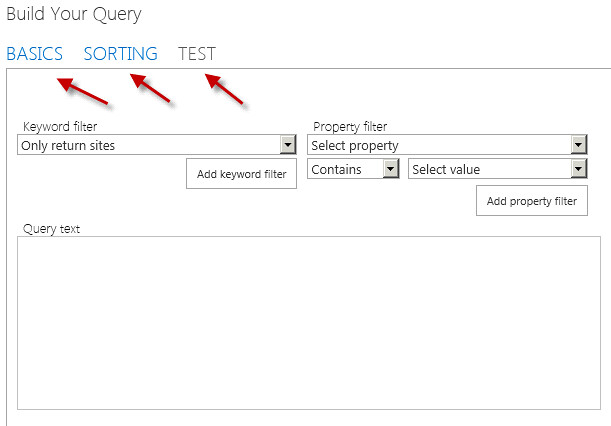
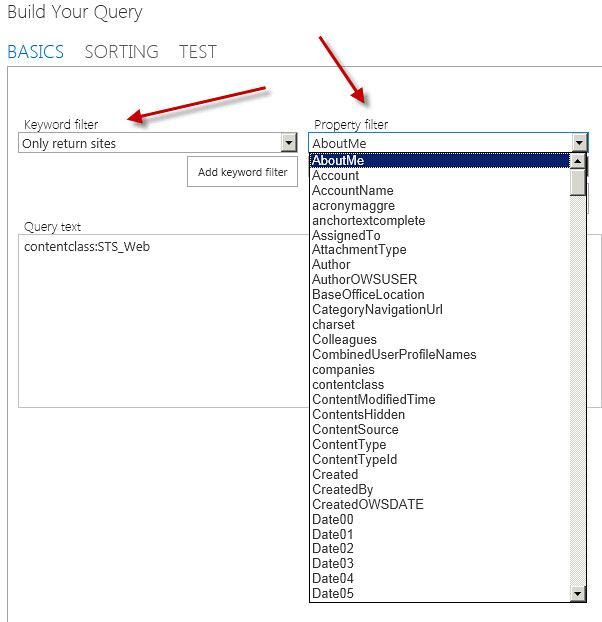
With SharePoint 2010 scopes you defined different types of rules which were limited to text properties and web addresses. In SharePoint 2013 there is a new query builder to help build a “Query Transformation”. You can now define any type of managed property inclusion or exclusion. The builder also gives you a large set of built in options to select from to help you build complex transformations, for example the name of the user who is running the query or a placeholder for a token from the request URL. Also, the query builder allows you to select from a list of all the managed properties and include property conditions similar to what you used in Advanced Search in SharePoint 2010. Here is an example of query text built by the builder to include content that has the user’s name running the query, a token from the URL and a ContentTypeID that starts with a certain value:

{searchTerms}{User.Name} {URLToken.1} ContentType=0x01*

You must include {searchTerms} to have the conditions appended to the query being submitted. The new query builder allows you to define much more complex conditions than the old search scoping rules. The builder also allows you to include custom sorting and gives you the ability to test the transformation and view the results it produces. There should be much more documentation on the capabilities of this builder and its syntax forthcoming from Microsoft.


How to use the new Result Source with your query

In SharePoint 2010 you appended scope names to your query text. In SharePoint 2013 you must set the KeywordQuery classes’ SourceID property to the GUID from a Microsoft.Office.Server.Search.Administration.Source. If you do not set this property to the source you want it will use the default source defined from the search service application. There seems to be no way from the UI to set the default result source for a search service application. So if you do not want to use the default result source you must retrieve the one you want. SharePoint 2013 is all about Office 365 and you can see evidence of this by the fact that you can define search managed properties, result sources, query rules and result types down to the site level. The SharePoint 2013 search API needed a way to retrieve these search objects easily, so the SearchObjectLevel and SearchObjectOwner classes were introduced to accomplish this. These two classes can be passed into various method calls to retrieve search objects, or used to create a SearchObjectFilter object to pass to the methods.

The SearchObjectFilter (Owners or Levels)

The SearchObjectFilter class is used in most cases to filter out the type of search objects you want returned. The SearchObjectFilter has two constructors one which takes a SearchObjectLevel enumeration and one that takes a SearchObjectOwner.

The SearchObjectLevel enumeration has the following levels:

public enum SearchObjectLevel 
{
        SPWeb = 0,
        SPSite = 1,
        SPSiteSubscription = 2,
        Ssa = 3, 
}

Using this enumeration in the constructor of the SearchObjectFilter you can filter based on Ssa = Search service application, SPSite = Site Collection, SPWeb = Site, and SPSiteSubscription = tenant.  Below is a code sample that uses a SearchObjectFilter based on a SearchObjectLevel to return a List of SourceRecords defined at the site collection level.

public static List<SourceRecord> GetSearchSourcesUsingLevel()
{
    using (SPSite site = new SPSite("
http://basesmc15"))
    {
        SPServiceContext serviceContext = SPServiceContext.GetContext(site);
        var searchProxy =
            serviceContext.GetDefaultProxy(typeof(SearchServiceApplicationProxy))
            as SearchServiceApplicationProxy;
        SearchObjectFilter filter = new SearchObjectFilter(SearchObjectLevel.SPWeb);

        //true is the default
        filter.IncludeHigherLevel = false;

        //false is the default
        filter.IncludeLowerLevels = true;

        List<SourceRecord> sources =
            searchProxy.GetResultSourceList(filter, false).ToList<SourceRecord>();

        return sources;

    }
}

This code will work only if there is an available SPContext. If you are running this in a console application or a timer job an error will be thrown stating a valid SPWeb could not be found on the SPContext. Hopefully, this will be fixed by release. The recommended approach is to create a SearchObjectOwner object using the appropriate SearchObjectLevel and a SPWeb. Then use the SearchObjectOwner to create the SearchObjectFilter. This enables the internal code to determine the scope of your search correctly.

public static List<SourceRecord> GetSearchSourcesUsingOwner()
{
    using (SPSite site = new SPSite("
http://basesmc15"))
    {
        using (SPWeb web = site.OpenWeb())
        {
            SPServiceContext serviceContext = SPServiceContext.GetContext(site);
            var searchProxy =
                serviceContext.GetDefaultProxy(typeof(SearchServiceApplicationProxy))
                 as SearchServiceApplicationProxy;
            SearchObjectOwner so = new SearchObjectOwner(SearchObjectLevel.SPSite, web);
            SearchObjectFilter filter = new SearchObjectFilter(so);

            //true is the default
            filter.IncludeHigherLevel = false;

            //false is the default
            filter.IncludeLowerLevels = true;

            List<SourceRecord> sources =
                searchProxy.GetResultSourceList(filter, false).ToList<SourceRecord>();
            return sources;

        }

    }
}

Notice the IncludeHigherLevel and IncludeLowerLevels properties. You can use these to adjust the filter to return sources above and below the SearchObjectLevel used to create the filter. For example if you wanted to return result sources from current site collection and the search service application then you would set the IncludeHigherLevel to true and IncludeLowerLevels to false. Below is example code getting a result source and using it in a query. The code uses the new SearchExecutor class to execute a query.

public static DataTable ExecuteKeyWordQuery()
{
    ResultTableCollection rtc = null;
    DataTable retResults = new DataTable();

    using (SPSite site = new SPSite("http://basesmc15"))
    {
        using (KeywordQuery query = new KeywordQuery(site))
        {
            query.QueryText = "microsoft isdocument:1";
            query.RowLimit = 500;
            query.SelectProperties.Clear();
            query.SelectProperties.Add("Path");
            query.SelectProperties.Add("IsDocument");
            query.SelectProperties.Add("Title");

            var source = from s in GetSearchSourcesUsingOwner()
                         where s.Name == "mysource" select s;

            if(source != null)
                query.SourceId = source.First().Id;
            SearchExecutor se = new SearchExecutor();
            rtc = se.ExecuteQuery(query);
            if (rtc.Count > 0)
            {
                var results = rtc.Filter("TableType", KnownTableTypes.RelevantResults);
                if (results != null && results.Count() == 1)
                    retResults.Load(results.First(), LoadOption.OverwriteChanges);

            }

        }

    }

    return retResults;

}


After result sources have been defined they can be used in any of the available search web parts that support sources. SharePoint 2013 search is focusing more on federation of search results rather than have users choose which scopes they want to search. The focus seems to be to create custom search result pages with multiple types of federated results.

More changes in SharePoint 2013 Search

In my next post I will talk about leveraging result sources and executing multiple queries with different sources and how SharePoint 2013 makes this easy. I will also talk about the changes in search syntax and enabling the use of FQL in your queries.

Monday, July 16, 2012

SharePoint 2010 Code Tips – Turning On and Off Remote Administration and other Tips

Technorati Tags: ,,

This is another code tip posting. This will have different code snippets that may be useful when developing SharePoint applications. The code accomplished various things and I will give you an idea how you may want to use them in your applications. The code is posted “AS IS” with no warranties and confers no rights.

Turn On and Off Remote Administration

Many times your receive “access denied” errors even when you are running with elevated privileges. This is very frustrating when you expect to be able to activate features from code that may want to create new timer jobs. According to Microsoft http://support.microsoft.com/kb/2564009 this is due to a new security feature implemented with SP2010. The feature explicitly blocks modification to any objects inheriting from SPPersistedObject in the Microsoft.SharePoint.Administration namespace.  However, there are many other places where this type of checking occurs outside of this namespace. In particular Microsoft.Office.Server.Search. In addition it is not always about modifications but even reading values. For example just trying  to access Microsoft.Office.Server.Search.Administration.CrawledProperty will throw an access denied error even when privileges have been elevated.

You can get around this problem by setting the SPWebService.RemoteAdministratorAccessDenied property to false. The Microsoft.SharePoint.ApplicationRuntime.SPRequestModule.EnsureInitialize method is the only code that uses this property. However, it uses it to set the SPSecurity..AdministrationAllowedInCurrentProcess property. This property is used a great deal throughout SharePoint to turn on access to resources SharePoint deems as configuration data that can only be access or modified from Central Administration .

The following code shows how you can set this property. It must be set from the ContentService.


public void EnableRemoteAdministration(bool enable)
{
SPWebService.ContentService.RemoteAdministratorAccessDenied = !enable;

SPWebService.ContentService.Update(true);

}


Just remember you cannot use this like you do SPSecurity.RunWithElevatedPrivileges. This is because when setting this property it checks to see if the current logged in user is a farm administrator or a member of the local administrators group. Once this property is set to false in most cases where you received and access denied error after elevating privileges, this error will no longer happen.


Setting the Default Group for a Site Collection


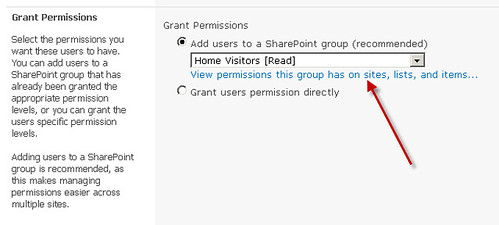
There are scenarios where you want a group to show up first in the list of groups when setting permissions. For example when granting permissions to a user in Site Permissions page of the site collection.


This group could be the most common group a user is added to. By making it the default group it will make assigning permissions much faster.


public static void SetDefaultGroupForWeb()
{

using (SPSite site = new SPSite("http://basesmc2008"))
{

using (SPWeb web = site.OpenWeb())
{
SPGroup group = web.SiteGroups["Home Visitors"];
web.AssociatedMemberGroup = group;
web.Update();

}

}

}

Editing URL (Link) Fields


I see a lot of questions on the forums of how to edit link fields. For example, how to set both the link (URL) and the description without having to parse “;#” string. It is straight forward to set these values using the SPFieldUrlValue.


public static void ModifyUrlFields()
{

using (SPSite site = new SPSite("http://basesmc2008"))
{

using (SPWeb web = site.OpenWeb())
{

SPList list = web.Lists["mynewlist"] as SPList;
SPListItem item = list.GetItemById(1) as SPListItem;

SPFieldUrlValue value = new SPFieldUrlValue(item["hyper"].ToString());
value.Url = "http://www.certdev.com";
value.Description = "very cool";

item["hyper"] = value;
item.Update();

}

}

}


View BarCodes in the SharePoint UI


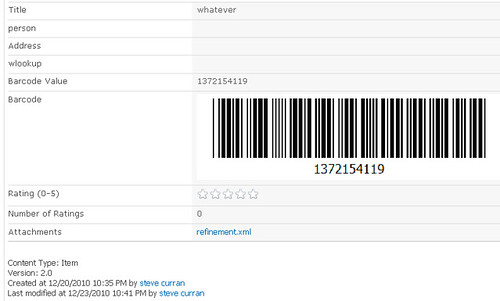
You can enable a barcode to be generated automatically for all new documents uploaded using SharePoint’s out of the box information policy. However, there may be times you may want to display the actual image of the barcode in your views or view forms. By default the barcode image is not displayable.


The following code will enable the viewing of the barcode image.


public static void EnableBarcodeSelection()
{
using (SPSite site = new SPSite("http://basesmc2008"))
{
using (SPWeb web = site.OpenWeb())
{
SPList list = web.Lists["customlist"];
SPField field = list.Fields["Barcode Value"];


field.Sealed = false;
field.ReadOnlyField = false;
field.ShowInDisplayForm = true;
field.ShowInEditForm = true;
field.Update();
list.Update();
}

}

}

This concludes this collection of code tips. Granted you may never need these but they may be useful in the future.

Thursday, July 5, 2012

SharePoint Server MVP 2012

Technorati Tags: ,,

I am grateful to find out that I was named a Microsoft SharePoint MVP for the fourth year in a row. It is an honor to be included in such a great community of people who devote their time to helping others get the most out of SharePoint. I like helping others but it is the allure of the puzzle that SharePoint represents that keeps bringing me back. You can work with SharePoint for many years and there are still days that you learn something new about it. My strong curiosity of how SharePoint works draws me back to the forums and blog posts to see what new puzzles I might be able to solve. I look forward to the future of SharePoint.

Tuesday, May 29, 2012

SharePoint 2010 Silverlight Client Object Model – How to upload a document and set metadata

Technorati Tags: ,,,

The Microsoft Client Object Model (CSOM) has three different platform libraries, one for managed code, one for Silverlight and another ECMA script based library. The client object models are provided through a proxy (.js files ECMA script) and (assembly files managed and Silverlight), which can be referenced in custom applications like other object models. The object models are implemented as a Windows Communication Foundation (WCF) service (.../_vti_bin/client.svc), but uses Web bindings to implement efficient request batching. All operations are inherently asynchronous, and commands are serialized into XML and sent to the server in a single HTTP request. The Silverlight and ECMA models require you to execute your code on a separate thread. This prevents CSOM calls locking the UI thread and making the UI unresponsive. In my opinion executing potential long running processes on a separate thread is the best approach for responsive applications. However, many developers find asynchronous programming confusing and messy. This type of programming requires callback methods to handle success and failure, thus making the flow of the code disjointed. The CSOM makes this easy for developers by providing the ClientContenxt.ExecuteQueryAsync method. This method enables you to use the Sivlerlight/ECMA object model the same way you would using the managed object model except when sending the request to the server the developer must provide a callback methods.

The two approaches to CSOM Silverlight asynchronous programming

A standard approach is to define  callback methods in your class to handle the response of the ExecuteQueryAsync method. The example below shows how to look up a user using a CAML query to the user information list. The example uses two defined methods, one for success and one for failure. The success method handles getting data back from the call. There are a couple of problems with this approach. One is that you must declare and store the return data in a class level variable and second you can not re-use the Success method because it has become tightly coupled with the class level ListItemCollection varable named users.  This approach would require you to create a class level variable for every type of return object and a success callback for each ExecuteQueryAsync call. Keeping track of which methods use which call backs can become very confusing.

public void LookupUser1()
{
    try
    {
        var clientContext = new ClientContext("http://basesmc2008/");

        CamlQuery camlQuery = new CamlQuery();
        camlQuery.ViewXml = @"<View>
                            <Query>
                                <Where>
                                    <Eq>
                                        <FieldRef Name='UserName'/>
                                        <Value Type='Text'>Steve.Curran</Value>
                                    </Eq>
                                </Where>
                            </Query>
                        </View>";

        this.users = clientContext.Web.SiteUserInfoList.GetItems(camlQuery);
        clientContext.Load(this.users, items => items.Include
                                (item => item["LastName"],
                                item => item["UserName"],
                                item => item["Title"],
                                item => item["Picture"]));

        clientContext.ExecuteQueryAsync(Success, Failure);

    }
    catch (Exception ex)
    {
        MessageBox.Show(ex.Message);
    }

}

private void Success(Object sender, ClientRequestSucceededEventArgs args)
{
        try
        {
            if (this.users != null)
            {
                string title = this.users[0]["Title"].ToString();
            }
        }
        catch (Exception ex)
        {
            MessageBox.Show(ex.Message);
        }
}

private static void Failure(Object sender, ClientRequestFailedEventArgs args)
{
    MessageBox.Show("Failed!");
}

The second approach is to use  Anonymous methods in place of defined call back functions. Anonymous methods were introduced in C# 2.0 and the ability to use multi-line and lambda expressions was introduced in C# 3.0. http://msdn.microsoft.com/en-us/library/0yw3tz5k(v=vs.100).aspx You can use these in VB.net but they do not support multi-line and lambda expressions. The example below is the same code in the first example but now is using anonymous methods to process the return values. Anonymous methods have the ability to read and write to variables declared in the local method, so there is no need to declare them at the class level. Secondly, the code flows and remains contextually together and coherent.

public static void LookupUser2()
{
    try
    {
        var clientContext = new ClientContext("http://basesmc2008/");
        CamlQuery camlQuery = new CamlQuery();
        camlQuery.ViewXml = @"<View>
                            <Query>
                                <Where>
                                    <Eq>
                                        <FieldRef Name='UserName'/>
                                        <Value Type='Text'>Steve.Curran</Value>
                                    </Eq>
                                </Where>
                            </Query>
                        </View>";

        ListItemCollection users = clientContext.Web.SiteUserInfoList.GetItems(camlQuery);
        clientContext.Load(users, items => items.Include
                                (item => item["LastName"],
                                item => item["UserName"],
                                item => item["Title"],
                                item => item["Picture"]));        

        clientContext.ExecuteQueryAsync((object eventSender, ClientRequestSucceededEventArgs args1) =>
        {
            string title = users[0]["Title"].ToString();

        }, (object sender, ClientRequestFailedEventArgs eventArgs) =>
        {
            string message = eventArgs.Message;
        }
    );

    }
    catch (Exception ex)
    {
        MessageBox.Show(ex.Message);
    }

}


Uploading a document and setting metadata

Some tasks in SharePoint require multiple steps and programming them with the Sivlerlight object model becomes difficult. One task would be uploading a document to a folder or document set and setting the metadata. How difficult could that be? Well this requires 4 separate steps and 4 ExecuteQueryAsync calls.

  1. Get the folder or document set
  2. Upload the file
  3. Set the metadata
  4. Update the list item

The following example shows how this can be done using anonymous methods so the task can be completed in one method block. Please note this code is not  production level code since you will have to fill code for getting the byte array of the document.

public static void UploadFile(string siteUrl,
    string listName, string targetFolder, string fileName)
{

    ClientContext context = new ClientContext(siteUrl);
    Web web = context.Web;

    Folder docSetFolder = web.GetFolderByServerRelativeUrl(listName + "/" + targetFolder);

    //STEP 1 GET FOLDER/DOCUMENTSET
    context.ExecuteQueryAsync((object eventSender, ClientRequestSucceededEventArgs eventArgs) =>
    {
        string documentUrl = "/" + listName + "/" + targetFolder + "/" + fileName;
        FileCreationInformation fci = new FileCreationInformation();
        fci.Url = documentUrl;
        fci.Content = new byte[] { }; //byte[] take your stream and convert to byte array

        FileCollection documentFiles = docSetFolder.Files;
        context.Load(documentFiles);

        //STEP 2 ADD DOCUMENT
        context.ExecuteQueryAsync((object eventSender2, ClientRequestSucceededEventArgs eventArgs2) =>
        {
            File newFile = documentFiles.Add(fci);

            context.Load(newFile);
            ListItem item = newFile.ListItemAllFields;

            //STEP 3 SET METADATA
            context.ExecuteQueryAsync((object eventSender3, ClientRequestSucceededEventArgs eventArgs3) =>
            {

                //start setting metadata here
                item["Title"] = "myimage";
                item.Update();
                context.Load(item);

                //STEP 4 UPDATE ITEM
                context.ExecuteQueryAsync((object eventSender4, ClientRequestSucceededEventArgs eventArgs4) =>
                {

                    string ret;
                    if (eventArgs.Request != null)
                        ret = eventArgs.Request.ToString();

                }, (object eventSender4, ClientRequestFailedEventArgs eventArgs4) =>
                {
                    string message = eventArgs4.Message;
                });

            }, (object eventSender3, ClientRequestFailedEventArgs eventArgs3) =>
            {
                string message = eventArgs3.Message;
            });

        }, (object eventSender2, ClientRequestFailedEventArgs eventArgs2) =>
        {
            string message = eventArgs2.Message;
        });

    }, (object eventSender, ClientRequestFailedEventArgs eventArgs) =>
    {
        string message = eventArgs.Message;
    });
}


Awaiting the future of asynchronous programming in Silverlight

There is no need to pull your hair out doing asynchronous programming. You can even do anonymous methods in jscript and use them with the ECMA CSOM. Anonymous methods allow you to put the code where it needs to be. The future of asynchronous programming in Silverlight can be seen now in Silverlight 5 and the System.Threading.Tasks namespace. This namespace is particularly useful with the HttpWebRequest methods that support the IAsyncResult interface. The example below shows how to use the Task.Factory to download a file and handle the response in one code block. http://msdn.microsoft.com/en-us/library/dd537609.aspx

string uri = "http://basesmc2008/lists/tester.xml";
var request = HttpWebRequest.Create(uri);
var webTask = Task.Factory.FromAsync<WebResponse>(request.BeginGetResponse, request.EndGetResponse, null)
    .ContinueWith(task => { var response = (HttpWebResponse)task.Result;
        var stream = response.GetResponseStream();
        var reader = new StreamReader(stream);
        string xmlFileText = reader.ReadToEnd();
        });

We also await future changes to the SharePoint client object model and the possibility of using the new .Net 4.5 feature of “Async await” which hopefully will be in the next version of Silverlight. http://blogs.msdn.com/b/dotnet/archive/2012/04/03/async-in-4-5-worth-the-await.aspx