The “Related Items” column was introduced in SharePoint 2013. It is a site column that is part of the Task content type. The column allows you to link other items to a given task. For example if you are doing an invoice approval workflow you may want to link an image of the invoice to the workflow task. The “Related Items” site column is not available to be added to other content types since it is by default part of the “_Hidden” site column group. Of course you can easily change this as explained in this link Enable Related Items Column allowing you to use it with other content types. The “Related Items” column is not visible in the new or edit form. It can only be accessed in the view form. This is probably due to the fact that the “Related Items” column has an “Invalid” field type and cannot be modified through traditional remote API list item methods. In this post I will show you how to do basic CRUD operations on the related items of a task item using the SharePoint REST API. The code samples are using the HttpClient with managed code. I was going to use JavaScript but the SharePoint Remote API exposes only static methods for these operations which unfortunately cannot be called across domains. As you read through the post you will be surprised by some of the quirks of the API and what to watch out for.

First get Authenticated
All the code examples for managing related items must send a form digest value. The code below shows an example to get this value via the REST API. You could also factor out all of the code for creating the HttpClient object and send this in as a parameter to all the examples.
public string GetDigest()
{
    string url = "http://servername/";
    HttpClient client = new HttpClient(new HttpClientHandler() { UseDefaultCredentials = true });
    client.BaseAddress = new System.Uri(url);
    string retVal = null;
    string cmd = "_api/contextinfo";
    client.DefaultRequestHeaders.Add("Accept", "application/json;odata=verbose");
    client.DefaultRequestHeaders.Add("ContentType", "application/json");
    client.DefaultRequestHeaders.Add("ContentLength", "0");

    try
    {
        var response = client.PostAsJsonAsync(cmd, "").Result;

        if (response.IsSuccessStatusCode)
        {
            try
            {
                string content = response.Content.ReadAsStringAsync().Result;
                var jss = new JavaScriptSerializer();
                var val = jss.Deserialize>(content);
                var d = val["d"] as Dictionary;
                var wi = d["GetContextWebInformation"] as Dictionary;
                retVal = wi["FormDigestValue"].ToString();

            }
            catch (Exception ex1)
            {
                System.Diagnostics.Debug.WriteLine(ex1.Message);

            }

        }

    }
    catch (Exception ex)
    {
        System.Diagnostics.Debug.WriteLine(ex.Message);
    }

    return retVal;
}
Get a Task’s Related Items
The code below shows how to retrieve the related items for a given task. All of the methods for the SP.RelatedItemManager class are static. Static methods must be called by appending the method name to the class name with a “.” (period) rather than a forward slash. The GetRelatedItems method takes two parameters. The first parameter is the SourceListName. This can be either the name (title) of the list or the ID (GUID) of the list. The code will run faster if you send in a string representing the ID (GUID). The second parameter is the SourceItemID. This is the integer value of the task item’s ID. The server code assumes the source list is in the current web you are making the call from. The method also will return a maximum of 9 related items.
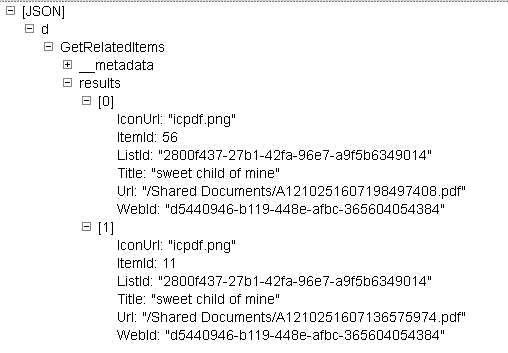
public async void GetRelatedItems(string digest)Below is an example of the json response. You can get this json from the response.Content.Result property. The result can be parsed using the Newtonsoft.Json assembly.
{
string url = "http://servername";
HttpClient client = new HttpClient(new HttpClientHandler() { UseDefaultCredentials = true });
client.BaseAddress = new System.Uri(url);
client.DefaultRequestHeaders.Clear();
client.DefaultRequestHeaders.Add("Accept", "application/json;odata=verbose");
client.DefaultRequestHeaders.Add("X-RequestDigest", digest);
client.DefaultRequestHeaders.Add("X-HTTP-Method", "POST");
string json = "{'SourceListName': 'POCreation','SourceItemID': 2}";
client.DefaultRequestHeaders.Add("ContentLength", json.Length.ToString());
try
{
StringContent strContent = new StringContent(json);
strContent.Headers.ContentType = MediaTypeHeaderValue.Parse("application/json;odata=verbose");
HttpResponseMessage response = await client.PostAsync("_api/SP.RelatedItemManager.GetRelatedItems", strContent);
response.EnsureSuccessStatusCode();
if (response.IsSuccessStatusCode)
{
var content = response.Content.ReadAsStringAsync();
}
else
{
var content = response.Content.ReadAsStringAsync();
}
}
catch (Exception ex)
{
System.Diagnostics.Debug.WriteLine(ex.Message);
}
}
Adding a Related Item
When adding a related item to an existing task the API can be confusing. The AddSingleLinkToUrl method takes 4 parameters, SourceListName, SourceItemID, TargetItemUrl, and TryAddReverseLink. Since I had started experimenting with the AddSingleLinkToUrl first I assumed the source parameters would be the list where the related item was coming from and the target parameters represented the task list I was working with. But of course it is the opposite. Just like in the GetRelatedItems method you can use either the list name or ID (GUID) for the SourceListName. The SourceItemID is the ID of the task list item. The TargetItemUrl is the server relative URL of the item you are adding as a related item. In the code below I am using a document from the Shared Documents library. The final parameter TryAddReverseLink is very interesting and this value is set to true when adding related items using the SharePoint UI. When you set this to true the server side code will check to see if the target list also has a “Related Items” field. If it does then the code will add a json value of the source task item to the target item’s “Related Items” field, thus creating a link between the two items. This does not raise an error if the target list does not have a “Related Items” field. Finally, a few things to be aware of. You will receive an error if the target URL is the URL to the task item itself. So you cannot relate to yourself. Secondly, if the source item already has 9 related items then the server code will try and remove any of the 9 that no longer exist and then add the one your adding. If it cannot remove any of the existing 9 an error is returned.
public async void AddRelatedItem(string digest)
{
    string url = "http://servername/";
    HttpClient client = new HttpClient(new HttpClientHandler() { UseDefaultCredentials = true });
    client.BaseAddress = new System.Uri(url);
    client.DefaultRequestHeaders.Clear();
    client.DefaultRequestHeaders.Add("Accept", "application/json;odata=verbose");
    client.DefaultRequestHeaders.Add("X-RequestDigest", digest);
    client.DefaultRequestHeaders.Add("X-HTTP-Method", "POST");

    string json = "{'SourceListName':'POCreation','SourceItemID':2,'TargetItemUrl':'/Shared Documents/A1210251607175080419.pdf','TryAddReverseLink':true}";
    client.DefaultRequestHeaders.Add("ContentLength", json.Length.ToString());
    try
    {
        StringContent strContent = new StringContent(json);
        strContent.Headers.ContentType = MediaTypeHeaderValue.Parse("application/json;odata=verbose");
        HttpResponseMessage response = await client.PostAsync("_api/SP.RelatedItemManager.AddSingleLinkToUrl", strContent);


        response.EnsureSuccessStatusCode();
        if (response.IsSuccessStatusCode)
        {
            var content = response.Content.ReadAsStringAsync();
        }
        else
        {
            var content = response.Content.ReadAsStringAsync();
        }
    }
    catch (Exception ex)
    {
        System.Diagnostics.Debug.WriteLine(ex.Message);
    }

}
Removing a Related Item
The DeleteSingleLink method API has 7 parameters. It is more complicated versus adding a related item. Once again you have the SourceListName and SourceItemID parameters. But now you have two more parameters SourceWebUrl and TargetWebUrl. These can be null if both webs are in the same web where the call is being made. If not then they can be set to either an absolute or relative URL. This method also requires the TargetListName and TargetItemID parameters which are handled the same way as the source parameters. The final parameter will try and remove the reverse link that may have been created when you added the related item. So it is good idea to set this to true since you do not want to leave any dead end relationships.
public async void DeleteRelatedItem(string digest)
{
    string url = "http://servername/";
    HttpClient client = new HttpClient(new HttpClientHandler() { UseDefaultCredentials = true });
    client.BaseAddress = new System.Uri(url);
    client.DefaultRequestHeaders.Clear();
    client.DefaultRequestHeaders.Add("Accept", "application/json;odata=verbose");
    client.DefaultRequestHeaders.Add("X-RequestDigest", digest);
    client.DefaultRequestHeaders.Add("X-HTTP-Method", "POST");

    string json = "{'SourceListName':'POCreation','SourceItemID':2,'SourceWebUrl':null,'TargetListName':'Documents','TargetItemID':36,'TargetWebUrl':null,'TryDeleteReverseLink':true}";

    client.DefaultRequestHeaders.Add("ContentLength", json.Length.ToString());
    try
    {
        StringContent strContent = new StringContent(json);
        strContent.Headers.ContentType = MediaTypeHeaderValue.Parse("application/json;odata=verbose");
        HttpResponseMessage response = await client.PostAsync("_api/SP.RelatedItemManager.DeleteSingleLink", strContent);


        response.EnsureSuccessStatusCode();
        if (response.IsSuccessStatusCode)
        {
            var content = response.Content.ReadAsStringAsync();
        }
        else
        {
            var content = response.Content.ReadAsStringAsync();
        }
    }
    catch (Exception ex)
    {
        System.Diagnostics.Debug.WriteLine(ex.Message);
    }

}
Building Better Relationships
There are other methods available on the SP.RelatedItemManager class such as GetPageOneRealtedItems. This basically is the same as calling the GetRelatedItems method but only returns the first 4 items. This method is used from the SharePoint UI. The UI will then call GetRelatedItems when you click the “Show More” link. Another available method similar to AddSingleLinkToUrl is AddSingleLinkFromUrl. The difference between the two is the assumption of which SPWeb you are making the call from. AddSingleLinkToUrl assumes the current web is the web where the source list is located, and the AddSingleLinkFromUrl method assumes the current web is the web where the target list is located. So depending where you are making the call from determines which method to call. It is possible to create a context menu item allowing users to make a document a related item of task. If you are not sure where the code will be hosted you can just use the AddSingleLink method. Similar to the DeleteSingleLink method you must supply more parameters which include the web ids of both the source and target. This allows the server code to relate items across webs. If you want more information on these methods then I recommend you get the SPRemoteAPIExplorer Visual Studio extension.
Are these relationships useful? I think so. It allows users to tie together task items with relevant documents located somewhere else. It decouples task data from documents allowing for different projects/tasks to work with the same documents. It may possibly be used by Microsoft’s new Delve to relate items. You can retrieve the related items value in search results by mapping the ows_relateditems crawled property to a managed property. The value is stored in json format. You could search the managed property for an item by using the value “ItemID:20”. This would return all items that are related to an item with a list item ID of 20. But to be exact you would have to search for “{ItemId:20”, “WebId:”d2a04afc-9a05-48c8-a7fa-fa98f9496141”,”ListId”:”e5a04afc-9a05-48c8-a7fa-fa98f9496897”}”. This would be difficult for end users.
I hope you found this post useful. Knowing how to relate items programmatically can make your workflows much more powerful. There is still much more to be discovered in the SharePoint Remote API, and there is still much more improvement needed.